

⏳ 22 min read · Last updated: October 2026
Disclosure: As an Amazon Associate I earn from qualifying purchases. This post contains affiliate links. If you buy through these links, I may earn a small commission at no extra cost to you. I only recommend products I’ve researched carefully from real specifications and verified buyer feedback, and I say when I have not run one myself. Thank you for supporting Urban Hydro Space!
🌱 Hands-on tested: the KETOTEK pH and EC pens and the ZeeDix 2-inch net cups; I’ve grown with both. The ZeeDix cups are out of stock, so the AC Infinity cups linked in their place are a research pick. 🔎 Research pick: everything else in this post, chosen from published specifications and listings. How I test and choose products.
Most small systems come with a container and a light, and nothing that tells you what’s going on in the water. That gap is where first grows go wrong. The pH drifts, the basil drops its lower leaves, and by the time anyone notices, the cause is a week old.
The best hydroponic accessories for a jar or a countertop garden are cheap, small and a little dull. Each one does a single job: it measures, adjusts, starts, holds, protects or harvests. This checklist covers ten of them, and it starts with the one I’d buy first.
Why a Few Small Accessories Make Such a Difference
Guessing is the expensive habit in small hydroponics. A one-liter jar holds very little water. A splash of extra nutrient, or a few days of pH drift, moves its numbers far more than it would in a big tank. Without a meter you’re feeding blind, and without a timer one long weekend away can leave the light on for days. The accessories here take that guesswork out, yet none of them needs a pump or an app. If you’re still choosing a system, start with the apartment hydroponics beginner guide and come back with a shopping list.

- Buy a meter first, because pH (5.5 to 6.5) and EC sit behind most small-system problems.
- Keep the pH pen’s cap wet with KCl storage solution, since a dry cap ruins the glass bulb.
- Start seeds in peat sponges, then pack clay pebbles around them in 2-inch net cups so they stay upright.
- Sleeve clear jars black up to the lid, and let a timer hold the light at 14 hours on, 10 hours off even when you travel.
- Dose nutrients with a small syringe, since a 5 or 10 ml barrel reads far finer than a 60 ml one.
The Checklist at a Glance
- Only buying one thing → KETOTEK pH and EC pens
- Want a pH check that never needs batteries → GH pH Control Kit
- Already own a pH pen → Apera KCl storage solution
- Starting seeds in jars → MAQIHAN sponges, clay pebbles and 2-inch net cups
- Growing in clear glass → Meprotal blackout sleeves
- Forever forgetting the light → BN-LINK mechanical timer
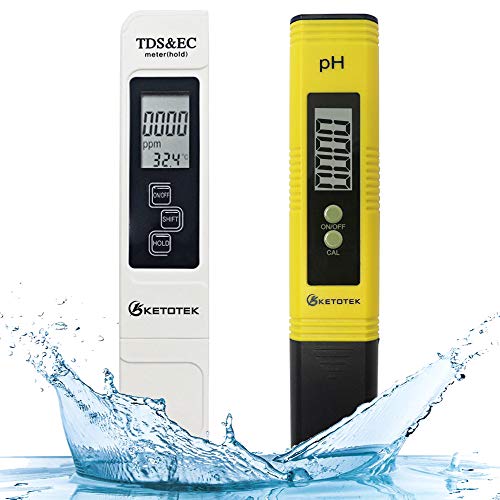
KETOTEK pH and EC/TDS Pen Set
- Two pens: one reads pH, while the other reads EC, TDS and water temperature
- Automatic temperature compensation on both
- Two-point pH calibration with buffer powders in the box
- Also the meter set I use on my own jars
What to Look for in Small-System Accessories
Space-Saving Designs
In an apartment, bulky gear gets in the way fast, so look for things that fit in one drawer or a small bin. Big mixing wands and oversized bottles also eat the counter space your jars and light already need. Small tools do the same job while the shelves stay clear.
Before ordering, run each item past these questions:
- How much room does it take on a shelf or in a drawer?
- Will it need batteries you’ll forget to keep on hand?
- Does the material still look clean after weeks of damp?
- Can you clean it in a kitchen sink in a minute or two?
Easy Cleaning Processes
Maintenance shouldn’t feel like a chore. Good small-system tools rinse clean in a kitchen sink without taking anything apart, so skip anything with deep crevices that hold slime between uses. Pumped systems need a full reservoir change every 2 weeks, and each change is also the moment to wipe the tools down while everything is empty.
That’s one reason the Kratky method is so easy to live with. There’s no pump, air line or tubing to scrub, and you fill the jar once rather than changing the water every two weeks.
Managing Noise and Power
Noise worries a lot of beginners, and it mostly comes down to the system. An active setup needs an air pump, and a quiet air pump keeps the bubbling low enough for a bedroom or studio. A passive Kratky jar makes no sound at all, so the only noise on that shelf is the faint tick of a mechanical timer, if you use one. Whatever you run, keep anything with a motor off bare wood so it can’t hum against the furniture.
1. KETOTEK pH and EC/TDS Pen Set (Tested)
- Size: a pH pen plus an EC, TDS and temperature pen
- Best for: anyone running a jar, a bucket or a countertop garden, especially a first one
- Key feature: both pens correct for temperature, so readings hold steady as the water warms
- Verdict: the first accessory to buy, and also the set I use myself
A small reservoir has two numbers worth checking. pH should sit between 5.5 and 6.5, while EC tells you how strong the feed is. This set splits the job across a pH pen with a glass electrode and a second pen whose titanium electrode reads EC, TDS and water temperature. Both also correct for temperature on their own.
The temperature reading is a quiet bonus. Roots do best in water at 65 to 75°F (18 to 24°C), and the EC pen shows it whenever you check the feed. A jar warming up on a sunny sill doesn’t go unnoticed. For calibration, KETOTEK includes pH 4.01 and 6.86 buffer powders, each dissolved in 250 ml of distilled water.
I use this set on my own jars. Still, it’s a budget meter, not a lab instrument, and the pH pen needs its cap kept wet (pick 3 handles that). My pH meter guide compares it with the Apera PH20 and other pens, and the EC and TDS meter guide lists feed targets by crop.
Amazon price right now: $14.99
2. General Hydroponics pH Control Kit
- Contents: 8 oz pH Up, 8 oz pH Down, 1 oz test indicator, test tube, eyedropper and color chart
- Best for: adjusting pH, and also checking it without batteries
- Key feature: a drop test that shows pH as a color, so it never needs calibrating
- Verdict: you need pH Up and Down anyway, and a backup test is handy too
A meter tells you the pH is off, but it can’t fix it. This kit puts both adjusters and a drop test in one box. Half-fill the tube with reservoir water, drip in a little indicator, then hold it against the color chart. GH’s own listing gives 5.5 to 6.5 as the range for most plants, which is the same range this site uses.
Two habits make the bottles last. Dose in drops rather than pours, because a liter jar needs very little. Then stir, give it a few minutes, and retest before adding more. A color test reads in broad steps next to a pen, so it works best as the tiebreaker when a pen reading looks wrong. The pH and nutrient calculator helps you plan a batch before the first drop goes in.

Amazon price right now: $18.89
3. Apera Instruments 3M KCl Storage Solution
- Size: 8 oz. bottle
- Best for: anyone who owns a glass-bulb pH pen, especially a pricier one
- Key feature: keeps the electrode conditioned between readings; reagent-grade, with the expiry date printed
- Compatibility: most glass-bulb pH probes, since Apera lists it for pH and ORP electrodes
- Verdict: small bottle, big job: it protects the most fragile thing on the shelf
Why Protecting Your pH Pen Matters
The glass bulb on a pH pen has to stay wet to read true. Left dry, it turns sluggish and starts to drift. Plain tap water is better than nothing but still the wrong liquid for the electrode, so accuracy slips over time. A potassium chloride (KCl) storage solution is what the bulb is designed to sit in. After each reading, a few drops in the cap is the whole routine.
Look after the pen and its readings stay worth trusting, which matters when every jar has to hold pH 5.5 to 6.5. A healthy pen also settles faster during calibration.
How to Recover a Dried-Out Probe
When a cap dries out, the glass can crust over and readings wander. Even so, the probe can often be saved:
- Rinse the glass bulb gently with distilled water to remove any surface crust.
- Fill a small shot glass with fresh KCl storage solution.
- Soak the probe upright for a full 24 hours without disturbing it.
- Rinse once more and recalibrate the pen before taking any readings.

Amazon price right now: see listing
Pros and Cons of pH Probe Storage Solution
- Pro: Helps a pH pen hold its accuracy for longer, so the pen itself lasts
- Pro: Reagent-grade and double sealed, with the expiry date on the bottle too
- Con: The storage cap on most pens is small, so check it and top it up every few days
4. MAQIHAN Hydroponic Grow Sponges (50-Pack)
- Size: 50-pack
- Best for: growers starting new seeds every 4 to 6 weeks
- Key feature: peat sponges buffered to pH 5.8 to 6.2, so seeds start inside the target range
- Compatibility: the listing gives no dimensions, so check a few in your cups or pod slots first
- Verdict: cheap per pod, so every grow gets a clean start
Starting Fresh Seeds in a Stable pH Environment
Starter pods run out faster than you’d think once you plant every few weeks. These are peat, buffered to pH 5.8 to 6.2. That sits inside the 5.5 to 6.5 range the rest of the system runs at, so a seed doesn’t start life in a pH swing. They arrive bone dry, which is how they keep. Before sowing, soak each one in clean water for about 15 minutes until it swells.
Once the seeds are in, put the light on its 14 hours on, and for leafy herbs keep it 6 to 8 inches over the tray. Close, steady light keeps seedlings short and sturdy instead of tall and floppy.
Avoiding Organic Decay With Fresh Media
A reused sponge carries the last crop’s dead roots into the new one, and decaying roots feed the pathogens behind root rot. A fresh sponge per seed costs little, so the habit pays for itself in clearer water.

Amazon price right now: see listing
Pros and Cons of MAQIHAN Grow Sponges
- Pro: Buffered to pH 5.8 to 6.2, so there’s one less variable at germination
- Pro: Ships dry, so an opened bag keeps until the next planting
- Con: Sold by a third-party seller, and since the listing gives no sponge size, fit is trial and error
5. Halatool Clay Pebbles (2 lb)
- Size: 2 lb bag, pebbles from 4 to 16 mm
- Best for: filling the space around a sponge in a net cup
- Key feature: inert and pH-neutral, so it won’t shift the solution; reusable after cleaning
- Verdict: what keeps a seedling upright when the top gets heavy
A sponge on its own wobbles in a 2-inch net cup, and when the top grows heavy the plant leans. A handful of expanded clay around it holds the plug upright and also lets air reach the upper roots. Halatool lists these as inert and pH-neutral, so they won’t push the solution’s pH around, and they can be washed and used again.
Rinse them well before the first use, because the listing itself warns about shipping dust and that dust settles as sludge at the bottom of a jar. The bag mixes sizes, so put the bigger pebbles at the bottom of the cup where the slots are and the small ones higher up.

Amazon price right now: $9.99
6. 2-Inch Net Cups: ZeeDix (Tested) and AC Infinity
- Size: 50-pack
- Best for: Kratky jars with a 2-inch-hole lid
- Key feature: heavy plastic that still holds its shape under a full root mass
- Compatibility: wide-mouth Kratky lids with a 2-inch hole
- Verdict: ZeeDix is the cup I grew with, and none of mine cracked or bowed under a full root mass. While it’s out of stock, AC Infinity is my research stand-in
Supporting Heavy Yields Without Cracking
Cups take more strain than you’d guess. A month into a basil run, the roots are dense and the top is heavy, so a thin cup can split and drop the plant into the jar. The ZeeDix cups I grew with held full root masses without bowing. They sit in a wide-mouth Kratky lid with a 2-inch hole. The same size also fits a DWC lid if you later move to an air-pumped bucket, and Deep Water Culture vs Kratky for apartment setups covers that choice.
AC Infinity’s cups are the stand-in while ZeeDix is unavailable, and I haven’t grown with them. Going by the listing, they’re heavy-duty, UV-resistant, BPA-free plastic. A ribbed inside steers roots toward the slots, and a wide lip rests on round openings like mason jars.
Net Cups Don’t Block Light: the Lid and Sleeve Do
A net cup is mostly slots, so it does nothing to keep light out of the water. Instead, that job belongs to an opaque lid on top and a sleeve or wrap on the jar itself (pick 7). Light reaching the solution is what grows algae. If the water has already turned green, my algae guide for jars covers the full fix. For more cup options, my mason jar net cup roundup weighs sizes and materials over several grows.

Out of stock right now: the ZeeDix cups are currently unavailable on Amazon. Until they are back, the closest in-stock option is these AC Infinity 2-inch net cups (50-pack), Amazon price right now $17.99. They are a research pick, not the cups I grew with. Prices refresh automatically. Prices are pulled from Amazon and were last checked on 9 October 2026 at 2:03 am. Amazon prices change often, so check the listing before buying.
Pros and Cons of 2-Inch Net Cups
- Pro: The ZeeDix cups held a dense root mass in my jars without cracking
- Pro: AC Infinity lists UV-resistant, BPA-free plastic and a wide lip for jar openings
- Con: Fifty is more than a few jars need, though spares nest inside each other in a drawer
🛒 See the in-stock alternative
7. Meprotal Blackout Jar Sleeves (4-Pack)
- Size: 4 sleeves, 86 mm wide
- Best for: clear 32 oz wide-mouth mason jars
- Key feature: slip-on nylon that keeps light out of the jar; washable and reusable too
- Verdict: neater than foil, which tears when you check the roots
Clear glass lets light reach the solution, and algae follows within weeks. Foil works, but it tears and looks it. Instead, these are nylon sleeves you slide the jar into. Meprotal sizes them for a 32 oz wide-mouth mason jar, the size my own Kratky jars are, and says they keep light out of the container in hydroponic use.
Pull the sleeve all the way up to the lid, since a band of clear glass at the top still lets light in. Slip it off when you want to look at the roots, then slide it back. With four in the pack, a two-jar shelf has spares. It’s sold by a third-party seller, so check the listing’s delivery date before you order.

Amazon price right now: $13.99
8. Small Measuring Syringes (1 to 10 ml)
- Size: 20 syringes, five each of 1, 3, 5 and 10 ml, with tip caps
- Best for: dosing liquid nutrients into jars, and pH adjusters too
- Key feature: small barrels, so a dose of a few milliliters reads clearly
- Compatibility: any liquid concentrate, such as the Flora Series or a one-part liquid feed
- Verdict: a cheap way to stop guessing doses
Measuring Nutrients With Precision
Jar doses are small. A liter of solution may need only a few milliliters of concentrate, so pouring it from a quart bottle is guesswork. A 5 or 10 ml syringe reads that volume clearly. That’s how you land on EC 2.0 to 2.4 for mint, or EC 1.4 to 1.8 for dill and parsley, without overshooting. Foosi’s set also comes individually sealed, in food-grade polypropylene, and lists plant irrigation among its uses.
A consistent feeding schedule only works if the dose is the same every time. Guessed volumes are behind a lot of tip burn, and a lot of stalled growth too. When you mix a full gallon at once, a bigger barrel saves refills: this 4-pack of 20 and 60 ml syringes with pipettes suits that job.
Keeping Apartment Counters Clean
Spilled nutrients leave sticky, dark rings on counters and in tile grout. A syringe ends that, and it also keeps concentrate from running down the side of the bottle. Better still, it lets you add pH Up or Down a drop at a time instead of overshooting and correcting back.
To keep your syringes working well for months:
- Draw up warm water right after dispensing nutrients.
- Pump the plunger several times to flush the nozzle.
- Pull the plunger out and let both parts air dry upright.
- Keep one syringe per bottle so solutions never mix.

Amazon price right now: see listing
Pros and Cons of Small Syringes
- Pro: Small barrels read clearly, since jar doses are only a few milliliters
- Pro: Twenty in the pack, so each bottle can have its own syringe
- Con: The tip can clog when concentrate dries inside after a quick rinse
9. BN-LINK 24-Hour Mechanical Timer
- Size: 2-pack
- Best for: anyone who has forgotten to switch a grow light off
- Key feature: push-down pins set a daily on and off pattern in 30-minute steps
- Compatibility: any standard outlet; three-prong, rated 15 A resistive; no hub or app
- Verdict: cheap insurance for the weekend when nobody is home to switch the light off
Automating Your Daily Light Schedule
Plug the timer in, push down the pins for the hours the light should be on, and plug the light into it. Each pin is 30 minutes, so a 14-hour on period is 28 pins. From now on the dial repeats the same pattern every day without anyone touching it.
No app, no Wi-Fi. If you’d rather see the options side by side, my timer roundup compares mechanical dials, a timer power strip and smart plugs. The PPFD vs PAR vs lumens guide explains how hours and intensity add up to a day’s light. After that, the grow light calculator checks that your fixture delivers enough over those 14 hours.
Why Schedule Consistency Prevents Bolting
Herbs grow compact and full on a steady 14 hours on and 10 hours off. Dill and cilantro react badly to drift: a few extra hours of light a day reads to them as high summer and pushes them toward flowering. Once they bolt, the leaves turn bitter and the harvest window closes fast. A timer takes the human error out of it.
Pros and Cons of the BN-LINK Timer
- Pro: Plug in and set, with no app, Wi-Fi or phone
- Pro: Two timers in the pack, so each shelf or light gets its own
- Con: 30-minute steps, and a faint tick that light sleepers will hear on a bedroom shelf
- Con: The dial stops during a power cut, so afterward it runs late by the length of the outage until you turn it back to the right time
Amazon price right now: $12.99
10. VIVOSUN 6.5-Inch Micro-Tip Snips
- Size: 6.5 inches
- Best for: harvesting herbs from a crowded jar
- Key feature: narrow stainless steel tips that reach between stems
- Verdict: kitchen scissors crush stems, while these cut them cleanly
Harvest is the point of the whole setup, so how you cut matters. Basil should be cut just above a pair of leaves, and in a crowded jar that spot sits deep among the other stems. Narrow tips get there without nicking the stems you’re keeping. VIVOSUN gives these precision-sharpened stainless steel blades, a sideways lock and handles that work in either hand.
Wipe the blades between plants and wash them after each session, as the listing advises, so nothing travels from one jar to the next. They’re also the right size when roots have filled a jar and need a trim.

Amazon price right now: $6.99
Best Crops for Your Upgraded Setup
Basil gains the most from the meter and the syringes, because a small jar drifts out of its EC 1.0 to 1.6 window faster than you’d expect. Measured doses also prevent the tip burn that spoils mature leaves before harvest. My foolproof basil guide covers the rest of its care.
Lettuce is the crop to practice on with new tools, because its forgiving pH range and low EC needs leave room for small mistakes. Mint grows so hard that a few spare net cups and a second jar come in handy sooner than you’d think. For a wider view, the best herbs for small hydroponic systems guide ranks seven varieties by difficulty, yield and flavor.
Use the seed to harvest calculator to build a timeline for whichever crop you start first. Knowing when to expect the first cut makes it easier to keep feeding and lighting steady until then.
Common Accessory Mistakes to Avoid
Even with the right tools, small habits can undo them. These six catch apartment growers most often:
- Storing the pH pen dry, or in tap water. A dry cap is the worst case for the glass bulb, and tap water is a poor stand-in. Keep KCl solution in the cap.
- Buying cups that don’t match the lid. A 3-inch cup won’t fit the 2-inch hole in a Kratky lid. Check the lid before ordering.
- Estimating doses by eye. Pouring straight from the bottle is the most common cause of tip burn in small systems. Measure with a syringe.
- Setting the timer for 12 hours instead of 14. It’s an easy slip on a mechanical dial, so count 28 pins at 30 minutes each.
- Reusing sponges from a failed crop. Old root matter carries pathogens to the new seedling, while fresh sponges are cheap.
- Leaving clear jars bare. Light on the solution grows algae, so sleeve or wrap the jar up to the lid.
A Word From Sarah
The meter is what I’d keep if I could have only one thing here. Every other accessory makes a small system easier to run, but the meter alone tells you what’s happening in the water before the plants do. Yellow leaves, tip burn and a jar that simply stalls usually trace back to a pH or EC that drifted for a week with nobody checking.
The timer comes a close second, because the day you need it is the long weekend you forgot to plan for. Buy those two first and add the rest when the need shows up; nothing else here is urgent.
The KETOTEK pH and EC/TDS pen set is the one I’d buy first, and it’s the set I use on my own jars.
Frequently Asked Questions
What equipment do I need to start hydroponics in a small apartment?
For a Kratky jar you need a wide-mouth jar with a Kratky lid, a 2-inch net cup, and a grow sponge with a few clay pebbles. Add hydroponic nutrients, a way to check and adjust pH, and a light on a timer if your window is weak. A Kratky jar needs no pump. A Deep Water Culture bucket also needs an air pump and stone, while countertop gardens build most of this in, so they mainly need nutrients, seed pods and a meter.
Do I need a pH meter, or are drops or test strips enough?
Drops are enough to start. A drop kit like the GH pH Control Kit shows pH as a color and never needs calibrating, but it reads in broad steps and says nothing about feed strength. A pen reads to a hundredth, and paired with an EC pen it shows both numbers that matter. Strips are the least precise of the three. Once you run more than a jar or two, a meter is worth it.
Does a small hydroponic system need an air pump?
Not if it’s a Kratky jar. Kratky is passive: the net cup’s base sits in the solution at first, and as the plant drinks, an air gap forms that the upper roots breathe from. A Deep Water Culture bucket does need an air pump and stone running around the clock, and my quiet air pump guide covers models calm enough for a bedroom.
What grow medium goes in a 2-inch net cup?
Start the seed in a peat sponge or a rockwool plug and set it in the cup. Then fill the space around it with clay pebbles so the plug stays upright as the plant grows. Rinse the pebbles first. In a Kratky jar, the bottom of the cup should touch the solution at the start.
How much noise will a small hydroponic accessory setup make?
Very little. Kratky jars have no pump and make no sound, so the only noise on the shelf is the faint tick of a mechanical timer. A smart plug or digital timer avoids even that. An air pump for a DWC bucket adds a low hum, and a quiet model is fine in a bedroom.
How often should the water in a small system be changed?
It depends on the system. Pumped and aerated systems get topped off daily with plain pH-adjusted water and emptied for fresh solution every two weeks. A Kratky jar is different: you fill it once and the level drops as the plant drinks, so there’s no daily top-off and no two-week change. A small syringe makes mixing each fresh batch quicker and more exact.
What accessories does a countertop garden like an AeroGarden need?
Fewer than a jar. A countertop garden has its own light, timer and pump, so skip those. It still needs plant food, replacement seed pods or blank sponges, and a meter now and then, because a small reservoir drifts in any system. My AeroGarden, Gardyn and Click and Grow comparison lists the pods and food each brand sells.
How much does a small grow light add to the electric bill?
Less than most people expect. A 20 to 30 watt LED on a 14-hour day uses about 8.5 to 13 kWh a month, and a timer keeps it from running all night by accident. Enter your light’s wattage and your local rate in the running cost calculator for the exact figure.
Why do I need a special pH probe storage solution?
A pH pen’s glass bulb has to stay wet to read accurately. Plain tap water is a poor storage liquid and a dry cap is worse; potassium chloride (KCl) solution is what the electrode is meant to sit in. Add a few drops to the cap after each reading and the pen stays accurate for longer.
Can I reuse old grow sponges from a previous crop?
Avoid it. Roots from the last crop rot inside the sponge and can carry pathogens to the new seedling before it roots. Fresh sponges cost little. Store the unused ones dry in their bag, the way they ship, and soak each one for about 15 minutes just before sowing.
- pH & Nutrient Calculator: Dial in your solution before you add a drop of fertilizer
- Grow Light Calculator: Confirm your fixture delivers the right PPFD during those 14 hours
- Seed to Harvest Calculator: Know exactly when to expect your first cut
Happy growing! 🌿
Sarah, Urban Hydro Space

Sarah Whitfield is the founder of Urban Hydro Space and an indoor gardening enthusiast dedicated to helping apartment dwellers grow fresh herbs and vegetables in small spaces. She researches hydroponic systems carefully from real specifications and verified buyer feedback, and shares practical tips and honest, clearly labeled product picks to make indoor gardening accessible for beginners.


