⏳ 19 min read · Last updated: March 2026
Using tap water for hydroponics is the first big question most apartment growers ask. I remember standing in my tiny galley kitchen, wondering if my local city water would harm my expensive new basil seedlings. Buying gallon jugs of distilled water gets heavy, and lugging them up three flights of stairs is exhausting. You want a practical setup, not a weekly workout routine.
Many beginners assume their sink water is bad for plants. However, the reality is much more nuanced. Depending on where you live, your local supply might be great out of the faucet, or it might need a little tweaking. Let me show you how to figure out if your tap water is safe, and how to treat it using simple methods that fit inside a small apartment.
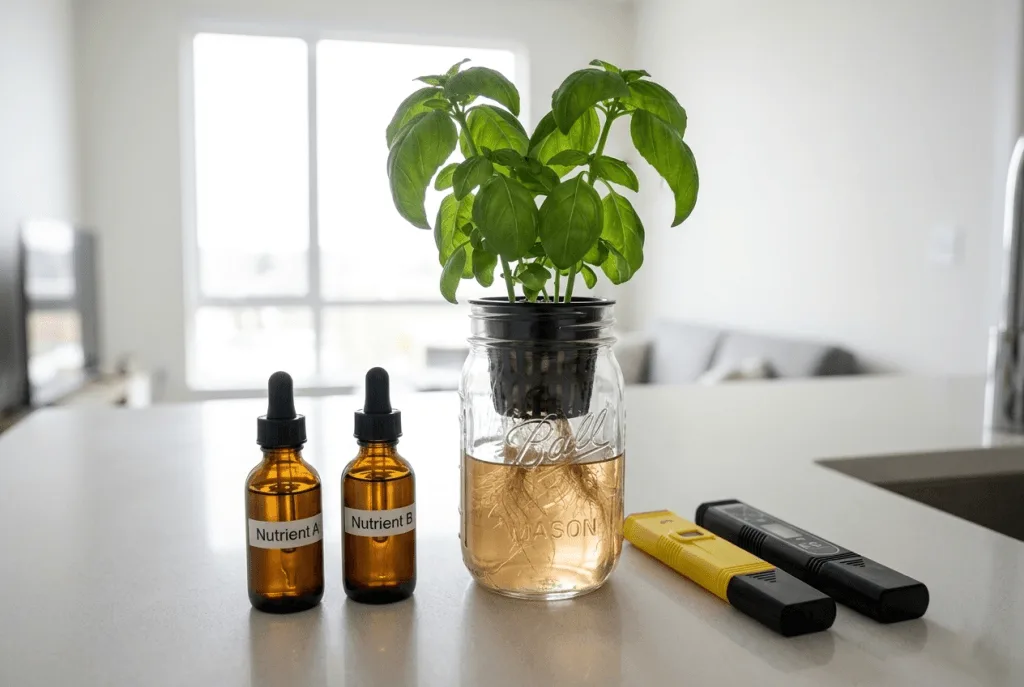
- Always test your starting EC level before adding any liquid nutrients.
- Off-gas basic chlorine by letting water sit uncovered for 24 to 48 hours.
- Use a crushed Campden tablet to neutralize stubborn chloramine.
- Maintain your final nutrient solution at pH 5.5 to 6.5 for optimal herb growth.
- Dilute hard city water with distilled water if your base EC is above 0.6.
🔎 Quick diagnosis table
| What you see | Most likely cause | Check this first |
|---|---|---|
| 🟡 Yellow leaves with green veins | High pH from hard water buffer | Test reservoir pH and add acid |
| 🤢 Drooping leaves, white crust on net pots | Excess calcium blocking nutrient uptake | Check base water EC level |
| 🟤 Brown, slimy roots after water change | Chloramine shock to the root zone | Call local water utility to check for chloramine |
| 🍂 Crispy brown edges on older leaves | Overall EC is too high | Dilute reservoir with fresh tap water |
- Tap EC under 0.4 → Use unfiltered tap water, just let it sit for 24 hours first.
- Tap EC over 0.6 → Mix your tap water 50/50 with bottled distilled water.
- City uses chloramine → Treat unfiltered tap water with a Campden tablet before use.
- Understanding Municipal Tap Water For Hydroponics
- How Tap Water For Hydroponics Affects pH And EC
- Chlorine vs Chloramine: Treating Tap Water For Hydroponics
- Testing And Filtering Tap Water For Hydroponics At Home
- Managing Seasonal Changes In Tap Water For Hydroponics
- Troubleshooting Tap Water For Hydroponics Problems
- A Word From Sarah
- Frequently Asked Questions
🚰 Understanding Municipal Tap Water For Hydroponics
Using tap water for hydroponics requires knowing what your city pumps through those pipes. Water is never just H2O when it comes out of a faucet. Municipalities add chemicals to keep the pipes clean, and the water picks up minerals from the ground before it even reaches the treatment plant. As a result, every apartment has a unique chemical cocktail flowing into the kitchen sink.
For small indoor systems, this baseline chemistry determines your success. If your water starts full of heavy minerals, there’s less room for the nutrients your plants need. Consequently, your herbs might suffer from deficiencies even when you follow the nutrient bottle instructions. You need to understand this baseline before mixing your first batch.

🧪 What is in your city water?
Tap water contains dissolved solids, mostly calcium and magnesium. These are the same minerals that create white scale around your showerhead. Plants need these minerals, but city water provides them in unpredictable amounts. Therefore, you can’t rely on tap water alone to feed your herbs without knowing the concentration.
Alongside minerals, utilities add disinfectants. They use either chlorine or chloramine to kill bacteria in the pipes. While this keeps you safe, these chemicals also kill the beneficial microbes in your hydroponic reservoir. You must manage both the minerals and the disinfectants to protect your indoor apartment garden from root stress.
Furthermore, trace elements like iron and zinc often travel through municipal lines. A small amount of trace iron is fine for basil or mint. However, large spikes in trace metals can interfere with your specific fertilizer blends. Testing your baseline prevents mysterious plant health issues later on.
📊 Reading your local water report
Every municipal water utility publishes an annual water quality report. You can find this online by searching your city name plus “water quality report”. This document tells you everything you need to know about preparing tap water for hydroponics. Look for two specific details: total hardness and the type of disinfectant used.
Hardness is usually listed in parts per million (PPM) or milligrams per liter (mg/L). If your water is above 120 PPM, it’s considered hard. This metric translates directly to your electrical conductivity (EC). A higher PPM means a higher starting EC before you even open your fertilizer bottles.
In addition, check the disinfectant section carefully. If it lists chloramine instead of free chlorine, you’ll need specific treatments before adding the water to your reservoir. Taking ten minutes to read this report saves months of frustration.
🔧 How old apartment pipes affect water
Your city water might be great when it leaves the plant, but it still has to travel to your apartment. Older buildings often have outdated plumbing that alters the water chemistry. Copper pipes can leach excess copper into the supply, while galvanized steel pipes might introduce rust and iron.
If water sits stagnant in these pipes overnight, it absorbs a higher concentration of these metals. Because of this, the first cup of water you draw in the morning contains the most contaminants. Your plants don’t appreciate a sudden influx of heavy metals.
To avoid this issue, let your kitchen faucet run on cold for 30 to 60 seconds before filling your hydroponic containers. This flushes out the stagnant water that sat in your building’s pipes all night. You get a much cleaner baseline for your hydroponic nutrients this way.
| US Region | Typical Water Hardness | Impact on Hydroponics |
|---|---|---|
| Northeast | Soft (0 to 60 PPM) | Excellent starting point, requires Cal-Mag |
| Midwest | Very Hard (180+ PPM) | High pH buffering, requires dilution |
| Southwest | Hard (120 to 180 PPM) | Challenging, watch for nutrient lockout |
| Pacific Northwest | Soft (0 to 60 PPM) | Great for direct tap use |
⚖️ How Tap Water For Hydroponics Affects pH And EC
Understanding how your water interacts with nutrients is critical. The chemistry of tap water for hydroponics dictates how much food your plants can absorb. The two measurements you care about are potential hydrogen (pH) and electrical conductivity (EC). If you ignore these, your indoor garden will struggle.
Tap water rarely comes out at the optimal pH for plants. Most cities buffer their water to be alkaline, usually above a pH of 7.0, to prevent the metal pipes from corroding. Unfortunately, hydroponic herbs prefer a slightly acidic environment. You’ll have to adjust this balance manually.
📉 The frustrating pH buffer problem
Hard tap water contains calcium carbonate, which acts like a chemical sponge for acid. When you add a pH Down solution, the carbonates absorb it. The pH might drop initially, but within a few hours, the sponge releases the buffer, and the pH spikes right back up. Watching your pH bounce around daily will exasperate you.
To fix this, you’ve to break the buffer over time. You can’t just dump a large amount of acid into the reservoir all at once. Here is the process:
- Measure your starting tap water pH using a pH meter for beginners.
- Add your required drops of pH Down.
- Stir well and wait 10 to 15 minutes for the chemical reaction.
- Test again. If it bounces back the next morning, add more acid until the carbonates are depleted.
🌿 Starting EC limits for common herbs
Electrical conductivity measures the total dissolved salts in your water. Nutrients are salts, but so are the random minerals from the city supply. If your tap water starts with an EC of 0.6, and your lettuce needs a total EC of 1.2, you only have room to add 0.6 worth of actual plant food. Because of this, high base EC starves your plants.
I learned this the hard way during my first year. I once killed a beautiful batch of spearmint by ignoring my starting water EC. My tap water was sitting at 0.6, and I dumped in full-strength nutrients trying to hit EC 2.4. The leaves curled and crisped up in days. Dropping the reservoir back to EC 1.8 fixed the new growth within a week. I always use our pH and nutrient calculator now to double-check my math.
Every crop has a maximum EC limit. Leafy greens prefer lower concentrations, while fruiting plants can handle more. If your base water takes up half of that limit, your plants miss out on vital nitrogen and potassium.
💧 Diluting hard water for a better balance
If you need to lower your starting EC, mix your tap water with purified water. Using a 50/50 blend of hard tap water and store-bought distilled water cuts your starting EC in half. This is a cheap workaround for apartment growers who can’t install large filtration systems.
For example, if your tap water tests at EC 0.8, mixing one gallon of it with one gallon of pure distilled water brings the overall EC down to a manageable 0.4. This creates plenty of room in your “nutrient budget” to feed your herbs.
Additionally, this dilution method cuts the calcium carbonate buffer in half. As a result, you’ll use much less pH Down solution to hit your target range of pH 5.5 to 6.5. It saves you money on chemicals while keeping your plants healthier.
🦠 Chlorine vs Chloramine: Treating Tap Water For Hydroponics
Disinfectants are the invisible enemies of root health. When using tap water for hydroponics, you must remove these chemicals before they touch your plants. Chlorine and chloramine serve the same purpose for the city, but they behave differently in your kitchen. You need to know which one you’re fighting.
Chlorine is a volatile gas dissolved in water. It wants to escape into the air. Chloramine, on the other hand, is chlorine bound to ammonia. It’s very stable and won’t evaporate on its own. Treating tap water for hydroponics means handling these compounds correctly.
⏱️ Off-gassing standard chlorine in 24 hours
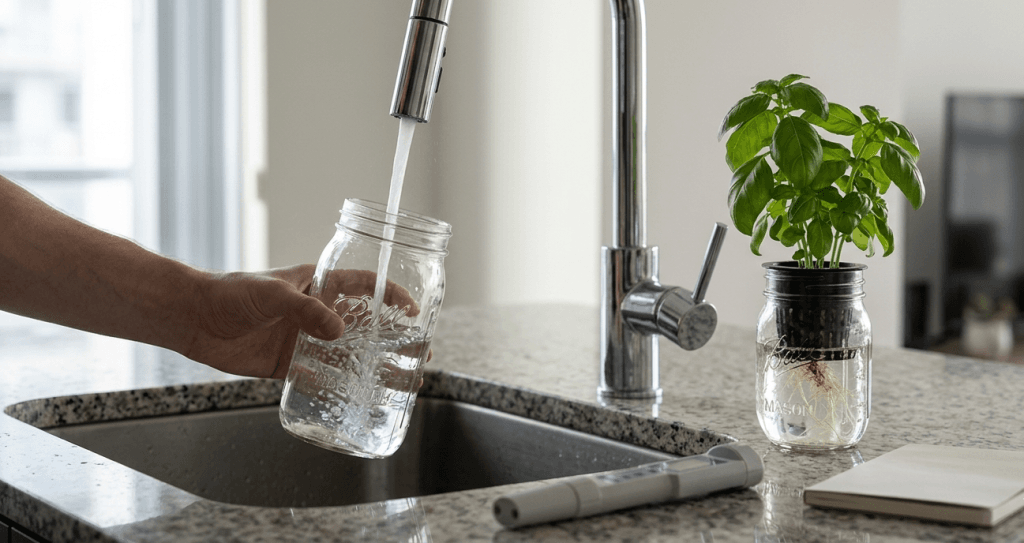
If your water utility uses standard free chlorine, treatment is effortless. The easiest method costs nothing and requires zero chemicals. You just need a bucket and some patience.
- Fill a wide-mouth container with cold tap water.
- Leave the container uncovered in your kitchen.
- Let it sit undisturbed for 24 to 48 hours.
- For faster results, drop an air stone into the bucket to agitate the water.
Once the chlorine dissipates, the water is safe for your hydroponic nutrients and beneficial microbes. Never pour fresh, untreated chlorine water directly into an active root zone. If you use an air pump to speed up the off-gassing, place it on a folded towel to reduce vibrations. Having a quiet hydroponic pump keeps your apartment peaceful while preparing water.
💊 Using Campden tablets for chloramine
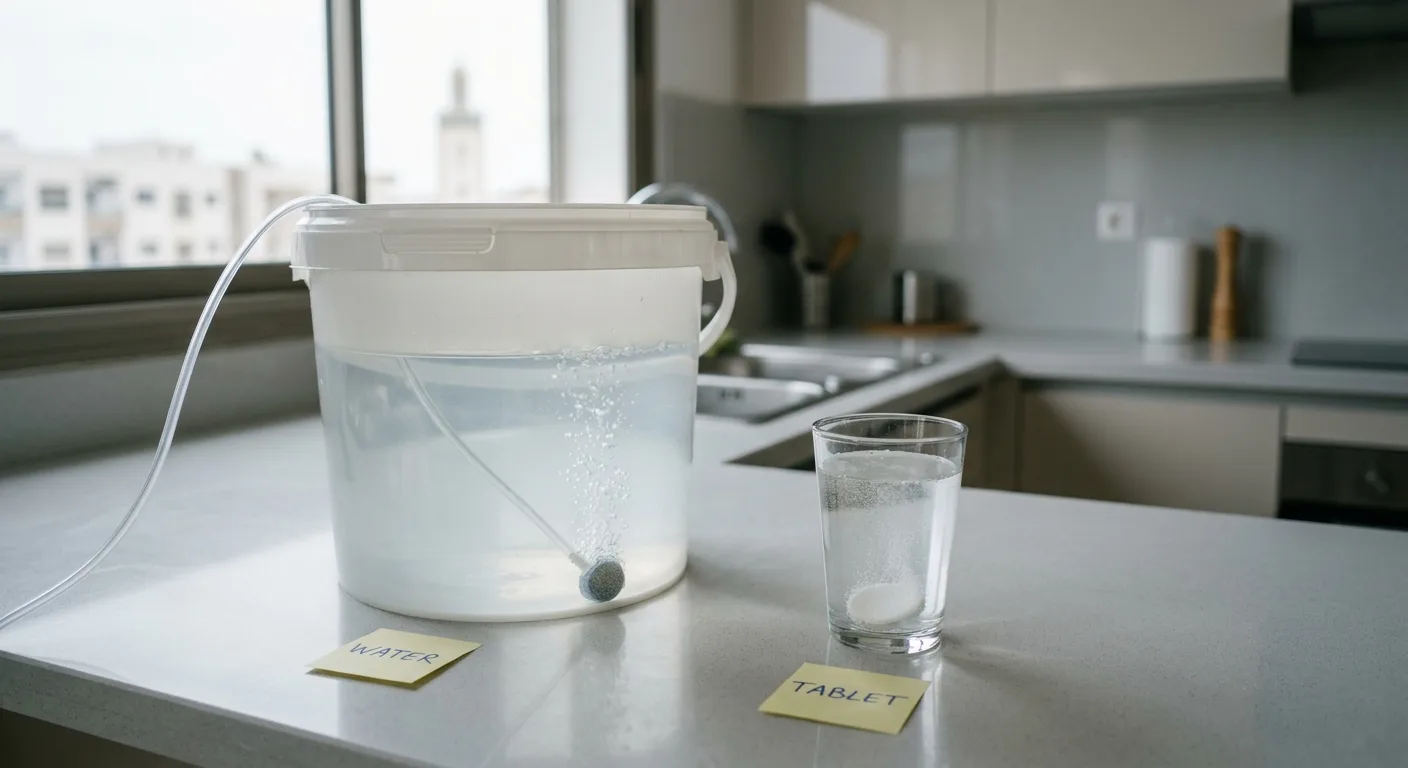
Chloramine won’t evaporate. You could leave a bucket sitting out for a month, and the chloramine would still be there. To remove it, you need a chemical reaction. Homebrewers have used Campden tablets (potassium metabisulfite) for decades to solve this exact problem.
These tablets are cheap, safe, and effective. One tablet treats twenty gallons of water, which is more than most apartment systems hold. Here is how to use them safely:
- Crush 1/4 of a Campden tablet between two spoons.
- Dissolve the powder in a small cup of warm water.
- Pour the dissolved liquid into 5 gallons of tap water.
- Stir well and wait fifteen minutes before adding plant nutrients.
This reaction breaks the chloramine bond. The chlorine gas escapes, leaving a tiny amount of ammonia behind. Plants consume this leftover ammonia as a source of nitrogen, making it a harmless byproduct for your hydroponic garden.
⚗️ Alternatives for chemical removal
Some growers prefer not to use potassium metabisulfite in their water supply. As an alternative, you can use pure ascorbic acid (Vitamin C powder). A tiny pinch (about 1/4 teaspoon) neutralizes chloramine in five gallons of water.
This method works well, but it has limitations. Keep in mind that Vitamin C will slightly lower your pH. You must test your levels afterward to ensure the water hasn’t become too acidic before mixing in your fertilizers. I never rely on ascorbic acid without verifying the final pH reading.
Furthermore, don’t use flavored Vitamin C packets meant for human drinks. These contain sugars and artificial colors that will feed bad bacteria and cause algae growth in your reservoir. Stick to pure, food-grade ascorbic acid powder.
🛠️ Testing And Filtering Tap Water For Hydroponics At Home
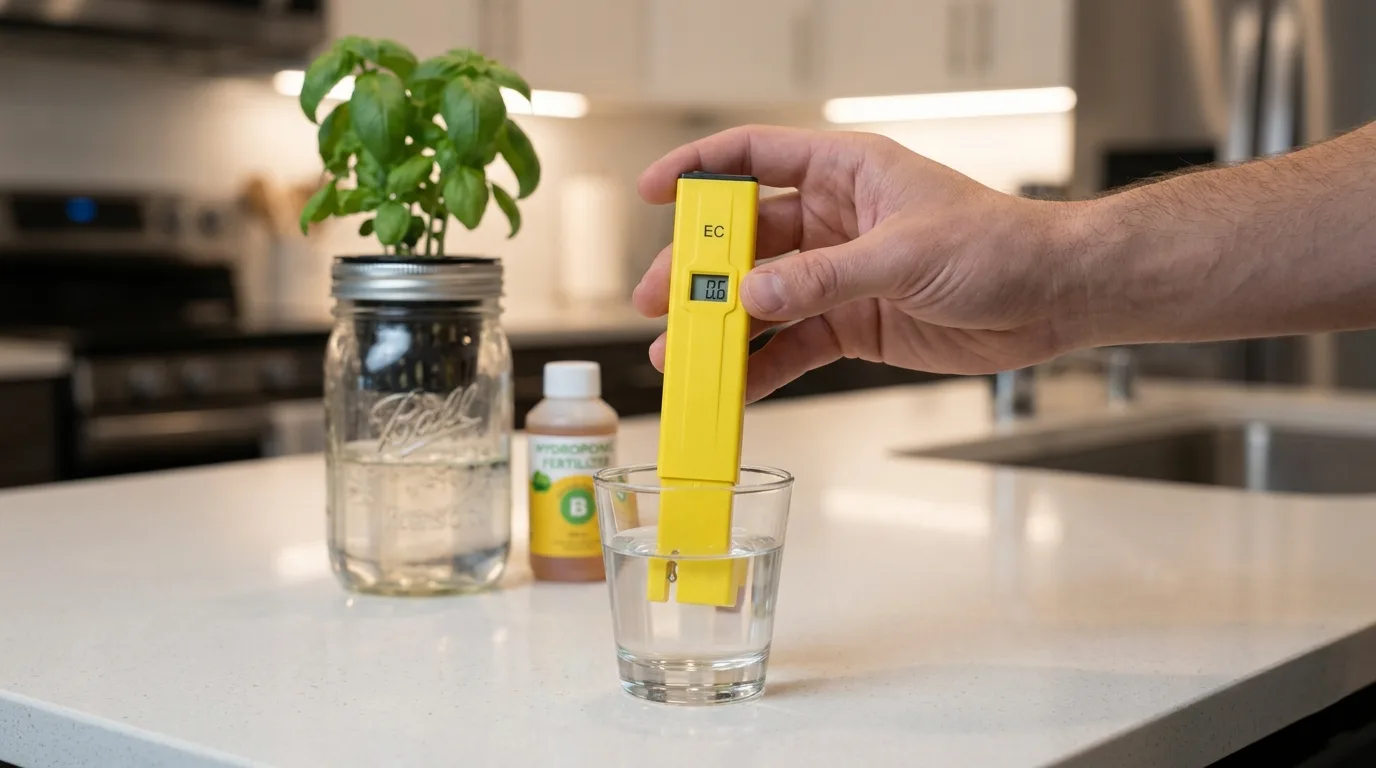
If you want to stop guessing, you need to test the water yourself. Preparing tap water for hydroponics is much easier when you’ve data. A digital meter tells you if your faucet water is viable. Don’t rely solely on the city report, as water quality changes throughout the year.
For small spaces, large filtration systems are often impractical. Renters usually can’t drill into sink plumbing. Fortunately, there are countertop solutions that make filtering tap water for hydroponics manageable in tight quarters.
🫙 Simple carbon filters for apartment sinks
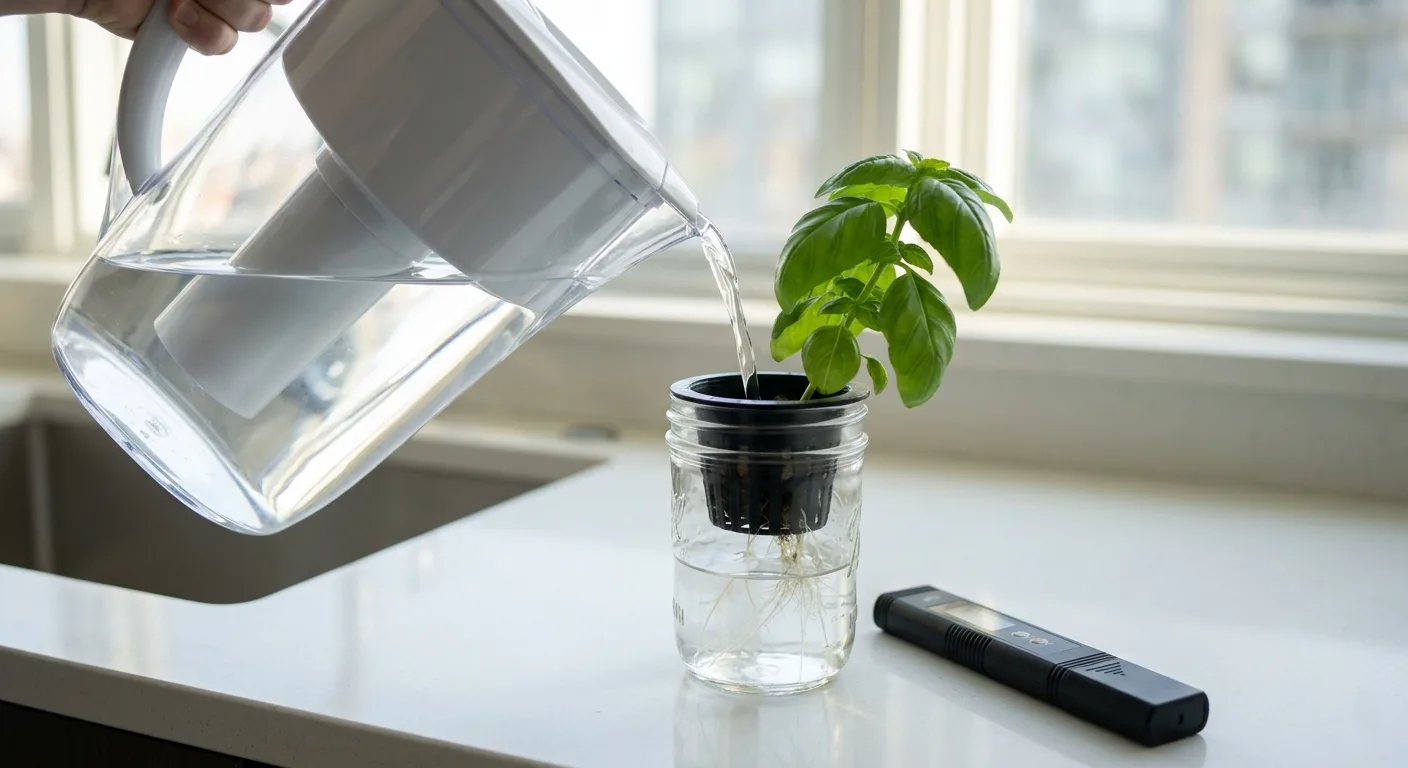
A standard activated carbon filter is an excellent tool for indoor growers. Pitcher filters, like Brita or PUR, use activated carbon to trap chlorine, heavy metals, and bad odors. If you’ve a small Kratky jar setup, running your water through a pitcher is a great first step.
However, you must understand their limitations. A standard carbon pitcher won’t lower your EC. The calcium and magnesium slip right through the carbon matrix. If you need to remove dissolved minerals to fix high EC, you need a different type of filter.
You can find filters that fit directly onto your faucet aerator. These save you from refilling a pitcher. Just remember to run the filter on a slow trickle. If the water rushes through the carbon too fast, it won’t remove the chloramine effectively.
→ How Often Should You Change Water In A Small System
→ How To Clean A Hydroponic System Without Mess
🧊 When to switch to RO or distilled water
Sometimes, the city water is just too hard to fix. If your starting tap water tests above EC 0.8 (roughly 400 PPM), fighting it becomes a chore. The pH buffers will drift every day, and your plants will suffer from nutrient lockout. At this point, filtering tap water for hydroponics with basic carbon isn’t enough.
You’ve a few options when your water is terrible:
- Buy a countertop Reverse Osmosis (RO) system that attaches to your sink aerator without tools.
- Purchase gallon jugs of distilled water from the grocery store.
- Use a ZeroWater pitcher, which removes all EC, though the filters degrade fast with hard water.
If you switch to pure RO or distilled water, you must add a Cal-Mag (Calcium-Magnesium) supplement back into the water before adding your main fertilizers. Pure water has zero buffer, meaning your pH will crash wildly without those base minerals. Check your lighting needs with a grow light calculator to ensure your plants are metabolizing these nutrients correctly under artificial light.
🚨 What to do if your filter fails
Carbon filters have a lifespan. When a filter becomes saturated, it stops pulling chlorine and metals out of your tap water. If you notice your plants yellowing after a water change, your filter might be expired.
To diagnose a failed filter, test the output water. Use your EC meter to measure the water coming straight from the tap, and then measure the water coming out of the filter. If you use a ZeroWater filter and the output is above EC 0.1, the resin is exhausted. For standard carbon filters, if you can smell a faint pool-chemical odor, the carbon is depleted.
In this scenario, replace the filter cartridge. Don’t use the compromised water in your reservoir. Instead, use the 24-hour off-gassing method for that week’s water change while you wait for a new filter to arrive in the mail. You can use our shopping list builder to keep track of your replacement schedules.
🌤️ Managing Seasonal Changes In Tap Water For Hydroponics
You might figure out the perfect water treatment routine in May, only to watch your plants struggle in December. Treating tap water for hydroponics isn’t a “set it and forget it” task. Municipalities alter their water sources and chemical treatments based on the weather.
These seasonal shifts mean your starting EC and pH will change without warning. By anticipating these variations, you can adjust your nutrient recipes before your plants show signs of stress.
❄️ Why your water changes in winter
During the winter, cities that rely on surface water (like lakes or rivers) deal with temperature drops and snowmelt. Cold water holds onto dissolved gases better than warm water. Consequently, the chlorine levels in your winter tap water might be higher than in the summer.
Additionally, road salt runoff from snowstorms makes its way into the water supply. This causes a noticeable spike in your baseline EC. If you live in a snowy climate, test your tap water every two weeks from November to March.
Furthermore, winter tap water comes out of the pipes freezing cold. If you mix nutrients into water that’s 45 degrees Fahrenheit and pour it over your roots, you’ll shock your plants. Always let your fresh tap water sit until it reaches room temperature (around 68 to 72 degrees) before a water change.
🔆 Adjusting your nutrient mix for summer water
Summer brings its own set of challenges for municipal water. High temperatures encourage algae blooms in city reservoirs. To combat this, treatment plants often flush their systems with higher doses of chloramine or switch treatment chemicals.
During summer heatwaves, you might notice your starting pH drifting higher than usual. The utility adds more alkaline buffers to stabilize the water in the heat. Because of this, you’ll likely need more pH Down solution during the summer months.
You can use our seed to harvest calculator to track how these seasonal water changes affect your overall growth speed. If summer crops are taking longer to mature, re-test your base water to ensure the city hasn’t quietly increased the chloramine dosage.
🩺 Troubleshooting Tap Water For Hydroponics Problems
Even with careful preparation, issues can arise. Using tap water for hydroponics involves some trial and error. When things look wrong in the reservoir, the water chemistry is the first thing you should check. Roots react to bad water environments before the leaves do.
Most problems caused by tap water present as visible symptoms. By identifying the physical signs, you can adjust your water treatment routine. Always confirm your suspicions with a meter reading to avoid making the wrong correction.
🍂 Fixing nutrient lockout from hard water
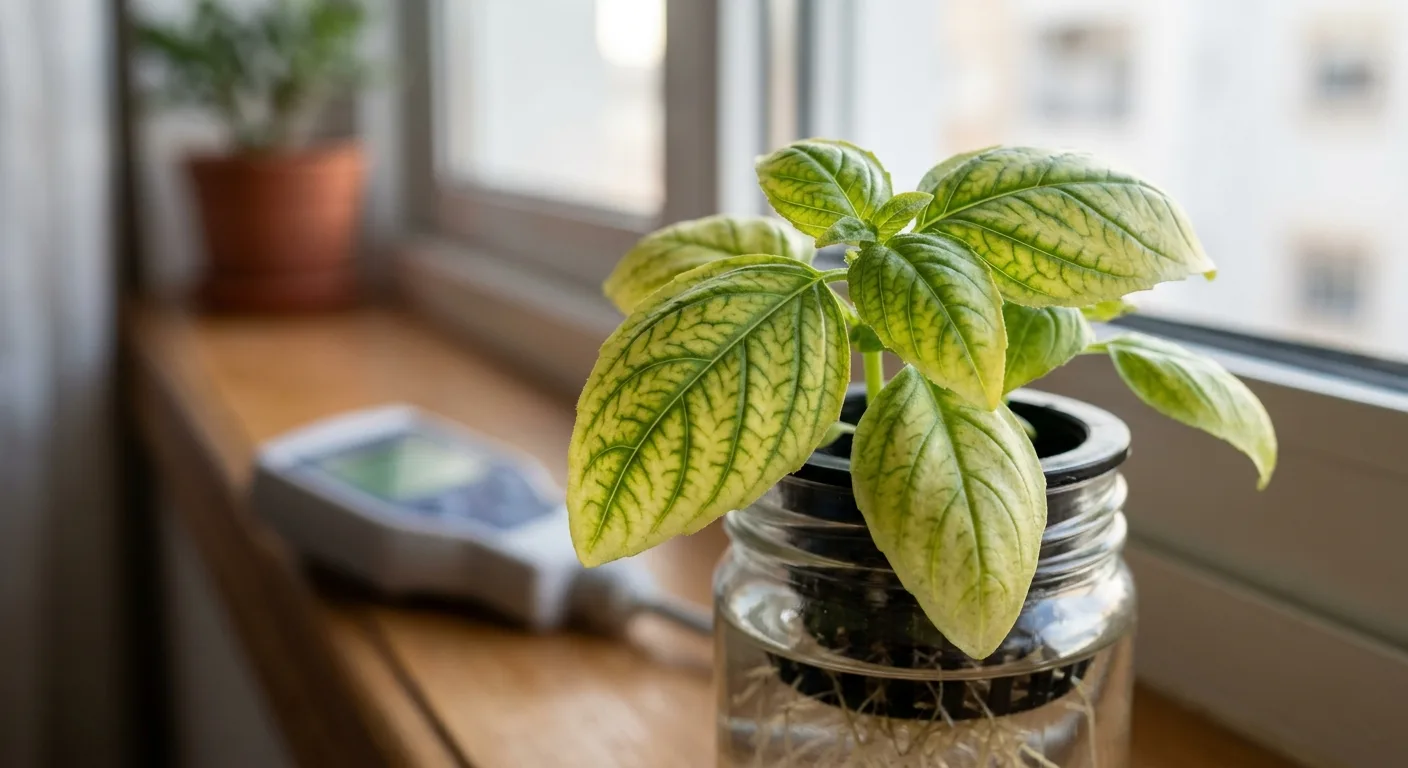
Nutrient lockout occurs when the pH drifts too high, usually pushed up by hard water bicarbonates. The nutrients remain in the water, but the plant roots physically can’t absorb them. You’ll often see the leaves turn pale yellow while the veins stay dark green. This is a classic sign of iron deficiency caused by high pH.
If you spot yellowing leaves, take immediate action. Don’t add more fertilizer; that will only make the toxicity worse.
- Empty the entire reservoir and rinse the container.
- Refill with a fresh mix of 50% tap water and 50% distilled water.
- Add a fresh dose of nutrients at half strength.
- Balance the pH to 6.0 and monitor it daily.
🌴 What to do if your plants stop growing
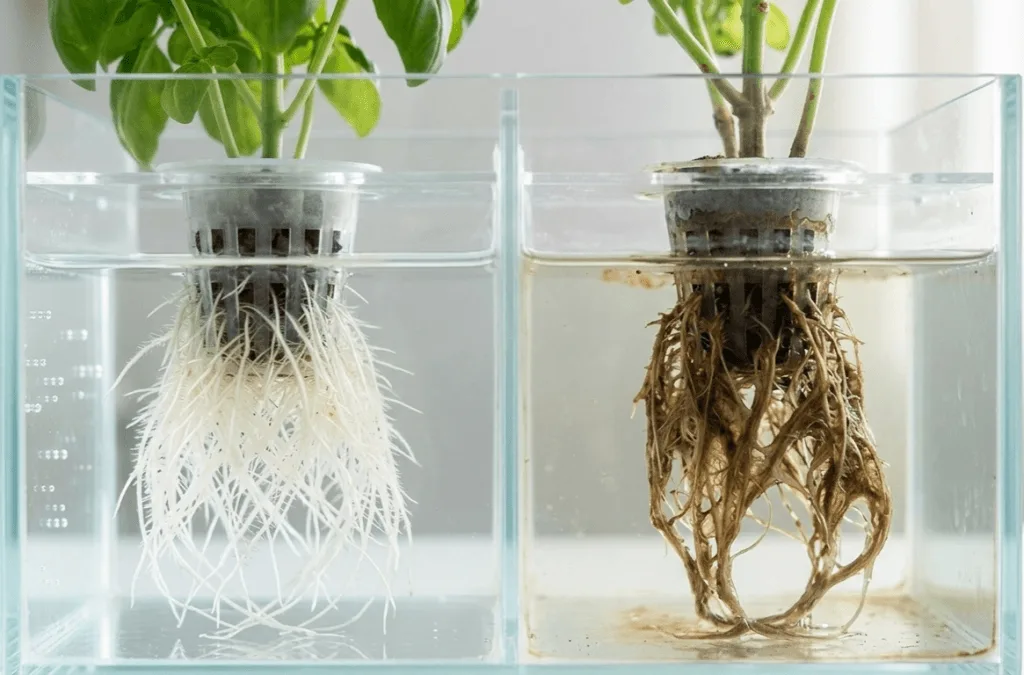
If your seeds sprout but refuse to grow past the seedling stage, your water might be shocking them. High chlorine levels burn fragile young roots. The roots become stressed and the plant will decline if left uncorrected.
To prevent root rot and stagnation, track your growth timeline. Check your roots visually. Healthy roots are white and firm. If they’re turning brown and slimy, your water is compromised.
Verify that your tap water treatment is working. Double-check your municipality’s water report to ensure they haven’t switched from chlorine to chloramine for the summer months. Then, perform a full reservoir change every 2 weeks to flush out accumulated city minerals and refresh the root zone.
🧽 Dealing with mineral scale on equipment
Hard tap water leaves behind a stubborn white crust on everything it touches. Over time, calcium carbonate scale builds up on your net pots, reservoir walls, and airline tubing. This scale can harbor bad bacteria and throw off your pH readings.
Scrubbing the scale with soap doesn’t work well. Instead, you need a mild acid to dissolve the mineral bonds. When you clean your system between crops, soak all plastic parts in a solution of warm water and white vinegar.
Let the equipment sit for 30 to 60 minutes. The vinegar breaks down the calcium, allowing you to wipe it away with a soft sponge. Rinse everything with clean, off-gassed tap water before starting your next batch of herbs.
💬 A Word From Sarah
When I first started growing basil in my kitchen, I was terrified of my faucet. I lugged three gallons of distilled water home from the grocery store every week, sweating on the subway, convinced my tap water would spell disaster. One week, I got lazy and just let a pitcher of tap water sit out overnight. My basil didn’t die. In fact, it grew fine. Figuring out the exact EC of my apartment’s supply saved my back and my wallet. Treat your water with respect, test it often, and don’t let perfection keep you from growing.
❓ Frequently Asked Questions
🚱 Can I use tap water for hydroponics without filtering it?
Yes, you can use unfiltered tap water if your starting electrical conductivity is below 0.4 and your city uses chlorine instead of chloramine. Letting the water sit for 24 hours allows the chlorine to evaporate before adding nutrients. Always test pH afterward, since tap water pH varies by area and often needs adjusting to reach the target range of 5.5 to 6.5.
🧪 How do I remove chloramine from tap water for hydroponics?
You’ll need a chemical treatment or a carbon block filter to remove chloramine. Crushing a Campden tablet or adding ascorbic acid powder to your reservoir neutralizes it on contact. Standard off-gassing doesn’t work for chloramine, unlike plain chlorine, so don’t rely on just letting the water sit overnight.
💧 Does a Brita pitcher make tap water safe for hydroponics?
A standard Brita pitcher removes chlorine and some heavy metals, making the water safer for light use. However, it doesn’t lower the overall mineral content or electrical conductivity. If you’ve got very hard water, a pitcher filter won’t solve the problem — you’ll need a reverse osmosis system or dilution with distilled water to bring the EC down.
📈 Why does tap water make my hydroponic pH keep rising?
Hard tap water contains high levels of calcium carbonate, which acts as a pH buffer and neutralizes the acid you add. You’ll need to keep adding pH Down over several days until the buffer breaks down. Once it does, pH becomes much easier to hold steady — so don’t give up after the first adjustment.
🧂 What is the maximum starting EC for tap water in hydroponics?
For most herbs and leafy greens, your starting tap water should ideally be below an EC of 0.4 before you add any nutrients. If your water tests above 0.6, you risk nutrient imbalances and should dilute it with distilled water to bring the baseline down. A digital EC pen costs around $15 and saves a lot of guesswork.
🌫️ Can boiling tap water make it better for hydroponics?
Boiling removes chlorine faster than off-gassing, but it doesn’t remove dissolved minerals. In fact, boiling evaporates water and concentrates the minerals left behind, which slightly raises your electrical conductivity. It isn’t an effective treatment for hard water — off-gassing or a Campden tablet is faster, cheaper, and doesn’t affect your EC.
📅 How often should I test my tap water for hydroponics?
Test your tap water at least once a month and whenever the seasons change. Municipalities alter their treatment chemical ratios based on temperature and rainfall, which shifts your starting pH and mineral levels without any notice. Keeping a simple log of your tap water readings makes it much easier to spot these shifts before they affect your plants.
Happy growing! 🌿
— Sarah, Urban Hydro Space

Sarah is the founder of Urban Hydro Space and an indoor gardening enthusiast dedicated to helping apartment dwellers grow fresh herbs and vegetables in small spaces. With hands-on experience testing hydroponic systems, she shares practical tips and honest product reviews to make indoor gardening accessible for beginners.