⏳ 16 min read · Last updated: September 2026
Disclosure: As an Amazon Associate I earn from qualifying purchases. This post contains affiliate links. If you buy through these links, I may earn a small commission at no extra cost to you. I only recommend products I’ve researched carefully from real specifications and verified buyer feedback, and I say when I have not run one myself. Thank you for supporting Urban Hydro Space!
🌱 Hands-on tested: the KETOTEK pH, EC and temperature meter. I have used it in my own grows. 🔎 Research pick: everything else in this post, chosen from published specifications and owner reports. How I test and choose products.
Finding the best timer for grow lights in an apartment setup changed everything about how I manage herbs indoors. Before I knew any better, I plugged my first countertop hydroponic lamp directly into the wall and flipped the switch by hand every day. Over one busy weekend, I forgot for three days straight, left the panel running for 72 hours, and scorched my lettuce leaves crispy brown. Eventually, I realized automation wasn’t optional if I wanted healthy plants without the daily hassle.
Because timing drives everything else, a steady light schedule keeps your hydroponic garden thriving in a small space. Instead, the right timer turns your lights on and off quietly, safely, and on time without relying on your memory. Below, I compare the best timers for grow lights in three compact options that fit into tight studio corners so you can step away without worrying about your greens. If you’re building your first indoor garden from scratch, the complete apartment hydroponics beginner’s guide is the best place to start before buying any equipment.
💡 The Best Timers for Grow Lights in an Apartment: Quick Overview
- Automating your lights also prevents plant stress and grow light burn in small setups.
- Smart plugs offer silent operation, which matters particularly in studio bedrooms.
- Mechanical dials cost less but produce a faint ticking sound at night.
- Your plants still need a strict 14 hours on, 10 hours off light routine to thrive.
- Multi-outlet strips let you schedule your lamp and run your air pump at the same time.
🏆 Sarah’s Top Pick
Kasa Smart Plug HS103P2
Completely silent Wi-Fi scheduling from your phone. No ticking, no clicking, no waking up at 2 AM. The best grow light timer for any bedroom or open-plan studio apartment.
★★★★☆ Best for Apartments · Silent operation
- Sleeping in the same room as your plants → Kasa HS103P2 (silent)
- Running an air pump alongside your light → BN-LINK 8-Outlet (always-on outlets)
- Spending as little as possible → Grow1 Mechanical (no app, no Wi-Fi)
🔍 What To Look For In The Best Timer For Grow Lights Apartment Use
When you share a small footprint with your plants, your equipment needs to stay unobtrusive. Generally, a good timer for grow lights in an apartment will sit flush against the wall and operate without humming noises. You’ll also want to avoid bulky outdoor models that block adjacent outlets. Overall, compact and silent designs perform best in tight living spaces.
Before picking a model, think about two things: how many devices you need to control, and whether you sleep near your plants. Once you have both answers, your choice narrows fast.
⚠️ Noise levels matter in small spaces
In practice, mechanical dials make a ticking sound as the internal motor rotates through its 24-hour cycle. You’ll hear the plastic pins clicking late at night in a quiet studio, which can disrupt sleep if the setup sits on your nightstand or shelf. In contrast, digital smart plugs run in complete silence, making them the right choice for bedrooms and open-plan studios.
Good places to use mechanical timers include:
- Kitchen countertops well away from sleeping areas
- Enclosed bathroom shelves with the door shut
- Living room bookshelves with solid backing
💡 Setting the right light schedule
Once your timer is active, program it for a consistent cycle. Specifically, leafy greens and herbs need steady energy to develop broad leaves without stretching toward the light. Position your lamp 6 to 8 inches above the canopy and set the schedule to 14 hours on, 10 hours off for reliable growth.
If you’re unsure what wattage your plants actually need, the hydroponic grow light calculator helps you match your bulb to your shelf size. For a deeper look at timing your lights around a busy workday, the apartment hydroponic light schedule guide for 9-to-5 growers walks through the best window options.
| Crop | Difficulty | Harvest Time | Best Timer Type |
|---|---|---|---|
| Basil | Easy | 5 to 6 weeks | Smart plug (silent) |
| Mint | Easy | 4 to 5 weeks | Any model |
| Chives | Easy | 7 to 9 weeks | BN-LINK strip |
| Parsley | Medium | 6 to 8 weeks | Mechanical dial |
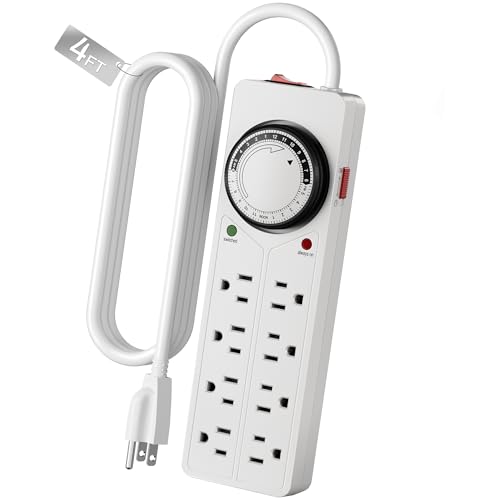
🛠️ BN-LINK 8-Outlet Strip: Best Timer For Multi-Device Grow Light Setups
Amazon price right now: $22.99
★★★★☆ Best for Multi-Device Setups1875W / 15A
⚠️ Watch out for: Bulkier than a single smart plug, and the mechanical dial produces a faint ticking sound at night
Occasionally you need to run an air pump alongside your lamp without juggling two separate plugs. The BN-LINK 8-Outlet Surge Protector with Timer therefore acts as a hybrid power strip and scheduling tool in one unit. Four outlets follow the timer dial, and four outlets stay on constantly regardless of the schedule.
In addition, this strip is ETL listed, rated at 1875W / 15A and includes surge protection rated to 1725 joules across all three lines. It comes with a 15-month warranty, and the updated black pin dial is much easier to read than older white-pin versions.
⏱️ Running multiple devices from one strip
Especially for Deep Water Culture growers, the always-on outlets are the standout feature. Your air pump keeps bubbling 24 hours a day for root oxygen while the timed outlets cut your lamp off at night. As a result, this setup maintains stable water temperatures between 65 to 75°F (18 to 24°C) by ensuring heat from your bulb stops automatically after dark.
To configure the strip for a single-lamp Kratky setup:
- To begin with, plug the heavy-duty cord into a grounded wall outlet.
- Set the current time by rotating the dial clockwise to the correct hour.
- Press the plastic pins down for each 15-minute block you want the lights on.
- Plug your grow lamp into one of the four timed outlets.
- Finally, connect your air pump or fan into one of the four always-on outlets.
🩴 Who this strip is best for
This model suits growers who are already expanding beyond a single glass jar. It also works well for anyone running multiple small hydroponic setups in one corner of a room. For placement flexibility, the 4-foot cord lets you keep the strip on an elevated shelf rather than the floor. However, size is the only real limitation. At roughly double the footprint of a single smart plug, it is bulkier, so you’ll want to tuck the cord behind furniture to keep your space tidy.
🔆 Kasa HS103P2: Best Smart Timer For Grow Lights In Apartments

Amazon price right now: $14.99 Prices refresh automatically. Prices are pulled from Amazon and were last checked on 27 September 2026 at 12:51 am. Amazon prices change often, so check the listing before buying.
★★★★☆ Best for Apartments / Silent Wi-Fi Scheduling2-pack
⚠️ Watch out for: Requires a 2.4GHz Wi-Fi connection for setup, and does not have always-on outlets for a simultaneous air pump
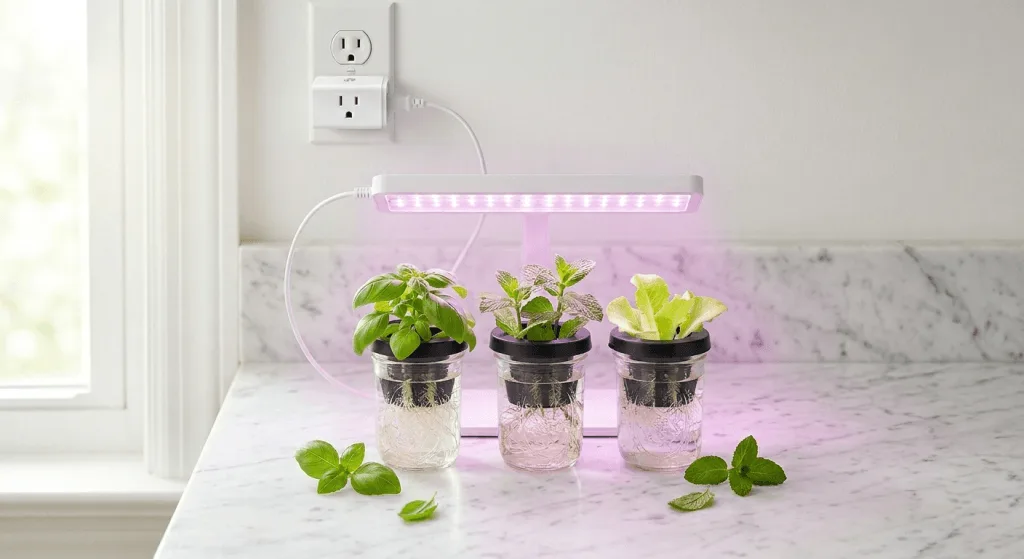
Above all, studio apartments demand silent operation. The Kasa Smart Plug HS103P2 therefore connects to your 2.4GHz Wi-Fi for full phone-based schedule control. You won’t hear any clicking, and you can update the light cycle from your couch without touching the plug.
The HS103P2 is also UL certified and rated at 15A / 120VAC, which is far more headroom than a compact grow light will ever ask for. Each plug in the pack works independently, so you can put one on your grow light and keep the second as a spare or use it for a second shelf.
📋 App-based scheduling from anywhere
Specifically, the free Kasa app lets you input your exact routine in minutes. You can set the lights to turn on at 7 AM and off at 9 PM, then shift the window by an hour if your plants show signs of stress without unplugging anything. The app also works with Amazon Alexa and Google Assistant, so voice commands are an option if your hands are wet during a water change.
If you want to dial in your timing to your specific work schedule, the 9-to-5 apartment light schedule guide shows the best on and off windows for growers who leave the apartment during the day.
🌱 Slim profile for tight wall sockets
Meanwhile, many older apartment buildings have limited wall outlets. So the Kasa HS103P2 uses a compact design that leaves the second socket free. You’ll still have room to plug in a phone charger or a small clip fan below it. It’s an excellent match for a simple Kratky method jar setup on a kitchen counter where space is at a premium. If you’re covering one grow light over multiple jars, the guide to running one grow light over multiple plants shows how to position everything on a single shelf.
→ Best LED Grow Lights for Apartment Countertops
→ Do Hydroponic Herbs Need a Dark Period at Night?
⏳ Grow1 Mechanical Timer: Best Budget Option For Grow Lights

Amazon price right now: $13.98
★★★☆☆ Best Budget Pick / No Wi-Fi Required15A / 120V
⚠️ Watch out for: Faint ticking sound at night, and you’ll need to manually reset the time after any power outage
When you want basic reliability without a Wi-Fi setup, a classic dial works fine. The Grow1 Single Outlet Mechanical Timer is designed specifically for hydroponic and grow room use. It’s UL listed, grounded, and rated at 15A / 120V, which handles any standard LED grow panel without trouble.
Besides that, the Grow1 supports 15-minute on and off increments across a 24-hour cycle. There’s also a 12-hour flowering mode built in, which is useful if you ever move on to fruiting crops that need a shorter day length.
📌 Simple pin operation with no app required
Unlike smart plugs, mechanical models don’t rely on internet connections. If your apartment router drops offline, this timer keeps your basil illuminated on schedule. You’ll rotate the dial clockwise to set the current time, then press the pins down for each block you want the lamp active.
To prevent common setup mistakes with the Grow1:
- Rotate the dial clockwise only when setting the current time.
- Press pins fully down for each “on” block until they click into place.
- Double-check that the side switch is set to “Timer” mode, not “Always On”.
- Confirm you haven’t left gaps between pin blocks that would cut your light cycle short.
⚠️ Drawbacks to consider before buying
Of course, the Grow1 produces a faint ticking sound from its internal motor. However, this noise can bother light sleepers if the jar sits near a bed. Beyond noise, the biggest limitation is that a power outage will stop the dial mid-cycle, requiring you to reset the current time once power returns. Conversely, smart plugs handle this automatically by pulling the correct time from the internet.
For a kitchen counter setup though, running a simple Kratky lettuce jar on a windowsill the Grow1 does the job at a fair price. Pair it with a full reservoir change every 2 weeks and a consistent light schedule, and your herbs will grow on autopilot.
Each crop in the table has its own walkthrough in the growing guides hub, with light, EC and harvest timing for all 39 crops.
🩺 How To Set Up Your Grow Light Timer Safely In An Apartment
Electrical safety deserves attention when you mix water and power in a small space. A poorly placed timer becomes a real fire risk when water splashes onto the pins. Most LED grow panels pull modest power, but confirming your outlet can handle the load before plugging in is always worth a minute of your time.
💧 Wattage limits and moisture protection
Never place your plug directly below your reservoir. Even a small leak could drip onto the outlets and cause a short circuit. Mount your strip or plug above the water line or position it to the side of the jar at a safe distance. Keep your nutrient mixing area away from your electrical setup, and maintain your water at pH 5.5 to 6.5.
If you spill pH Down near your timer, wipe the plastic casing immediately with a dry cloth rather than a wet one. The acidic liquid won’t destroy the plastic on contact, but repeated exposure degrades it over time.
→ University of New Hampshire Extension: Hydroponics at Home
→ UMN Extension: Small-Scale Hydroponics
🔧 Monthly timer inspection routine
Over time, dust settles into mechanical dial slots too and causes pins to stick. As a result, a quick monthly check keeps everything running reliably. Before you inspect the timer, finish your weekly water maintenance using the pH and nutrient calculator so your hands are dry before you touch the electrical components.
A quick monthly safety check:
- Unplug the unit from the wall completely.
- Next, wipe the plastic casing with a dry microfiber cloth to remove dust and residue.
- Subsequently, test each pin to confirm none have become stuck in the down position.
- Plug it back in and test the manual override switch to confirm it works.
- Verify your light hangs 6 to 8 inches above leafy herbs and 4 to 6 inches above low-growing oregano.
- pH + EC monitor: KETOTEK pH/EC/Temp Combo Meter. Keep your reservoir in the correct range while your timer handles the light. One probe reads pH, EC, and temperature so you catch nutrient drift before it damages your plants.
- pH adjustment: pH Up and Down Kit. Overall, automated lighting keeps your plants on schedule. Correct pH keeps nutrients available. Both matter equally in a small DWC setup.
- Backup mechanical timer: Keep one cheap mechanical unit in a drawer. If your smart plug loses Wi-Fi during a storm, swapping in a mechanical backup takes under a minute and keeps your light schedule intact.
Plan your full apartment grow kit with the hydroponic shopping list builder.
💬 A Word From Sarah
I ran a cheap mechanical timer on my bedroom shelf two years ago for a mint jar setup. The ticking kept me awake, so I wrapped the plug in a hand towel to muffle the noise. Then it overheated overnight, melted the plastic dial, and shorted out the entire wall outlet. I lost two mature mint plants because they sat in total darkness for four days while I waited for an electrician to replace the socket. Now I use a Kasa smart plug for any room where I sleep, and I never cover any electronics. So the extra ten dollars is worth every cent.
❓ Frequently Asked Questions
💡 Why do I need a timer for grow lights in an apartment?
A timer ensures your plants receive consistent daily light cycles without relying on your memory. Manual switching leads to forgotten days and stressed herbs, especially over busy weekends. An automated plug gives your hydroponic garden the same hours every day, which is one of the simplest ways to steady growth in a small indoor setup.
⏱️ How many hours should a grow light timer run for herbs?
Generally, most indoor herbs thrive on 14 hours on and 10 hours off. Spinach is the one exception: it runs 12 hours, since 14 sits inside its bolting band. Program your timer to match this window from the start. This rhythm helps leafy greens develop properly without exhausting the plant through continuous exposure. A window from 6 AM to 8 PM works well for most apartment schedules and preserves a natural dark period overnight.
⚠️ Will a mechanical timer make noise in my apartment?
Yes, mechanical dials produce a faint ticking sound as the internal motor rotates. If you sleep near your hydroponic setup, this noise will bother you at night. Therefore choose a silent digital smart plug for any bedroom or open-plan studio. Smart plugs like the Kasa HS103P2 eliminate ticking while leaving the adjacent outlet free.
📱 Can I use a smart plug as a grow light timer?
Since you set the schedule once and forget it, smart plugs make excellent grow light timers for apartments. They operate silently and let you adjust the schedule from your phone. You’ll need a 2.4GHz Wi-Fi connection to set them up, but they offer precise minute-by-minute control and allow you to shift your lighting window easily if your daily routine changes.
⚠️ What happens if my timer breaks while I’m at work?
If a timer fails, it usually sticks in the off position or stays continuously on. One day of irregular light won’t ruin mature herbs, but prolonged exposure causes bleaching and stress. Either way, replace a faulty unit within a day or two to protect your plants. Keeping a cheap mechanical backup in your supply drawer is a smart precaution for any apartment grower.
🔗 Can one timer control multiple grow lights?
You can plug a power strip into a single heavy-duty timer to run multiple lamps at once. Nevertheless, always confirm the combined wattage of your lights falls below the timer’s rated maximum. Most LED panels pull very little power, but you should add up the wattage of every device before daisy-chaining them to avoid overloading the circuit.
🔌 Do smart plugs use a lot of electricity?
Smart plugs draw a negligible amount of power to maintain their Wi-Fi connection, typically less than a dollar per year in electricity costs. The real saving comes from preventing your grow lights from running 24 hours a day. A proper automated schedule cuts your light running time by roughly 40 percent compared to leaving lamps on continuously. For the full math, the grow light electricity cost breakdown walks through what a shelf actually costs to run.
🚨 Do I need to reset my timer after a power outage?
Mechanical timers stop spinning during a power outage and require a manual time reset once power returns. Smart plugs pull the current time from the internet automatically once your router reboots, so the schedule resumes on its own. This makes digital models much lower maintenance for apartment growers who experience occasional storms or tripped breakers. The full hydroponics power outage recovery checklist covers the plants, not just the timer.
⚙️ Are digital or mechanical timers better for grow lights?
For most apartments, digital wins. Mechanical timers cost less and run without Wi-Fi, but they tick at night and lose their settings in an outage. Digital timers and smart plugs run silently, hold minute-by-minute schedules, and recover on their own after a power cut. Choose mechanical only for a shelf far from where you sleep, or as a cheap backup in your supply drawer.
🛠️ How do I set up a grow light timer for the first time?
Plug the timer into the wall first, then plug your light into the timer. Set the current time, then program on at 6 AM and off at 8 PM for a 14 hour window. Watch one full cycle to confirm both switches fire on time, and feel the outlet for warmth during your monthly check. Once seedlings move under the lamp, the transplant timing guide covers what comes next.
Happy growing! 🌿
Sarah, Urban Hydro Space

Sarah Whitfield is the founder of Urban Hydro Space and an indoor gardening enthusiast dedicated to helping apartment dwellers grow fresh herbs and vegetables in small spaces. She researches hydroponic systems carefully from real specifications and verified buyer feedback, and shares practical tips and honest, clearly labeled product picks to make indoor gardening accessible for beginners.