
Affiliate disclosure. As an Amazon Associate I earn from qualifying purchases. Urban Hydro Space earns a small commission on purchases made through links on this page, at no extra cost to you. Full disclosure.

Researched, not tested: every product in this post was chosen from the makers’ published specifications, labels and listings, not tried at home. How we research and choose products.
The best microgreens kit for a kitchen counter grows without soil: a tray, a thin fiber mat and seed, with water wicking up from below. Soil-free is the only kind I’d buy, and it matches the method every other guide here uses. You can buy a kit ready-made, which is the easiest start and a good gift, or build your own set from standard 10 by 20 inch trays and mats that will grow a tray a week for years.
The kits and trays below are judged on their specs: one ready-made kit, mesh sprouter trays with lids, heavy-duty trays for a weekly routine, the mats that go in them and a seed pack to fill them. None of them is magic, though. The kit matters less than the light, the water and the air around it, so I’ve added what any tray needs to work well. Never grown microgreens before? The radish microgreens guide takes one tray from seed to harvest, and the beginner’s guide to apartment hydroponics covers the basics behind every crop on this site.
The Best Microgreens Kits and Trays at a Glance
Pick by how much you want to grow and how often. Specs are the makers’ own.

Easiest start: ZESTIGREENS Self-Watering Microgreens Kit
Research pick.
- In the box: a 12 by 6 inch tray with a hydroponic insert, a blackout felt lid, two hemp mats and seed.
- Best for: a first tray on the counter, or a gift.
- Skip if: you want big harvests, because refills cost more per tray than a DIY set.
Check price on Amazon $39.95
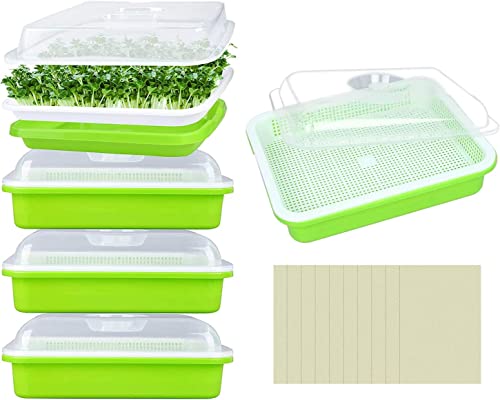
Budget trays with lids: Legigo Sprouter Trays, 5-Pack
Research pick.
- In the box: five mesh trays with clear lids and 10 planting papers, each about 12.7 by 10.2 inches.
- Best for: several small trays of different crops at once.
- Skip if: you only grow tiny seeds, since they need a paper or mat so they do not slip through the mesh.
Check price on Amazon $26.99
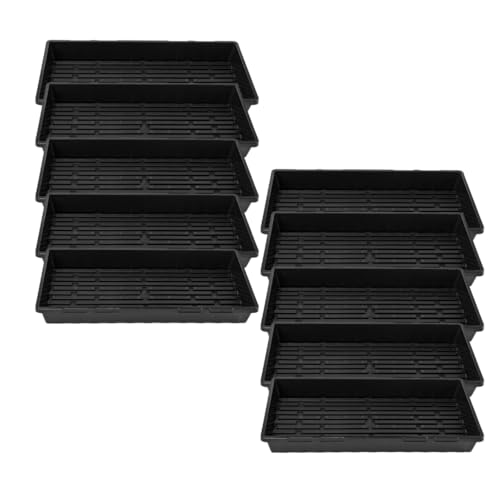
A tray a week, for years: Bootstrap Farmer 1020 Trays, 10-Pack
Research pick.
- In the box: ten no-hole 1020 trays in 1.8 to 2.0 mm polypropylene, made in the USA.
- Best for: a weekly sowing routine with mats or a mesh insert.
- Skip if: you grow one tray a month, because thinner trays cost much less.
- Also covered below: RooTrimmer mesh and no-hole 1020 trays, and the lighter Yield Lab 10-pack.
Check price on Amazon $66.49

Mats for 1020 trays: Emsiok Hemp Microgreen Mats, 8-Pack
Research pick.
- In the box: eight natural hemp mats cut to 10 by 20 inches, made without adhesives.
- Best for: no-hole trays, where the mat holds the seed and the water.
- Skip if: you use the ZESTIGREENS kit, since its own hemp mats fit its tray.
Check price on Amazon $17.89

Seed to fill them: Handy Pantry Daikon Radish Seeds, 1 lb
Research pick.
- In the box: one resealable pound of certified organic daikon radish seed, sold for sprouting and microgreens.
- Best for: sowing the fastest tray crop over and over from a single bag.
- Skip if: you want to taste several crops before settling on one, since this bag holds radish only.
Check price on Amazon $18.55
Whichever you pick, I’d keep the tray at 65 to 75°F with the air moving, and give it light once the seeds sprout. Prices are pulled from Amazon and were last checked on 18 November 2026 at 8:47 am. Amazon prices change often, so check the listing before buying.
Key takeaways
- Soil-free kits use a tray, a fiber mat or mesh, and water wicking up from below, so they stay clean and reusable.
- A ready-made kit is the easiest start, but standard 10 by 20 inch trays with mats are cheaper per tray if you grow every week.
- Most microgreens are ready in 7 to 14 days: radish in 7 to 10, broccoli in 8 to 12, pea shoots and sunflower in 10 to 14.
- Any kit needs the same conditions: 65 to 75°F, humidity at 40 to 60 percent, moving air, and light at 10 to 12 inches for 14 hours.
- Most failures come from mold, so sow evenly, water from below and keep the air moving.
Ready-Made Kit or DIY Trays?
A ready-made kit puts everything in one box: a tray built for the job, mats cut to fit, seed and a cover. It’s hard to get wrong and it looks good on a counter, so it makes a lovely present (the gift guide for indoor herb growers has more ideas). The catch is cost per tray, because once you’re growing every week, the brand’s refill mats and seed add up.
A DIY tray set uses the standard 10 by 20 inch tray that professional growers use, known as a 1020 tray. You buy a solid tray, a mat or mesh insert, a cover and seed separately. It takes ten minutes to understand, and after that it costs very little per tray while the trays last for years. Most people who stick with microgreens end up here eventually.
My advice: start with one kit to learn the rhythm, then move to 1020 trays once you’re sowing every week. Both routes grow the same greens under the same conditions, so you lose nothing by starting small. If you’re starting in the new year, the January 30-day plan builds a whole routine around one microgreen tray.
What to Look For in a Microgreens Kit

- No soil. Hemp, jute or coco mats, or a mesh insert over water, keep the kitchen clean and let you rinse and reuse the tray. Some kits use soil pucks or discs instead. They work, but I’d skip them, since they’re messier and harder to reuse.
- Bottom watering. Nothing beats it against mold, because a tray that wicks water up from below keeps the leaves and seed coats dry.
- A cover for the dark days. Seeds sprout best kept dark and damp for the first 1 to 4 days, so a lid or blackout cover is useful.
- Standard sizing. Anything sized to a 1020 tray takes any brand’s mats and inserts later, whereas odd-sized kits tie you to their own refills.
- Food-safe plastic. Look for BPA-free trays, and wash them between crops.
The Picks Side by Side
Every detail comes from the maker’s listing, checked in October 2026. Names in the table link to Amazon (paid links), so you can check the live price there.
| Pick | Type | Size | Medium | Cover |
|---|---|---|---|---|
| ZESTIGREENS kit | Ready-made kit | 12 x 6 in | Hemp mats, self-watering insert | Blackout felt lid |
| Legigo sprouter trays | Trays, 5-pack | About 12.7 x 10.2 in | Mesh, planting papers | Clear lids |
| Bootstrap Farmer 1020 | No-hole trays, 10-pack | 10 x 20 in | Add a mat | Use a second tray |
| RooTrimmer mesh 1020 and no-hole 1020 | Trays, 10-packs | 10 x 20 in | Mesh insert over water | Use a second tray |
| Yield Lab 1020 | No-hole trays, 10-pack | 10 x 20 in | Add a mat | Use a second tray |
| Emsiok hemp mats | Mats, 8-pack | 10 x 20 in | Hemp | None |
The Picks in Detail
ZESTIGREENS Self-Watering Kit: Easiest Start
This is a complete soil-free kit: a reusable 12 by 6 inch tray in a bamboo surround, a hydroponic insert that keeps the mat above the water, a blackout felt lid for the dark days, two hemp mats and a mix of seeds. The mat ends dip into the water, so the tray waters itself from below. ZESTIGREENS says harvests come in about a week. That sounds right to me, since most microgreens take 7 to 14 days.
The maker notes that some larger seeds do better in other setups, so I’d treat it as a home for small seeds such as broccoli, kale, radish and amaranth, or for micro basil. Pea shoots and sunflower want more room than this tray has, and a 1020 tray like the ones below gives them that, as the pea shoots guide shows. Refill mats are sold separately too, as a 10-pack of hemp mats $19.95 cut to fit the tray.
Check the ZESTIGREENS kit on Amazon $39.95
Legigo Sprouter Trays: Budget Trays With Lids
You get five mesh-bottomed trays, each sitting in its own base with a clear lid, for the price of one fancy kit. The mesh drains well, and the lids hold humidity in the first days before they come off. Legigo includes ten planting papers and suggests laying one on the mesh so small seeds don’t slip through. It also warns against piling seed too thickly, which I was glad to see, because that’s the main cause of mold on any tray.
Because you get five, you can run a different crop in each or sow one every couple of days for a steady supply, the same rhythm the succession planting guide uses for herbs. I’d pick these over the kit when you’re curious about lots of crops. One snag: clear lids let light in, so throw something dark over the trays for the first 1 to 4 days if your crop needs it.
Check the Legigo trays on Amazon $26.99
Bootstrap Farmer 1020 Trays: For a Weekly Routine
Standard 1020 trays are cheap, but thin ones crack and buckle within a few months of weekly use. Bootstrap Farmer’s no-hole trays are 1.8 to 2.0 mm thick polypropylene, made in the USA and sold as a 10-pack built to last for years. If you already know you’ll sow every week, these are the ones I’d buy. Lay a jute or hemp mat in one, sow, then flip a second tray on top as the blackout cover.
If you’d rather have a mesh insert over a reservoir of water, RooTrimmer sells matching 1020 mesh trays $41.99 and no-hole trays $44.99. Check the listed dimensions before you buy a humidity dome to fit them, or just flip a second tray on top as the cover. The Yield Lab 10-pack $29.95 is a lighter no-hole tray, so lift it with a hand under the middle when it’s full and wet; otherwise it can flex and crack.
Check the Bootstrap Farmer trays on Amazon $66.49
Emsiok Hemp Mats: For 1020 Trays
Natural hemp mats cut to 10 by 20 inches, eight to a pack, made without adhesives. Hemp holds water well, so the seed stays damp without sitting in water, and you can trim it to fit any tray. A mat is a simple thing, so I only judged two specs here: the size and the material. Check the Emsiok mats on Amazon $17.89.
Handy Pantry Daikon Radish Seeds: Seed to Fill Them
Radish makes an easy first crop for a new tray, and it’s ready to cut in 7 to 10 days. Handy Pantry packs this daikon seed by the pound in a resealable pouch, and the listing describes it as certified organic, non-GMO and grown in the US, meant for sprouting and microgreens. Seed bought by weight makes sense here, because a tray is sown thickly, with the seeds touching.
A mixed pack is the other route if you’d like to sample flavors first; the ten-type Survival Garden Seeds pack this guide named at launch was out of stock on Amazon on 16 November 2026. Whatever the packet, I’d sow a small test patch before filling a whole tray. Untreated seed sold for sprouting or microgreens is what you want for any tray, so check the label even on seed you already own. Check the radish seed on Amazon $18.55.
Getting the Best From Any Kit

Whatever you buy, cheap or expensive, the tray needs the same conditions, so here are the figures I recommend for microgreens:
- Sow evenly: seeds touching, never piled.
- Keep it dark and damp for the first 1 to 4 days, until the shoots lift the cover, then uncover and give light.
- Light: 14 hours on and 10 off, about 10 to 12 inches above the tray. A small LED strip covers one tray; the seedling grow light guide compares strips that fit.
- Water and air: keep both at 65 to 75°F (18 to 24°C), humidity at 40 to 60 percent, and a little air moving, for instance with a small clip-on fan. If your apartment runs cold, hydroponics in winter has the fixes.
- Feed lightly, if at all: plain water or EC 0.5 to 1.0 at first, 0.8 to 1.2 once green, never above 1.2, checked with an EC meter.
- Harvest: cut once, just above the mat, at 1.5 to 3 inches tall. Radish is ready in 7 to 10 days, broccoli in 8 to 12, pea shoots and sunflower in 10 to 14.
When a tray fails, it’s usually mold, and microgreens mold vs root hairs covers telling it apart from harmless root hairs and keeping it away. Want to start even smaller? Microgreens in jars needs no tray at all, while the salad topper mixes guide grows several crops for one bowl. The seed to harvest calculator gives the cutting date for each crop, and the pH and nutrient calculator works out a light feed if you use one.
Where these facts come from
Growing figures are the ones in this site’s crop table for microgreens, with their research on the crop sources page. Product details, sizes and materials come from each maker’s Amazon listing, read in October 2026 (the radish seed in November 2026), not from home testing.
One Last Tip
Put the tray where you’ll walk past it every morning. I mean that literally: on the counter by the kettle, not in a cupboard or a corner you never pass. Microgreens move fast, so in the first days the cover needs lifting daily, and later the day they’re ready to cut is easy to miss. They reward attention far more than equipment, and no kit, however clever, makes up for a tray that lives out of sight.
Frequently Asked Questions
What is the best microgreens kit for beginners?
For a first tray, I’d pick a soil-free, self-watering kit such as the ZESTIGREENS, since the tray, insert, blackout lid, hemp mats and seed all come in one box. It’s hard to get wrong. If you’ll grow every week, though, 1020 trays with mats work out cheaper per tray.
Do microgreens kits need soil?
No. Hemp, jute or coco mats work fine, and so does a mesh insert over water, because the water wicks up from below. Soil discs work too, but they’re messier and harder to reuse.
What is a 1020 tray?
It’s the standard growing tray, about 10 by 20 inches, that professional growers use. Because mats, inserts and covers from different brands all fit it, anything built around 1020 trays is easy to refill and expand. Go thick if you’ll use it weekly, since thick trays last for years.
How long do microgreens take to grow in a kit?
Usually 7 to 14 days. Radish is the quickest at 7 to 10, broccoli takes 8 to 12, and pea shoots and sunflower need 10 to 14. The seeds sprout in 1 to 4 days under a dark cover, then want light until you cut them at 1.5 to 3 inches.
Do microgreens kits need a grow light?
Not always. A bright window can do it in summer, but in winter or a dim room I’d use one, because the greens come out sturdier and greener. A small LED strip covers one tray at 10 to 12 inches, on for 14 hours and off for 10.
Why do my microgreens get moldy?
The usual suspects are thick sowing, humidity over 60 percent, still air and a soggy mat. Sow evenly, water from below, air the cover daily while it’s on and keep a little air moving. Fuzz that sits only on the roots isn’t mold at all; it’s root hairs.
Can you reuse a microgreens tray?
The tray, yes. The mat, no. Compost the mat and roots after harvest and wash the tray before the next sowing. A thick, food-safe tray will last years of weekly use, while a thin one cracks much sooner.
What seed should I use for microgreens?
Untreated seed sold for sprouting or microgreens. Try a variety pack first, then buy your favorites in bulk, because bulk seed costs much less per tray. I’d start with radish or broccoli, since they’re the easiest.
Do microgreens need nutrients?
Barely. Plain water or EC 0.5 to 1.0 is fine for the first days, then 0.8 to 1.2 once they’re green. I’d never go past 1.2, because a strong feed on a crop this short gives limp stems and burnt edges rather than bigger greens.
Is a microgreens kit a good gift?
A really good one, especially a complete soil-free kit that looks nice on a counter. The first harvest comes within a week or two and needs no experience. I’d tuck in a bulk seed pack too, so they can keep going after the first tray.


