

⏳ 20 min read · Last updated: October 2026
Disclosure: As an Amazon Associate I earn from qualifying purchases. This post contains affiliate links. If you purchase through these links, then I may earn a small commission at no extra cost to you. Thank you for supporting Urban Hydro Space!
🌱 Hands-on tested: the KETOTEK pH, EC and temperature meter and the ComSaf 32 oz jars. I have used both in my own grows. 🔎 Research pick: everything else in this post, chosen from published specifications and listings. How I test and choose products.
The best grow lights for low light apartment hydroponics do not have to cost a fortune, and a weak light is the usual suspect when basil struggles. But you do not need a large setup or much cash to give plants what they need. If you are just getting started, my beginner’s guide to apartment hydroponics walks through every piece of equipment alongside the lighting.
Key Takeaways
- For under $50 full-spectrum LED bar lights are your best bet, because they give balanced light for herbs and leafy greens.
- Run 14 hours on, 10 hours off for herbs and leafy greens, then set it once on a cheap outlet timer.
- Position lights 6 to 8 inches above leafy herbs, or instead 4 to 6 inches for oregano and thyme.
- Running costs are trivial. A 20 W light running 14 hours a day costs about $1.26 a month.
- Check your tap water pH before blaming the light. Yellow leaves are usually a pH problem rather than a lighting one.
- No lights yet → start at Choosing the Best Grow Lights Under $50
- Have a light but plants are leggy or burned → jump to Troubleshooting
- Want to see a two-shelf build on this budget → skip to the shelf setup
What $50 Actually Buys You
Enough, as it turns out. A four-pack of 2-foot bars lights a shelf of herbs, and one grow bulb in a lamp you already own rescues a single plant. For a dense 2×2 patch, one small fanless panel does it. None of that is a compromise. In an apartment the limiting factor is almost never the fixture; it is the distance you hang it at and whether it runs on a timer.
Why the Best Grow Lights for Apartment Hydroponics Are Worth Every Dollar
Light is, first of all, the energy source for your plants, since everything else depends on it. Without enough of it, or the right kind, they will struggle although your nutrients and pH may be perfect. So in an apartment with limited natural light, relying on a windowsill alone leads to disappointing results. In fact, basil seedlings on a dim sill stretch themselves thin reaching for sun that is not there.
Most lists of the best hydroponic grow lights open with tent panels that cost several times this budget. A shelf of herbs does not need them.
Understanding PAR and DLI
First, PAR stands for Photosynthetically Active Radiation, since it covers the wavelengths (400 to 700 nanometers) plants use for photosynthesis. In other words, it is not about how bright the light looks to your eyes, although that is what most listings advertise. Instead it is about how much usable energy your plants receive.
DLI, or Daily Light Integral, then measures the total PAR a plant receives across 24 hours. Think of it as a plant’s daily calorie intake from light, since the total across the day is what counts. My guide to PPFD vs PAR vs lumens explains which number actually matters when you are reading a product listing.
For a deeper explanation of PAR and DLI, therefore, the University of Minnesota Extension guide on lighting indoor plants is an excellent reference.
Common Light Problems in Apartments
North-facing windows, shaded balconies, and short winter days all leave plants starving for photons. So the most visible result is legginess: tall, weak stems with sparse leaves as the plant reaches toward a source that is not strong enough. Slow growth and a lack of flowering are other common signs, though they take longer to notice. Meanwhile, my mint would grow but never thrive until I added a dedicated light.
If your windows face north specifically, my north-facing apartment lighting strategy covers the zero-direct-sun case. To dial in nutrients alongside your light setup, meanwhile, use the free pH and nutrient calculator.

Choosing the Best Grow Lights Under $50
For under $50 though, you can get a setup that makes a real difference. However, three main types are worth knowing, each suited to a different situation. So use the free shopping list builder to pull together a complete kit listing lights alongside every other piece you need.
- Best for shelves and trays: Barrina T5 2 ft bars, 4-pack → Check price ★★★★☆
- Single plant on a desk: LED Grow Bulb (E26/E27) → Check price ★★★★☆
- Supplemental light on lower shelves: LED Strip Lights → Check price ★★★☆☆
- One dense 2×2 growing area, fanless: VIPARSPECTRA P700 → Check price ★★★★☆
⭐ Sarah’s Top Pick
Barrina T5 2-Foot Bars, 4-Pack
Best for: Shelves, trays, and multiple plants
★★★★☆ $42.74
Barrina T5 2-Foot Bars, 4-Pack (My Top Pick)

Amazon price right now: $42.74 Prices refresh automatically. Prices are pulled from Amazon and were last checked on 10 October 2026 at 1:41 am. Amazon prices change often, so check the listing before buying.
If I had one shelf to light and a budget under $50, I would buy the Barrina T5 four-pack and stop researching. It is the bar set Amazon shows first when you search for full-spectrum bars, and the listing explains why: four 2-foot bars in black aluminum housings, with 192 LEDs drawing 40 W between them. The 5000K daylight white looks like ordinary light in a kitchen, not the purple glow of a red and blue panel.
Each bar has its own switch, and the connectors chain up to 16 in a row. Clips, cable ties and a magnetic bar with double-sided tape come in the box, so the set mounts under a wire shelf or a kitchen cabinet without tools. About 10 W per bar is modest. I would run all four across one shelf rather than spreading them over two, with the bars 6 to 8 inches over basil and lettuce. For pairing them with a passive system, see my guide to setting up a Kratky lettuce jar.
Two variations, depending on the space. Under a kitchen cabinet, the 1-foot version of the same set (four bars, 20 W in total) fits where 2-foot bars would hang past the edge. And if you only want one bar, APICDOM’s single 2-foot fixture draws 16 W with a 660 nm red boost and links up to four on one cord.
If you want a step up from budget bars, my roundup of the 3 best LED grow lights for countertop hydroponics covers premium picks above this price band.
One Panel Worth Naming: VIPARSPECTRA P700
Everything above is a category rather than a specific model, so here is the one light I would name outright at this budget. The VIPARSPECTRA P700 has usually fit the under-$50 budget (check the current price on Amazon) while behaving like a proper panel rather than a strip.
Two things earn it the slot. It draws 70 real watts and covers a full 2×2 foot footprint in vegetative growth, so one fixture does the work of three or four bar lights. More importantly for an apartment, it is fanless cooled by aluminum heat sinks instead. Most panels in this class have a fan, and a fan running 14 hours a day in a studio is the thing people quietly give up on after a month.
It also has a four-level dimmer, which matters more than it sounds. Seedlings want 10 to 12 inches and low intensity, mature basil wants 6 to 8 inches and full output, and a dimmer lets one fixture do both instead of you moving hardware every two weeks.
LED Grow Bulbs (E26/E27 Socket)

Amazon price right now: $8.99
Already own a lamp with a standard E26 or E27 socket? Then an LED grow bulb is the cheapest real grow light there is. Briignite’s A19 draws 11 W and lists a PPF of 25 µmol/s, which is enough for one basil plant or a jar of mint held close.
If you want a number to plan with, SANSI’s 15 W bulb is the one that publishes it: about 153 µmol/m²/s of PPFD at one foot. Run that for 14 hours and the plant collects roughly 7.7 mol of light a day, about half the 12 to 17 that leafy greens want. That is the honest case against bulbs for anything bigger than one plant. It is also why the bulb belongs 6 to 8 inches from the leaves, not a foot away. My guide on whether a clip-on grow light really works covers the same question for gooseneck fixtures.
Clip-On Gooseneck Lights (One Jar on a Kitchen Counter)
Amazon price right now: $20.99
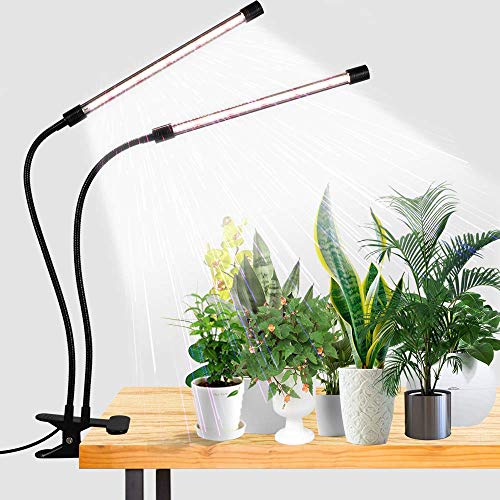
Search Amazon for a grow light for indoor plants and the whole first page is clip-on goosenecks. The GooingTop lamp sits at the top of it: 74 white and 10 red LEDs drawing about 10 W, a gooseneck on a clamp, and power from USB or a wall plug. For one jar on a kitchen counter or a desk it fits better than any bar.
Its built-in timer stops at 12 hours, with 4 and 8 as the other choices. That is two short of the 14 this site runs herbs on, so switch the lamp’s own timer off and run it from an outlet timer.
LED Strip Lights (For Small Spaces)
Amazon price right now: $13.49
Strips go where nothing else fits: the underside of a cabinet, the lip of a shelf, the lower tier of a rack where spinach usually ends up. The DBFAIRY plug-in strip is flexible, cuts to length and sticks to any clean, dry surface, with four brightness levels from 25 to 100%.
Two cautions before you buy. The listing gives no wattage or roll length, so treat a strip as supplemental light for seedlings, microgreens or plants that already get some sun, not as the main source. And its built-in timer offers 3, 9 or 12 hours, so a 14-hour herb shelf still needs an outlet timer. Spinach is different: it runs 12 hours on this site, because 14 pushes it toward bolting, so the strip’s 12-hour setting suits it exactly. My two tier grow shelf height guide covers the clearance math for a lower shelf.
How to Position Your Grow Lights
First, understand that getting the right light is only half the job, because positioning it correctly matters just as much. Too close and you burn your plants. Too far, meanwhile, and they stretch into weak, spindly stems. With LEDs the margin is more forgiving than older, hotter fixtures, though precision still pays. So use the free grow light calculator to get the wattage, PPFD target, and hang height for your shelf size and crop.
Light Height by Plant Type

Above all, watch the plants themselves. Stretching means the light is too far. Crispy or bleached edges on top leaves means it is too close. Move it 1 to 2 inches, then leave it alone for 24 to 48 hours before you touch it again. For height rules by herb, meanwhile, see my guide on grow light distance for hydroponic herbs on a shelf. Lighting crops of different heights from one fixture is its own puzzle, and sharing one grow light between basil, mint and lettuce maps the footprint.
Setting Up a Light Timer
Consistency matters more than intensity for steady growth, because plants respond to routine. A simple mechanical outlet timer or a digital timer costs very little and is non-negotiable for any hydroponic setup. My roundup of the 3 best compact timers for apartment grow lights covers models that fit thick power strips.
If you would rather control it from your phone, a smart plug two-pack costs little more and lets you shift the schedule without unplugging anything. Either way, put the whole setup on a surge protector strip rather than straight into the wall, since lights, a timer and a pump on one outlet is exactly the load that suffers when power flickers back after a cut.

Amazon price right now: $13.99
Most leafy greens and herbs need 14 hours on and 10 hours off. That dark period is not wasted time, since it is when plants process sugars and complete metabolic functions. Fruiting plants like cherry tomatoes run on the same fourteen hours and want a brighter day rather than a longer one. What actually happens overnight is in my guide on why hydroponic herbs need darkness, and the light schedule guide for 9-to-5 growers shows how to fit it around work.
Personally, I run every system on digital timers, so my basil gets its 14 hours whether I am home or not. Setup takes under five minutes and therefore removes the guesswork entirely.
Understanding Light Spectrum
Light is a spectrum, so each color range therefore plays a different role in plant development. Full-spectrum lights are the easiest all-in-one solution for beginners, but understanding what each range does helps you make smarter buying decisions.
Power Consumption and Running Costs
The biggest practical advantage of LED grow lights for apartment growers is efficiency, since the running cost is close to nothing. Because LEDs draw so little power, running costs stay trivial. Here is what that looks like at a typical US rate of $0.15 per kWh on the standard 14-hour schedule.
Monthly Cost Breakdown
Running 3 to 4 LED bar lights for a full apartment setup costs under $6 a month. That is year-round fresh herbs and salads for less than a single grocery trip, and the initial investment pays itself back within the first growing cycle. For a full breakdown by wattage and local rate, see my grow light electricity cost guide.
Why LEDs Beat Older Bulbs
Additionally, older fluorescent tubes draw roughly five times the wattage of a modern LED bar for the same coverage. Beyond the electricity savings, LEDs also run cooler, which means less heat stress in a small apartment and no risk of scorching leaves that drift close to the fixture. In summer that matters more than people expect, as my guide to managing grow light heat explains.
Troubleshooting Common Grow Light Issues
Even with good lights, problems come up eventually. Most are quick to diagnose, though, once you know what to look for.
Leggy Plants
Problem: Plants are tall, thin, and stretched with sparse leaves and weak stems.
Cause: Simply not enough light. The plant reaches for a source that is too far or too dim, so the stems elongate.
Fix: First lower the light to 6 to 8 inches above leafy herbs, or 10 to 12 inches for seedlings. If it is already close, add a second fixture. One bar is often not enough for four basil jars. Leggy stems are the sign, and a second bar usually fixes it within a week. For seedlings specifically, why hydroponic seedlings stay small covers the other causes.
Burnt or Bleached Leaves
Problem: Crispy brown edges or washed-out spots on top leaves, closest to the light.
Cause: Light is too close or too intense. LEDs still cause light stress when the fixture sits too near the canopy.
Fix: Instead raise the light by 2 to 4 inches and monitor for a few days. Nutrient burn looks similar but starts on the older leaves, and how to spot and fix grow light burn walks through telling the two apart.
Algae Growth
Problem: Green slime or film appears on the growing medium, reservoir, or roots.
Cause: Light is reaching your nutrient solution, and algae thrive in light plus moisture.

Fix: Simply block all light from the solution using opaque containers, foil, or black paint. A clear glass jar with a thin foil wrap can turn green within five days, with the basil roots coated, while a jar painted black stays clear. Every other cause is in my algae guide for hydroponic jars.
A Two-Shelf Setup on This Budget
Here is how I would light a two-level shelf with the picks above, and where my own experience starts and stops. I grow in ComSaf 32-ounce jars, and those I can vouch for. The lights are research picks, chosen on their specifications rather than years in my kitchen.

For the frame, use a wire shelving unit. Adjustable shelves matter more than the brand, because you raise the shelf instead of re-hanging the light every time the basil grows.
Top Shelf: Herbs on a 14-Hour Timer
The Barrina four-pack clips or tapes under the shelf above, across its full width. Below it sit Kratky jars of basil and mint with a Kratky lid kit on top, a stand-in while the lids I use are hard to get. The bars hang 6 to 8 inches over the leaves on a 14-hour timer; thyme or oregano would want them closer, at 4 to 6 inches. The jar build itself is in my Kratky jar setup guide.
Lower Shelf: Spinach on Its Own Timer
Spinach gets the bottom shelf, in jars or a small DWC tote, with a second set of bars on a separate outlet timer set to 12 hours, because 14 sits inside its bolting band. Keep its water cool too, 59 to 68°F. A lower shelf away from the warm top tier helps.
Still choosing between jars and a pump? My DWC vs Kratky comparison breaks it down, and the free seed-to-harvest calculator estimates the timeline for each crop. For crop ideas under these lights, see the 7 best herbs for small hydroponics or the foolproof hydroponic basil guide. If you would rather buy a system with the light built in, the 3 best countertop hydroponic systems covers plug-and-play options.
→ University of Minnesota Extension: Lighting for Indoor Plants
→ Penn State Extension: Hydroponic Systems and Plant Nutrition
Essential items to pair with your grow light setup:
- Mechanical Outlet Timer → runs the 14-hour schedule without you touching a switch
- KETOTEK pH, EC and Temp Meter → catches nutrient and pH problems before they show in the leaves
- pH Up and Down Adjustment Kit → nudges the reservoir back into 5.5 to 6.5 when tap water pushes it out
- General Hydroponics MaxiGro Nutrients → a one-part formula that covers basil, lettuce, and mint
Compare meters in my pH meter review and nutrient options in the best nutrients for small systems.
A Word From Sarah
An inexpensive LED bulb screwed into a desk lamp you already own is a real grow light for one basil jar, and that desk lamp is my answer whenever someone tells me they cannot afford to start. The common mistake is assuming the expensive fixture is the missing piece, when what the plant actually needs is any decent light held at the right distance on a consistent timer. Cheap and consistent beats expensive and improvised every time.
Frequently Asked Questions
What are the best grow lights for apartment hydroponics on a budget?
Full-spectrum LED bar lights are the best option for most apartment growers. A four-pack of 2-foot bars, such as the Barrina T5 set at 40 W in total, covers a full shelf of herbs or leafy greens and usually fits under $50. They run cool and need no special wiring. A single grow bulb in an existing lamp is cheaper if you only have one plant.
How far should grow lights be from hydroponic plants?
Keep the light 6 to 8 inches above leafy herbs like basil, mint, and lettuce. Woody herbs such as oregano and thyme prefer 4 to 6 inches. Start seedlings further back at 10 to 12 inches, then lower gradually. Stretching means too far, bleached tips mean too close.
How many hours of light do hydroponic herbs need per day?
Fourteen hours on and ten off, for herbs and leafy greens alike. Cherry tomatoes get the same fourteen hours with brighter light rather than a longer day. Spinach is the exception at 12 hours, because 14 pushes it to bolt.
Do I need a full-spectrum LED for hydroponic herbs?
Yes, full-spectrum is right for most apartment growers. Blue drives vegetative growth, red supports flowering, and white delivers both in balance. Red-and-blue only panels work but are harder to manage and make it difficult to spot early problems in leaf color, since everything looks purple.
Can I use a regular LED bulb as a grow light?
A standard household LED will not provide enough intensity or the right spectrum. You need a bulb labeled as a grow light or full-spectrum plant light, built with the correct color temperature and output. A 9 to 15-watt full-spectrum bulb in an E26 socket, usually under $20, suits a single plant.
How much does it cost to run LED grow lights per month?
A single 20-watt bar running 14 hours daily costs about $1.26 a month at $0.15 per kWh. Two Barrina four-packs, 80 W across a two-tier shelf, run roughly $5.04 monthly. Compared with older fluorescent tubes drawing 100 watts each, LEDs are the obvious choice for any long-term setup.
Why are my plants growing tall and spindly under my grow light?
Spindly growth, called etiolation, means the light is too far or too dim. The plant stretches toward a source it cannot reach. Lower the fixture to 6 to 8 inches above leafy herbs and position it directly overhead. If intensity is still low, add a second bar rather than stretching one across too many plants.
Is a sunny window enough without a grow light?
For part of the year, if the window faces south and nothing shades it. The trouble starts in autumn: from October through March daylight runs short of the 14 hours herbs want, and the glass and screen take up to half of what does arrive. A bar or bulb on a timer that fills the gap is what keeps basil from stalling every winter.
How many bar lights do I need for one shelf?
About 20 watts of bar light covers one tray of leafy greens, roughly two feet by one foot, which is two bars from the Barrina four-pack. For a wider shelf or more than four plants, run two bars side by side rather than raising one higher, since raising it reduces intensity everywhere instead of widening coverage.
What’s better, Mars Hydro or Spider Farmer?
At this budget they are not the same size of light. Spider Farmer’s SF300 draws 32 W from 192 LEDs, while Mars Hydro’s TS600 draws 100 W and lists 190 µmol/s of output; the TS600 usually costs a little more than this guide’s budget. For one shelf of herbs either works, but the TS600 is the closer match to the 70 W P700 above, and my countertop LED roundup compares it in more detail.
What is the best grow light for a small space?
Match the light to the space rather than the plant count. One jar on a desk: a grow bulb in a lamp you already own, or a clip-on gooseneck. Under a kitchen cabinet: a set of 1-foot bars. A whole shelf: a four-pack of 2-foot bars. A small cupboard or tent: one fanless panel such as the P700.
Will a grow light keep me awake in a studio apartment?
Only if it runs into your sleeping hours. Set the 14-hour window to end before bed, for example 7 a.m. to 9 p.m., choose a fanless fixture so there is no hum, and shield the side that faces the bed. My guide to blocking grow light leak in an apartment covers screens and placement.
Can I leave grow lights on 24 hours a day?
No, and it slows growth rather than speeding it. Plants need darkness to process the sugars made during the day, so continuous light stresses them over time and produces pale, rigid foliage. Give them 10 dark hours every night; set an outlet timer once and you can forget about it.
Happy growing! 🌿
Sarah, Urban Hydro Space

Sarah Whitfield is the founder of Urban Hydro Space and an indoor gardening enthusiast dedicated to helping apartment dwellers grow fresh herbs and vegetables in small spaces. She researches hydroponic systems carefully from real specifications and verified buyer feedback, and shares practical tips and honest, clearly labeled product picks to make indoor gardening accessible for beginners.


