

⏳ 19 min read · Last updated: September 2026
Disclosure: As an Amazon Associate, Urban Hydro Space earns from qualifying purchases at no extra cost to you. This post contains affiliate links. Some of the gear here I have grown with myself. The rest I research thoroughly before it earns a place on this page, and I always tell you which is which. Thank you for supporting Urban Hydro Space!
The best countertop hydroponic systems for apartments are the ones that actually fit on a counter. Not the ones that look small in product photos. Buyer reviews are full of the same expensive lesson: someone measures their counter in hand spans instead of inches, orders a nine-pod system on sale, and it overhangs the edge by two inches so the cabinet door underneath will not close. It goes back the same week. These three systems were compared on published dimensions and specs, so here are the picks that hold up, ranked honestly and measured properly.
🌱 Hands-on tested: the KETOTEK pH, EC and temperature meter, the ComSaf wide-mouth mason jars, the Kratky wide-mouth lids and the AeroGarden Harvest (I grew in the standard Harvest, not the Harvest Lite covered here). I have used these in my own grows. 🔎 Research pick: everything else in this post, chosen from published specifications and listings. How I test and choose products.
- Measure your counter with a tape before you order. Every system below therefore lists its real footprint in inches.
- The AeroGarden Harvest is the plug-and-play pick, so nothing is left to guesswork. 6 pods and a built-in light.
- The Click & Grow Smart Garden 3 has no pump, so it makes no sound at all.
- The Kratky Mason Jar Kit is the cheapest way in and needs no electricity, though you handle pH and nutrients yourself.
- Run the AeroGarden, or the separate light over a Kratky jar, 14 hours on and 10 hours off; the Click & Grow follows its own built-in timer. Top off the two smart gardens as their makers direct, with a full reservoir change every 2 weeks; the Kratky jar is sized to last the crop, so let its level fall instead.
Quick Picks
Measure your counter with a tape, then subtract two inches for the cabinet door. Sizes are from the Amazon listings.
🏆 Best overall: AeroGarden Harvest Lite
🔎 Research pick: I grew in the standard Harvest, not this Lite.
- Fits: 11.89 x 7.84 in, 7.4 in tall, and it grows plants up to 12 in, so leave headroom above it.
- Sound and power: a soft pump hum; a 20W light plus the pump.
- Best for: a first harvest with zero guesswork, 6 pods at once.
- Skip if: it would sit on the desk where you take calls.
🛒 Check price on Amazon $74.22
⭐ Quietest: Click & Grow Smart Garden 3
🔎 Research pick.
- Fits: 9 x 4.9 in, 12.5 in tall, and the lamp extends as the plants grow.
- Sound and power: silent, because there is no pump; an 8W light only.
- Best for: quiet rooms and a counter that should look good.
- Skip if: three plants will feel small, or you would rather not buy its pods.
🛒 Check price on Amazon $124.95
💸 Cheapest: Kratky Mason Jar Kit
🔎 Research pick: the Kratky lids I grew with are out of stock, and this kit is the closest in stock.
- Fits: one wide-mouth jar per plant, 3.38 x 3.38 in per lid, 6 lids in the kit.
- Sound and power: silent and unplugged, but the jars need a separate grow light.
- Best for: the lowest cost, and learning pH and nutrients for real.
- Skip if: you want reminders and a timer, since you check pH and EC yourself.
🛒 Check price on Amazon $14.99
Every spec side by side is in the comparison table below. Prices are pulled from Amazon and were last checked on 9 October 2026 at 11:35 pm. Amazon prices change often, so check the listing before buying.
Why Countertop Hydroponic Systems Work So Well for Small Apartments
Think of it like this. Soil gardening outdoors is cooking a full meal from scratch every night. In contrast, a countertop hydroponic system is meal prep. You do the setup once, then keep it topped up while the box handles the schedule. As a result you get real food in a fraction of the space, and you get it without a balcony.
There is a second reason these work indoors, and it matters more than people expect. Because the roots sit in oxygenated water rather than soil, the plant spends almost nothing on root expansion and puts that energy into leaves instead. That is why a countertop basil plant outruns the same seed in a pot on the same windowsill.
What to Look For Before You Buy
Before getting to the picks, here is what separates a system you keep from one you resell:
- Footprint. Measure with a tape rather than your eyes. Then subtract two inches for the cabinet door.
- Noise. A pump hum is nothing in a kitchen. However, it is something else entirely on a desk during a client call.
- Pod count. More pods sounds better. In practice, three plants you actually harvest beat six you forget about.
- Running cost. The sticker price is the small number, though. Therefore check what a refill pod kit costs before you commit, because that is the recurring one, or plan to refill the pods with your own seeds and nutrients.
If you want the bigger picture of how systems, lights, nutrients, and crops fit together in a small space, the complete apartment hydroponics beginners guide is the place to start. For the problems beginners hit first, the guide on why hydroponic plants turn yellow covers the fixes. And if you are still weighing a countertop kit against a DIY jar build, my comparison of DWC vs Kratky for apartment beginners breaks down which suits your space and budget.
Side-by-Side Comparison of the Best Countertop Hydroponic Systems
This is the comparison table that is hard to find when you are shopping. Every number that changes the decision, so you can stop opening tabs.
⭐ Sarah’s Top Pick for 2026
AeroGarden Harvest
6 pods, a 20W LED, a timer that runs itself, and everything else in the box. The shortest path from unboxing to cutting basil.
Amazon price right now: $74.22 Prices are pulled from Amazon and were last checked on 9 October 2026 at 11:35 pm. Amazon prices change often, so check the listing before buying.
On a tight budget? The Kratky Mason Jar Kit is the cheapest way to get started.
The 3 Best Countertop Hydroponic Systems for Apartment Beginners
1. AeroGarden Harvest: Best Overall
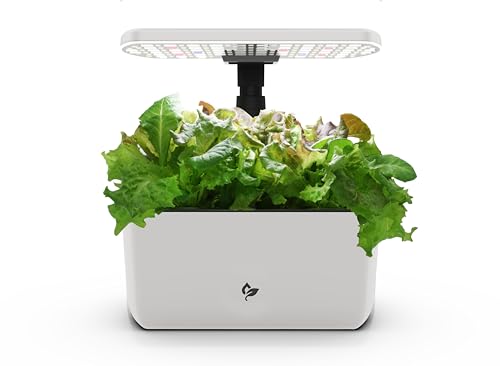
Best for: First-timers who want results without a learning curve | ⭐
The AeroGarden Harvest is the system I would hand to someone who has never done this and say, “just follow the panel.” It works. Consistently. Yet it asks almost nothing from you in return.
I grow in the standard Harvest, and it is still where my basil and mint come from. The first batch gave me leaves worth picking at about three weeks and a real cutting harvest at four, which is roughly what the crop guides predict, but it felt fast after two failed attempts in soil. The light is also strong enough to carry a plant through winter in my north-facing kitchen. For rooms with even less daylight, see the best grow lights for low-light apartments under $50. If you are weighing the brand itself rather than this specific model, my longer review of whether an AeroGarden is still worth buying in 2026 goes into the pod economics.
AeroGarden Harvest Specs and Setup
The unit runs a 20-watt full-spectrum LED on a timer, though you only set that once. Set it to 14 hours on and 10 hours off, which is the schedule every herb and leafy green on this site runs. It holds 6 seed pods too, so basil, mint, chives, and parsley can all go at once. The panel tells you when to add water and nutrients, so there is nothing to remember. The footprint is 11.89 x 7.84 inches and Amazon lists it at 7.4 inches tall, with room for plants up to 12 inches, so picture a drip coffee maker.
Setup takes about 15 minutes. First fill the reservoir, because nothing seats properly in a dry tank, then add the nutrient dose and drop in the pods. Then plug it in and set the timer. After that you are mostly just harvesting. Use the seed to harvest calculator to see when each pod comes due, and if you are moving your own seedlings in rather than using pods, read when to transplant seedlings into a countertop system first.
AeroGarden Harvest Pros and Cons
For feeding schedules that pair with any countertop unit, the beginner hydroponic nutrients guide for small apartment systems covers the mixing side.
So this is the most practical entry point for someone who wants a harvest before they want a hobby. It is also the one I recommend to family.
Amazon price right now: $74.22
2. Click & Grow Smart Garden 3: Best Premium Pick

Best for: Quiet rooms, small counters, and anyone who cares how it looks | ⭐
At first glance it looks like a decorative object. White casing, almost no branding, one slim arm arcing over three pods. It belongs in a Scandinavian home goods catalog. It is certainly the priciest thing here. However the premium buys two specific things, and both of them matter in an apartment: build quality and silence.
Passive wicking with no pump can look like a corner being cut. It is not: wicking keeps the roots supplied without moving parts, and the missing pump is exactly what makes it silent.
How the Silent Wicking System Works
The Smart Garden 3 has no water pump. It runs on passive capillary wicking. The medium in each pod pulls moisture up from the reservoir by absorption, the same way a paper towel climbs a wet countertop. No motor, no impeller, no moving parts. So there is nothing to make a sound, and nothing to fail in year three either.
It also holds 3 pods in a 9 x 4.9 inch footprint. That is narrow enough for a windowsill or the strip of counter beside the sink, where the AeroGarden simply will not go. For the lighting side of a small setup, the guide to the best LED grow lights for apartment countertop hydroponics covers panels you can add. If you are torn between the two brands specifically, I put them head to head in AeroGarden vs Gardyn vs Click and Grow.
Because of that, this is the one for renters who care what their kitchen looks like and want something that feels considered every time they walk past. It also makes the best gift on this list by a wide margin, since it arrives looking like a present rather than an appliance.
Amazon price right now: $124.95
3. Kratky Mason Jar Kit: Best Budget Pick

Best for: Skeptics, tinkerers, and anyone who wants to understand what is happening
A Kratky mason jar on a windowsill is where many people start, and yellowing basil is the usual first puzzle. Tap water running at pH 7.8 is the typical cause: the nutrients are in the jar the whole time, but at that pH the plant cannot take up iron, so the leaves yellow while more food goes in. Bring it into the 5.5 to 6.5 range and growth takes off. Watching roots hang in clear water with no soil at all is what turns this from an experiment into a habit.
Get your starting numbers from the free pH and nutrient calculator before you fill anything. Then you need a way to confirm them, because guessing is the most common mistake. My picks are in the best pH meters for hydroponic beginners and the best EC and TDS meters for small reservoirs. A jar is small enough that being 0.5 pH out shows up in a week, so there is nowhere to hide.
How the Kratky Method Works
Kratky is passive hydroponics. No electricity, no pump, no moving parts. First you fill a mason jar with nutrient solution, though you should mix and pH it in a jug beforehand. Then you seat a net cup holding your seedling in the lid so the roots just touch the water, and you walk away. That really is the whole system. For the full build, see how to set up a Kratky lettuce jar on a sunny windowsill and check the best mason jar net cups and lids so the parts actually fit together.
Meanwhile the plant drinks the level down, and an air gap opens between the water and the net cup. Roots growing into that gap turn into air roots that pull oxygen straight from the atmosphere. So the plant feeds itself and you do almost nothing after day one. Each lid insert is 3.38 x 3.38 inches and the kit ships 6 lids so six plants from one small kit.
Kratky Kit: Pros, Cons, and Your First Grow
Grow one head of lettuce first. Watch it work. Once you have seen roots fill a jar and leaves push out with no soil and no plug in the wall, you will understand why people fall into this hobby. Then upgrade knowing what you are paying for.
Amazon price right now: $14.99
What You’ll Also Need for the Kratky Kit
The lid kit is only the hardware. Get these before your first grow:
- KETOTEK pH + EC + Temp meter: all three readings in one pen. Buy this one first, because everything else depends on knowing your numbers
- Wide-mouth mason jars: 32 oz for herbs, 64 oz for lettuce
- GH MaxiGro nutrients: the simplest one-part formula for beginners
- pH Up and Down kit: tap water almost always lands too alkaline at pH 7.0 to 8.0
- Rockwool cubes: germinate here, then move the whole cube into the net cup
- Blackout jar sleeves: fits 32 oz wide-mouth jars, tidier than foil and reusable
Use the free shopping list builder to price a complete, budget-matched kit in one click.
The 4 Numbers Every Countertop Hydroponic System Runs On
Whichever box you buy, the plants inside it want the same four things. The expensive units automate some of these for you. None of them automate all four.

The AeroGarden handles the light schedule and prompts you on the rest. Click & Grow handles the light and the feeding, since the pods come pre-dosed. Meanwhile the Kratky jar hands you all four, which is precisely why it teaches you more. For the water side in detail, my guide on how often to change hydroponic water gives the exact schedule for each system type here.
- Best for beginners: AeroGarden Harvest. Plug-and-play, 6 pods, automated prompts.
- Best for quiet and looks: Click & Grow Smart Garden 3. No pump, and Scandinavian design.
- Best for learning on a budget: Kratky Mason Jar Kit. The cheapest start, no electricity, teaches you the real thing.
🛒 Free tool
Not sure what to buy first?
Answer three questions (what you want to grow, your experience and your budget) and the shopping list builder splits your kit into what to buy first and what can wait.
How to Pick the Right Countertop Hydroponic System for Your Situation
I will make this simple. Answer one question: what is the biggest constraint you are actually working with?
- You want results and no learning curve → AeroGarden Harvest
- Counter space is tight, or the room has to stay silent → Click & Grow Smart Garden 3
- You want to test the idea before spending real money → Kratky Mason Jar Kit
There is no wrong answer among the three. Every one of them ends with food on your counter. However, there is a wrong move, and it is spending another two weeks reading comparison posts instead of starting one.
Most people who get into indoor growing say the same thing afterwards: they wish they had started sooner. For a first crop, the guide on growing hydroponic basil in a small apartment pairs with any system here. And before you commit to a spot on the counter, the grow light calculator will tell you the PPFD that corner can actually deliver.
→ University of New Hampshire Extension: Hydroponics at Home
A Word From Sarah
The habit to avoid with an AeroGarden is treating its reminder light as the schedule rather than a backup. Skip a day because the plants look fine, then skip another, and by week three basil stems can go woody at the base while growth simply stops. A 6-pod unit with mature plants in it can drop the water level below the pump intake in a single warm day. The reminder fires on a timer. Your basil does not. So I top off every morning while the kettle boils, and the plants never go short.
The Click & Grow is the research pick for anyone who wants silence. Passive wicking sounds like a downgrade, but it suits herbs well, and with no pump there is simply nothing to hear on a work call. The pre-dosed pods also mean a long weekend away takes no arithmetic first. If you want to understand why the ten dark hours matter as much as the fourteen lit ones, the post on why the dark period matters for hydroponic herbs explains the whole cycle.
Frequently Asked Questions
Is a countertop system a good hydroponic starter kit?
For most beginners, yes. A countertop system is the most complete starter kit you can buy, because the light, pump, reservoir and seed pods arrive together and the prompts tell you when to add water and nutrients. If you would rather learn the method for less money, a Kratky mason jar kit is the cheaper start, but you mix nutrients and test pH yourself.
How noisy are hydroponic systems if I work from home?
Most countertop systems are either silent or produce a soft pump hum that disappears into normal apartment noise. The AeroGarden Harvest hums quietly, and you will notice it in a very still room. Meanwhile the Click & Grow Smart Garden 3 and the Kratky jar kit make no sound at all, since neither one has a motor. For quieting a DWC pump, see my guide on fixing a noisy hydroponic pump.
How much ongoing maintenance do these systems need each week?
Check the water level daily and top off as your system’s instructions require. Budget a few minutes each week to inspect the plants and wipe up splashes. For a small mixed-nutrient reservoir, this site’s routine is a full solution change every 2 weeks; follow the kit maker’s directions where its pod system differs. See how to clean a small system without flooding your kitchen.
How much will a countertop hydroponic system add to my electricity bill?
Very little. At 14 hours per day the AeroGarden Harvest runs a 20W LED plus a small pump, which works out to roughly $2 to $4 a month. Meanwhile the Click & Grow runs a small LED only, so it costs even less. A Kratky jar kit uses no electricity whatsoever. None of these will show up as a noticeable line on an apartment bill. To check yours at your own electricity rate, with pods and nutrients included, use the free running cost calculator.
Do I need a pH or EC meter with a countertop system?
It depends on the pods. Pre-seeded pods from Click & Grow and AeroGarden arrive dosed, so you can skip a meter at first. However, the moment you switch to blank pods, your own seeds, or a Kratky jar, you are mixing nutrients yourself and a meter stops being optional. Keep pH between 5.5 and 6.5. My picks are in the best pH meters for beginners and the best EC and TDS meters for small reservoirs or grab the KETOTEK combo pen that reads both.
Can I use my own seeds instead of buying proprietary pods?
Yes, and it is where the real savings live, since a pod refill kit often costs a third of the machine. Buy blank grow sponges or rockwool cubes that match your basket size, germinate your own seed, then drop the cube in. Because you are now mixing nutrients yourself, you also need a one-part formula like MaxiGro and a way to read pH. Otherwise you are back to guessing, which is where most first grows go wrong.
Which countertop hydroponic system is best for an absolute beginner?
The AeroGarden Harvest. It runs the light schedule for you, prompts you when water and nutrients are due, and ships with everything in one box. If you have never grown anything hydroponically, it removes the guesswork and gets you to a first cutting in roughly 3 to 4 weeks.
AeroGarden vs Click & Grow: which is better for apartment growing?
Both are good, but they solve different problems. The AeroGarden Harvest gives you 6 pods, a raising light arm, and automated prompts, so it scales further and stays more hands-on. The Click & Grow Smart Garden 3 is smaller, has no pump, and uses pre-dosed pods that never need mixing, which suits a desk or a quiet room. Choose the AeroGarden for a bigger harvest. Choose the Click & Grow for a set-and-forget planter on a narrow shelf.
What is the easiest hydroponic system for beginners?
A small countertop kit with its own light is convenient if your apartment lacks a bright window. A covered Kratky jar is simpler mechanically and quieter, but you must supply suitable light and mix nutrients yourself. Pick the setup whose weekly checks you will actually do.
What is the best hydroponic setup for a beginner?
Start with one small reservoir, one easy crop such as lettuce or basil, a stable tray and enough light. A compact kit packages those parts; a Kratky jar lets you build them separately. Put the system where you can see the water level and reach an outlet safely if it uses power.
What is a good hydroponic kit for beginners?
Look for a stable reservoir, a light sized for the growing area, clear replacement-pod or net-cup availability, and instructions you can follow. Check its actual dimensions and whether it uses a pump before buying. The best kit for a dark kitchen differs from the best option for a quiet bedroom.
What are the 5 disadvantages of hydroponics?
For an apartment kit, plan for five possible costs: counter space, a grow light and its electricity, recurring nutrients or pods, water checks, and spill or pump-noise management. A pump-free jar avoids the noise but still needs light and attention to its water level. None of these makes the method unsuitable; they help you choose a manageable size.
Happy growing! 🌿
Sarah, Urban Hydro Space

Sarah Whitfield is the founder of Urban Hydro Space and an indoor gardening enthusiast dedicated to helping apartment dwellers grow fresh herbs and vegetables in small spaces. She researches hydroponic systems carefully from real specifications and verified buyer feedback, and shares practical tips and honest, clearly labeled product picks to make indoor gardening accessible for beginners.


