⏳ 16 min read · Last updated: April 2026
Figuring out exactly when to transplant hydroponic seedlings usually means the difference between a thriving countertop garden and weak, stunted plants. When I lived in my first tiny studio apartment, I moved my basil sprouts into my new system after just five days. Because of this early transfer, the tiny taproots could not reach the water reservoir. The delicate plants dried out over a single weekend, and that failure cost me two weeks of growing time.
That frustrating mistake taught me to watch the plant itself rather than relying on a calendar. Young sprouts need time in a humid nursery environment to build strength before moving to a high-light, deep-water setup. If you move them too quickly, they suffer from sudden environmental shock. However, waiting too long causes the roots to tangle in the nursery tray. If you are new to indoor growing altogether, the complete apartment hydroponics guide for beginners covers the full setup process before you reach the transplant stage.
Today, I will show you the exact visual cues your plants give you when they are ready for the big move. We will also cover how to adjust your nutrients so the young roots adapt safely. By following these steps, you can set your apartment garden up for a healthy harvest without the usual beginner stress.
- Wait until plants grow 3 to 4 true leaves before moving them.
- Ensure visible roots are at least 1 to 2 inches long beneath the plug.
- Start with nutrients mixed at exactly one quarter strength to prevent root burn.
- Keep your grow lights a safe 12 to 14 inches above new transplants for the first week.
- Do a full reservoir drain and refill every 2 weeks once the plant is established.
- Impatient for fast green growth → lettuce (ready in 10 to 14 days)
- Warm apartment → basil (thrives in heat, forgiving roots)
- Cool and drafty kitchen → mint (handles cooler temps well)
- Slowest to sprout but worth the wait → parsley
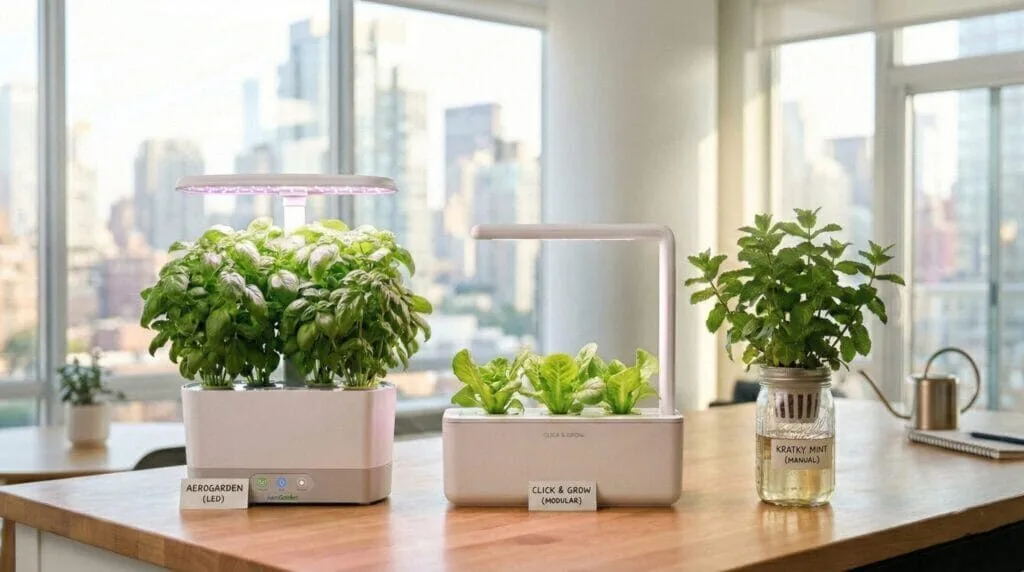
- The Golden Rules of When To Transplant Hydroponic Seedlings
- Preparing Your Countertop System for the Big Move
- Step-by-Step: How to Transplant Hydroponic Seedlings
- Troubleshooting Shock When You Transplant Hydroponic Seedlings
- Common Mistakes Beginners Make Timing the Transfer
- A Word From Sarah
- Frequently Asked Questions
🌿 The Golden Rules of When To Transplant Hydroponic Seedlings
Many new growers ask for a specific date to mark on their calendar. The problem is that plants do not own watches. Depending on the ambient temperature in your apartment, a basil seed might be ready in twelve days or it might take twenty. Patience plays a massive role in successful indoor gardening, and learning to read the physical signs of maturity prevents early plant decline.
📏 Checking the True Leaves Count
When a seed first opens, it produces two smooth, rounded leaves called cotyledons. These are temporary energy stores, not actual foliage. You should never transplant based on these initial sprouts alone. Instead, wait for the secondary foliage to develop fully.
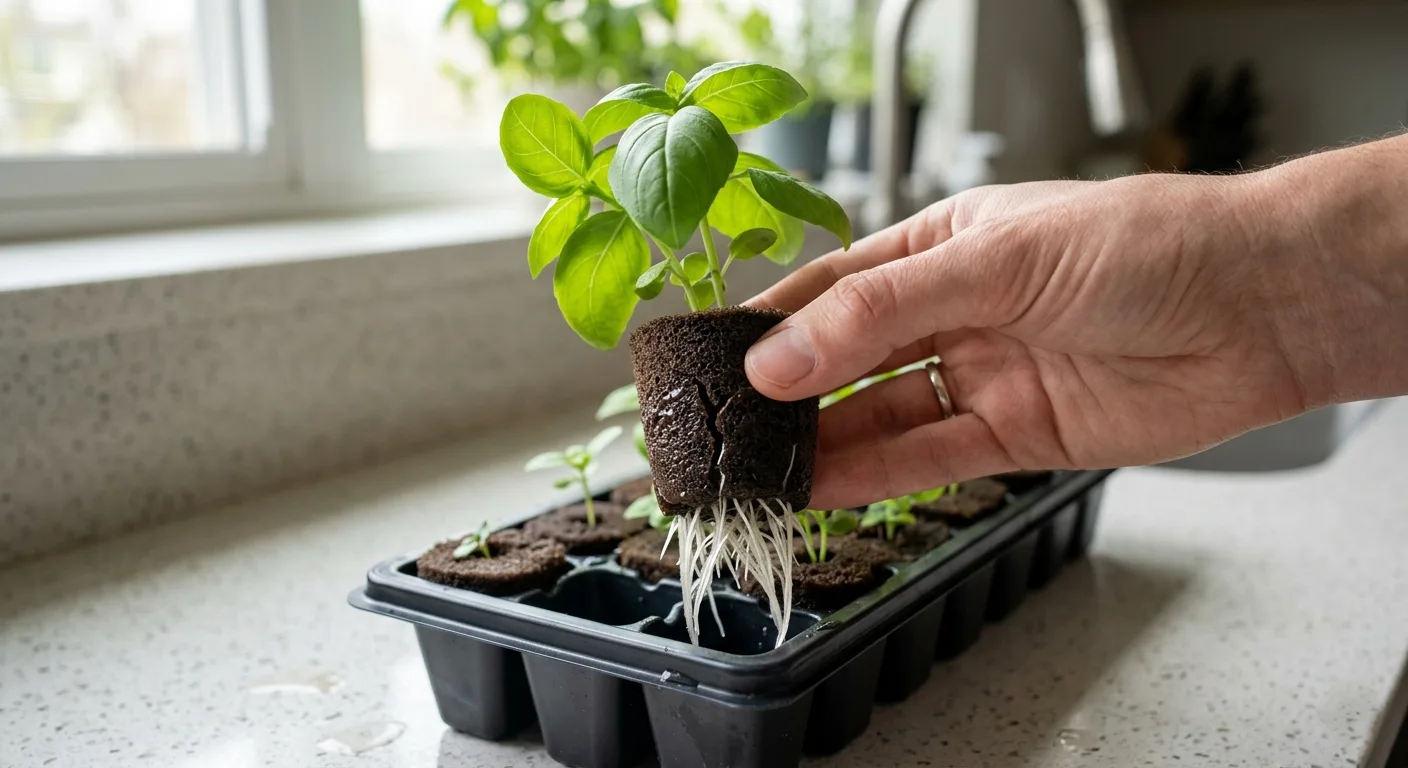
True leaves look like miniature versions of the adult plant. Basil, for example, will show its distinct textured, pointed leaves. Wait until you can count 3 to 4 true leaves on the main stem. This mature foliage ensures the plant can process the stronger light from your countertop system. If you move a plant before true leaves form, it lacks the chlorophyll needed to handle bright LED panels. I have lost entire trays of delicate herbs because I rushed this specific stage.
🪴 Inspecting the Root Development
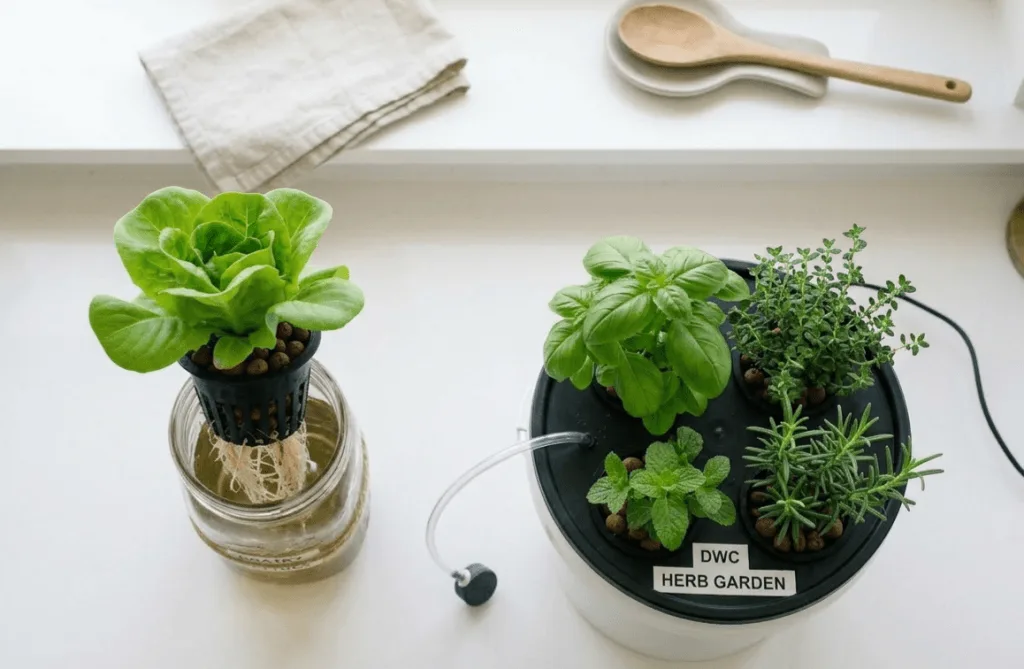
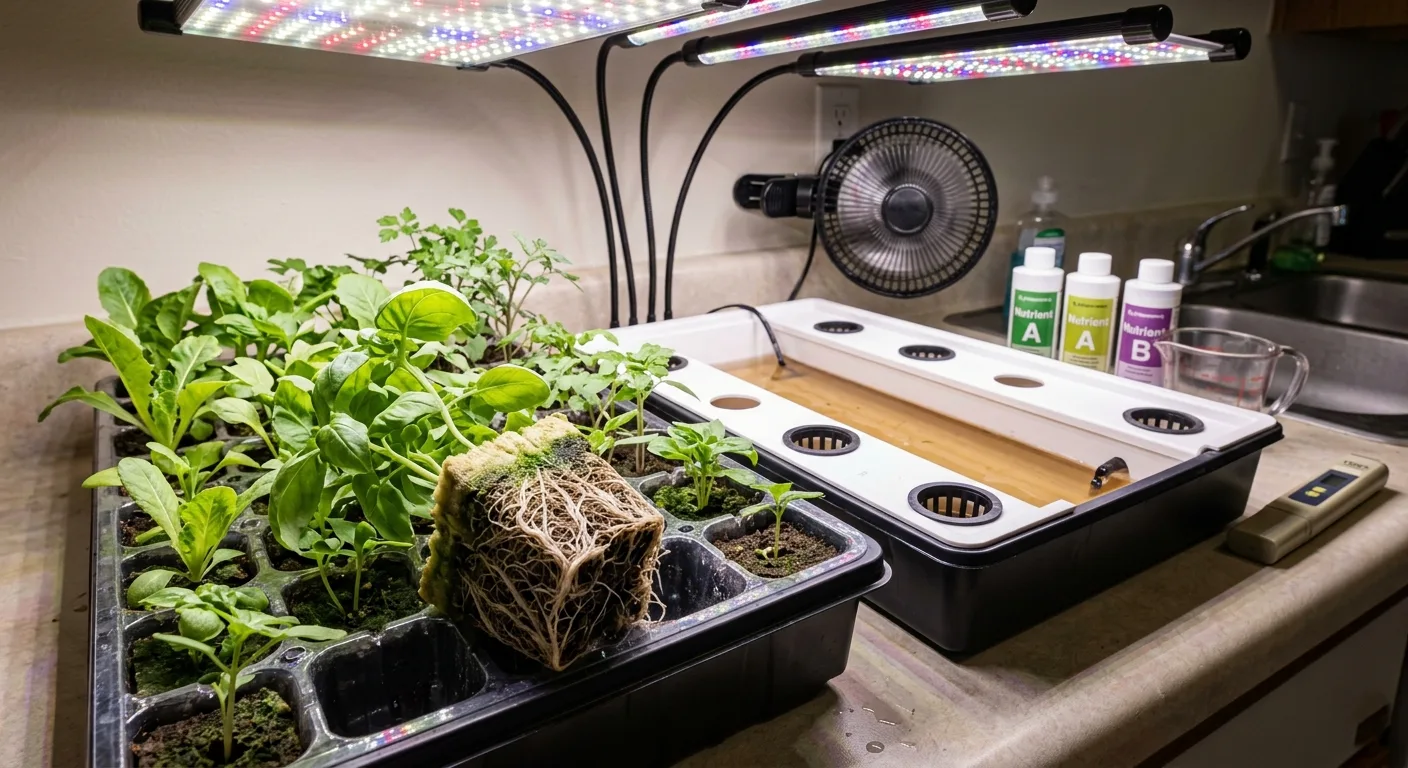
Top growth is only half the story in any apartment garden. The root structure determines if the young plant can survive in an active reservoir. Lift the grow sponge from the nursery tray gently to check underneath.
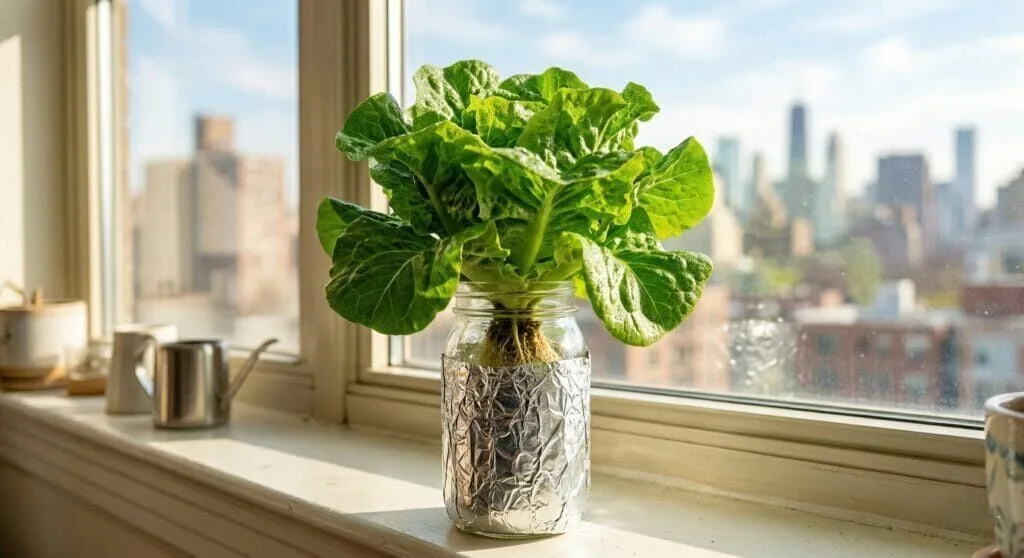
You want to see bright white roots poking through the bottom of the medium. Aim for 1 to 2 inches of roots hanging freely. If the roots barely peek out, they will not reach the water line in your permanent setup. For passive setups like the Kratky method, strong downward root growth is even more critical. Since there is no water pump splashing moisture upward, the taproot must physically touch the standing water. The full Kratky jar setup guide walks through exactly how to position the roots at the right depth for this method.
⏳ The Typical Timeline for Apartment Gardens
Timelines vary depending on the temperature of your kitchen or living room. Seeds sprout faster in warm, humid spaces. Conversely, a drafty apartment window slows down metabolic processes. Most fast-growing greens take about two weeks to reach an acceptable transplant size. Woody herbs like thyme and rosemary often require three to four weeks. Checking the physical leaves and roots is always safer than following a strict calendar. Use the seed to harvest countdown calculator to set a monitoring reminder based on your sow date, then adjust based on what you actually see.
🎋 Assessing Stem Thickness Before Moving
Beyond leaves and roots, stem thickness tells you a lot about a plant’s health. A frail, stringy stem indicates the plant is stretching toward a distant light source. If you move a weak stem into a net cup filled with heavy clay pebbles, it will snap. You want stems that look plump and sturdy, supporting the weight of the top leaves without bending sideways.
🛠️ Preparing Your Countertop System for the Big Move
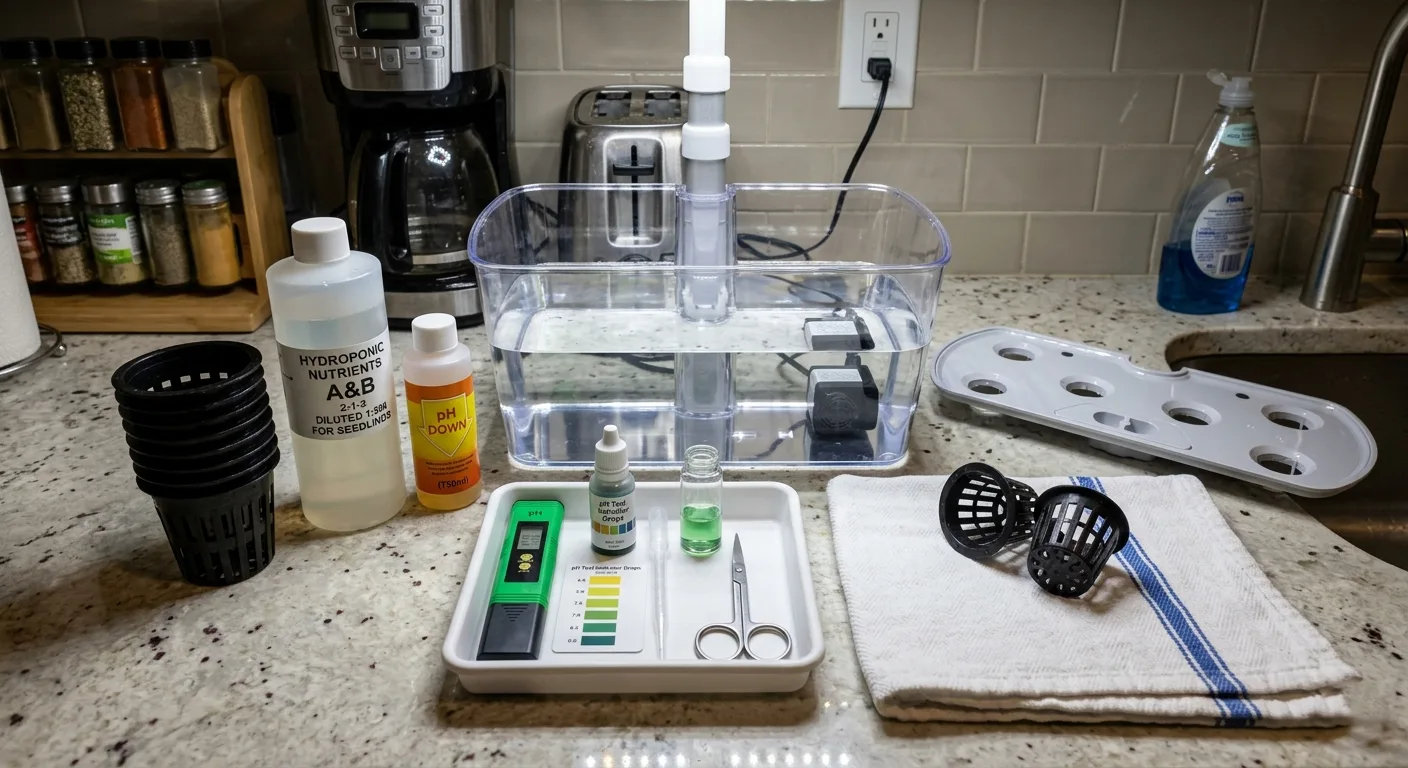
Before you lift a single delicate sponge, your new environment must be ready. Moving fragile sprouts into a dry or unadjusted system invites instant root shock. I treat moving day like setting up a nursery for a newborn. Everything needs to be calibrated before the plants arrive. If you are scrambling to mix nutrients while bare roots are exposed to dry air, the plants will suffer.
Use the hydroponic shopping list builder to confirm you have all the equipment on hand before transplant day. Running out of pH adjuster mid-process is one of the most common reasons beginners stress their transplants unnecessarily.
💧 Mixing the First Nutrient Batch Safely
Adult plants handle heavy feeding, but baby roots burn in strong solutions. You must dilute your liquid plant food for the first week. Start by mixing one quarter strength nutrients into your filtered tap water. This light feeding prevents toxic salt buildup on fresh tissue. If you follow a simple feeding schedule for small apartment systems, stick to the mildest vegetative ratio for the first week. For early vegetative growth, you need a solution rich in nitrogen to promote leaf expansion.
| Measurement | Target for Seedlings |
|---|---|
| pH Level | pH 5.5 to 6.5 |
| Electrical Conductivity (EC) | EC 0.6 to 0.8 (quarter strength) |
| Water Temperature | 65 to 72°F (18 to 22°C) |
Use the free pH and nutrient calculator to dial in the right volumes for your exact reservoir size before the seedlings go in. Getting this right on day one prevents the pH swings that cause nutrient lockout in young roots.
🔆 Setting the Right Grow Light Distance
Countertop LEDs are powerful, and placing them too close crisps tender leaves. Adjust your panel to sit at least 12 to 14 inches above the top of the young foliage for the first week. As the plant establishes, gradually lower the light toward the standard 6 to 8 inch distance for mature herbs. The grow light calculator helps you match your panel wattage to the correct height for your shelf size. Run the timer for exactly 14 hours of light, 10 hours off per day from day one. If you struggle with manual switching, the guide on the easiest light schedule for apartment hydroponics shows how to automate the whole cycle around your workday.
🌡️ Balancing Water Temperature and pH
Cold tap water shocks plant tissue. Let your filled reservoir sit overnight to reach room temperature before inserting any net cups. Aim for a water temperature of 65 to 72°F (18 to 22°C) for optimal oxygen absorption. If your apartment runs warm and the reservoir feels hot to the touch, the guide on small hydroponic system temperature problems and fixes covers several practical cooling methods.
Next, use your liquid test kit to check the acidity. If the water is too alkaline, the young plant experiences nutrient lockout and starves even in a fresh reservoir. Adjust the balance drop by drop until you hit a steady pH 6.0, which is the sweet spot for most leafy greens and herbs. If your pH keeps drifting back up after adjustment, the guide on why hydroponic pH keeps drifting in small systems explains the most common causes and how to stabilize it.
🧽 Sanitizing the Reservoir Beforehand
Never move clean, vulnerable seedlings into a dusty or unwashed tank. Even brand-new countertop kits often have manufacturing dust inside the reservoir that can harbor bacteria and attack fresh root tissue. Wipe the inside of the basin with a mild solution of warm water and a few drops of dish soap. Rinse it completely until no bubbles remain. If your water source is tap water, the guide on using tap water for hydroponics explains how to treat chloramine and hard minerals before your first fill.
🔊 Managing Water and Air Pumps
If your system relies on active circulation, test the hardware before the plants go in. Turn on your water pump to ensure the liquid is reaching the grow deck properly. Check that your air pump is delivering a steady stream of small bubbles from the airstone. Pumps can vibrate loudly against hard kitchen counters. To keep your living space peaceful, rest the system on a thin neoprene mat or folded towel. This simple trick will quiet a noisy hydroponic pump without compromising the oxygen flow your new roots need.
🏵️ Step-by-Step: How to Transplant Hydroponic Seedlings
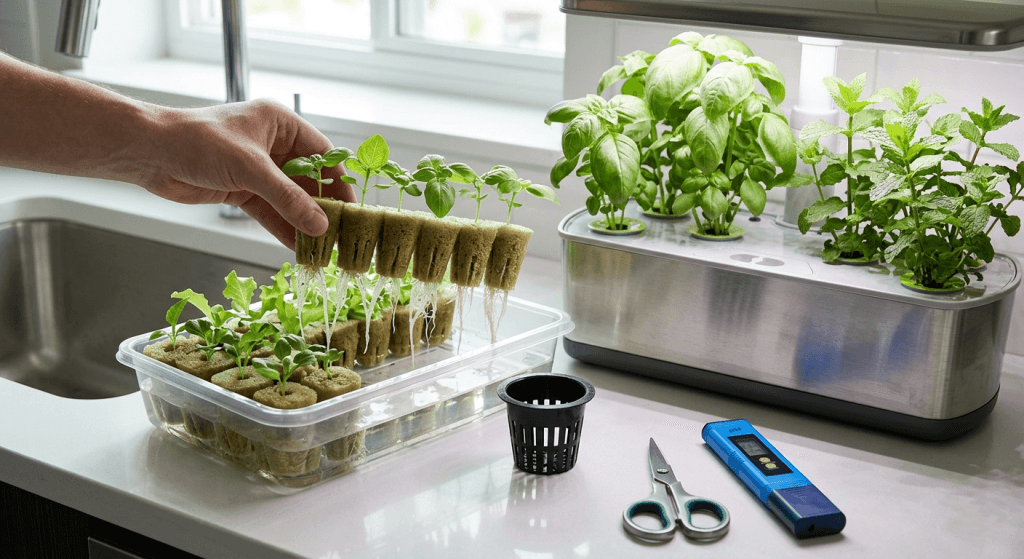
Once your countertop setup is fully prepped, it is time to make the physical move. Handling the sprouts correctly prevents broken stems and damaged roots. Gather a pair of clean scissors, your net cups, and a small towel to catch drips. If you are growing hydroponic lettuce in a countertop system, you need to be especially careful. Lettuce stems snap under pressure. Ensure your hands are washed and free of any household cleaners or lotions before touching the root mass.
✂️ Thinning Out the Weaker Sprouts
Beginners often plant two or three seeds per sponge to guarantee germination. If multiple seeds sprout, you must remove the extras. Leaving them all creates fierce competition for light, water, and space inside the small net cup.
- Identify the thickest, tallest sprout with the largest leaves.
- Take sterilized scissors and snip the weaker stems right at the base.
- Do not pull or yank the extra sprouts, as this tears the shared root system hidden below.
- Discard the snipped greens into your kitchen compost bin.
A single, strong plant will always yield a much larger harvest than three cramped, competing sprouts. Be brave and make the cut.
🧱 Handling Rockwool and Grow Sponges
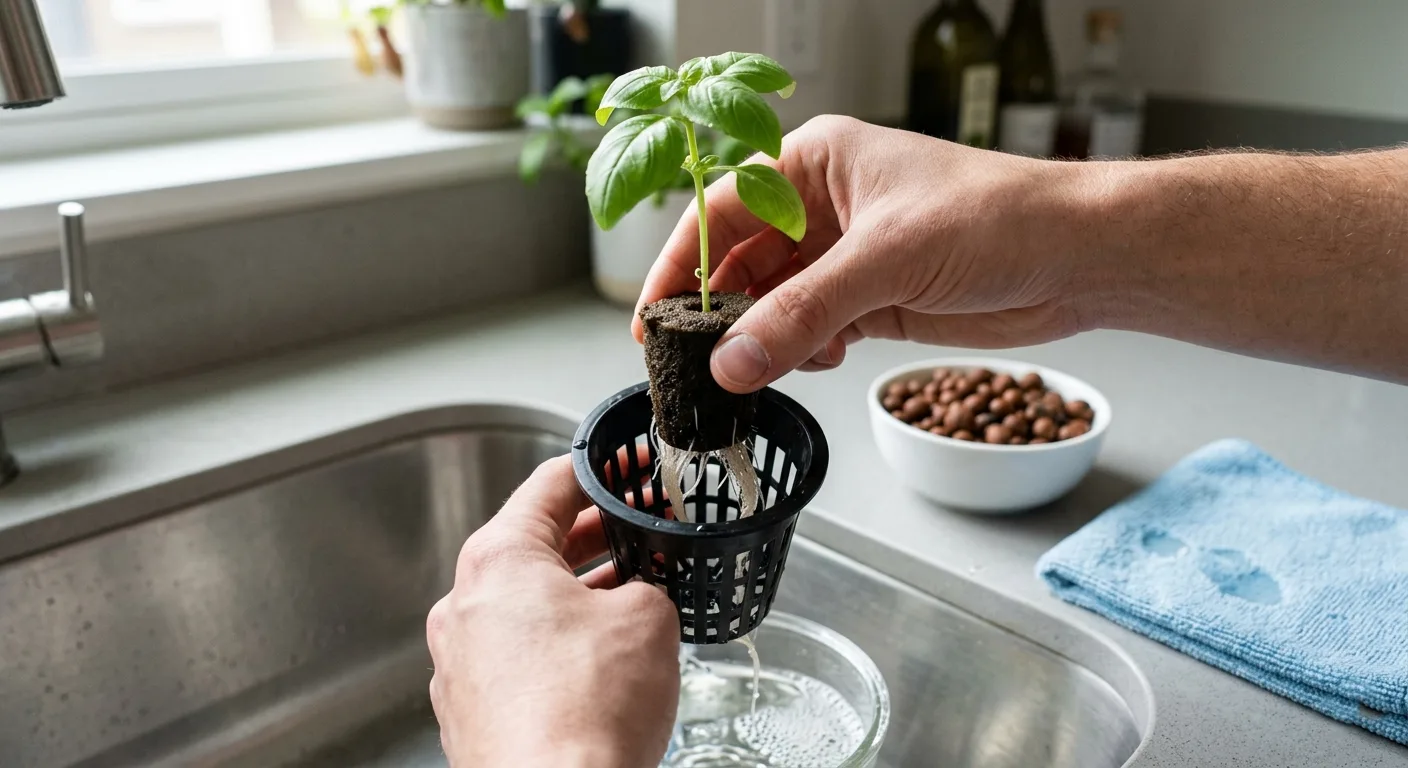
Rockwool and peat sponges hold a large amount of moisture. You want to transfer them while damp, not dripping wet. Squeezing the sponge damages the microscopic root hairs hiding inside the material. Pick up the sponge by the sides using your thumb and forefinger. Never pull the plant upward by its fragile stem. If long roots are sticking out sideways, tuck them downward gently so they point toward the bottom of the plug. Cupping your free hand underneath the roots as you move them across the kitchen prevents any dangling roots from catching on the edge of the tray. For a deeper look at starting seeds correctly before you reach the transplant stage, the guide on starting hydroponic seeds in rockwool covers the full germination process.
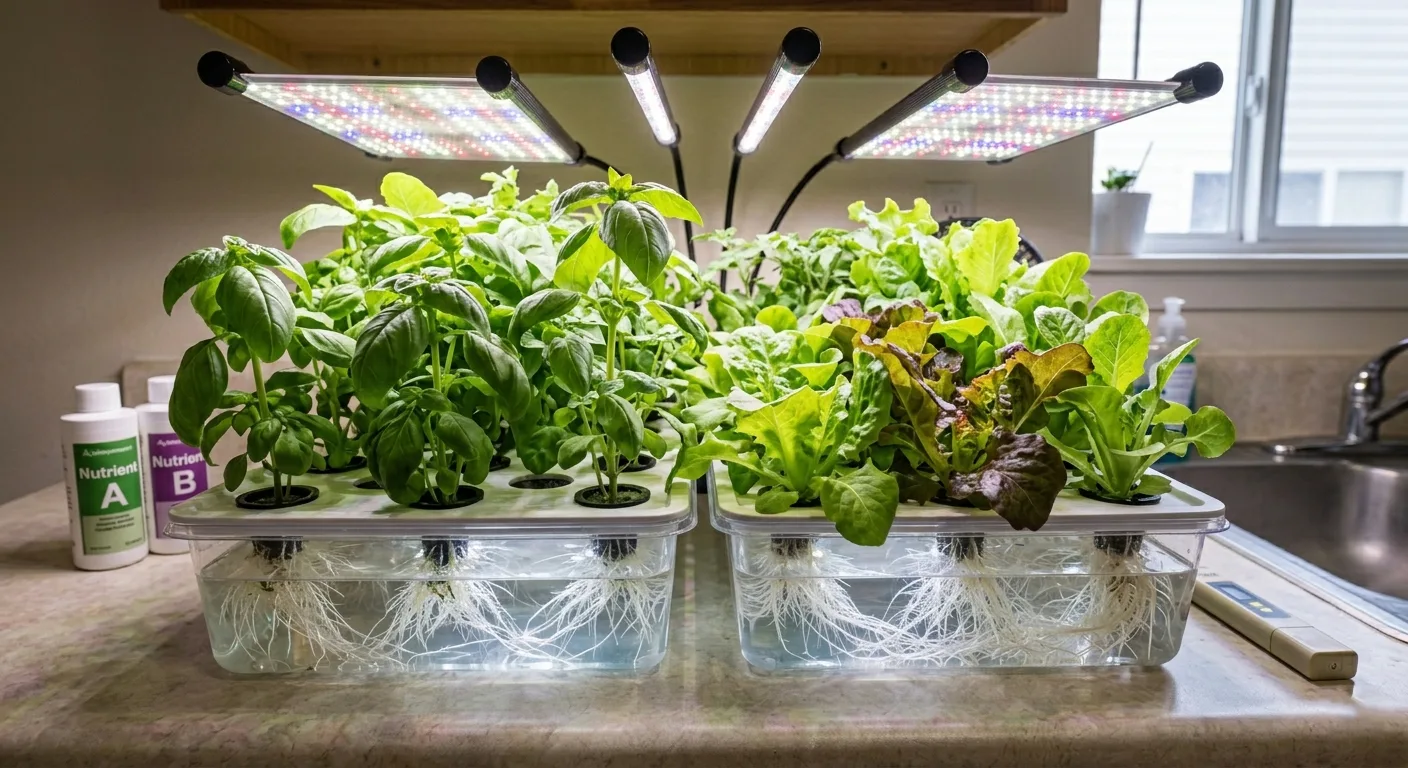
🧺 Placing the Seedling in the Net Cup
Drop the sponge into the net cup so the top sits flush with the plastic rim. Look underneath the deck to verify the water level. The liquid should touch the bottom quarter of the sponge, allowing moisture to wick upward. If the water submerges the entire sponge, the stem will rot within a week. For broader guidance on what nutrients to use on change day versus a top-off day, the best hydroponic nutrients for small apartment systems guide covers the full routine.
🪨 Securing with Clay Pebbles
Sometimes a thin grow sponge feels loose inside a wider net cup. If the sponge wobbles, the plant will tip over as it grows taller. Drop a few rinsed clay pebbles into the empty spaces around the sponge for structural support. Do not pack them tightly, as the roots need room to expand. A light layer on top also blocks ambient light, which keeps your sponge cleaner and reduces algae growth on the wet surface.
🩺 Troubleshooting Shock When You Transplant Hydroponic Seedlings
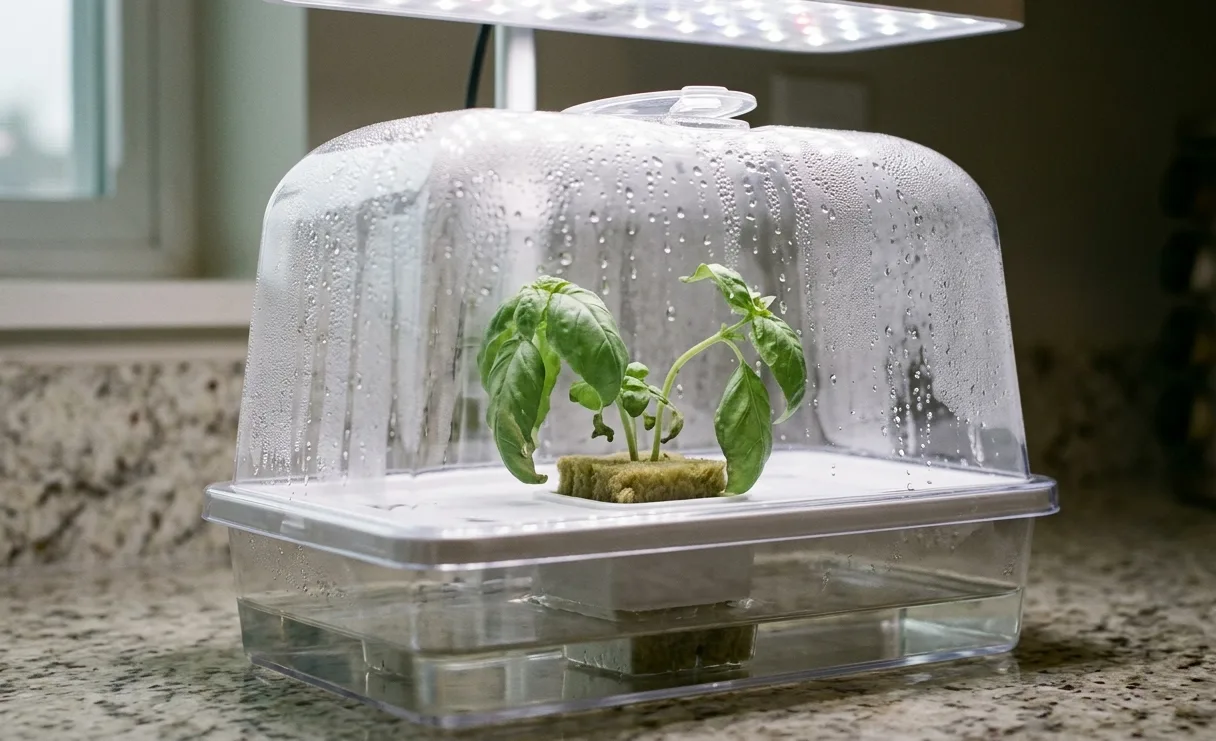
Even with careful hands, plants sometimes react poorly to a new environment. Recognizing transplant shock early allows you to correct the issue before the roots shut down. Most visual symptoms appear within the first 48 hours. Do not panic if the plant looks sad on day one. A minor adjustment to your light height or water levels usually fixes the problem quickly.
🥀 What to Do If Leaves Droop Instantly
Severe wilting right after the move indicates the roots cannot drink fast enough to support the leaves. This usually happens if the air in the new location is dry, or if the roots got damaged during handling.
- Turn your LED grow lights off for 24 to 48 hours to reduce heat stress on the damaged roots.
- Place a clear, vented plastic cup over the net basket to create a temporary humidity dome.
- Check the water level underneath the deck to ensure it physically touches the bottom of the sponge.
- Once the leaves perk up and stand tall, remove the cup and turn the lights back on.
🟡 Fixing Yellow Leaves After the Move
If the lower leaves turn pale yellow a few days after moving, the plant is struggling to absorb food. This is one of the most common signs of a pH problem in a fresh reservoir. When the water acidity drifts outside the pH 5.5 to 6.5 window, the roots are locked out from feeding even when nutrients are present. For a full breakdown of this pattern, the guide on why apartment hydroponic plants turn yellow covers every cause in order.
Test your reservoir water immediately. If the pH has drifted above 6.5, add a tiny drop of your chosen pH adjuster, stir well, and wait an hour. The new growth emerging in the center should look bright green within a few days.
🦠 Preventing Algae on Exposed Rockwool
Algae spores love the bright lights and constant moisture of your countertop setup. If the top of your grow sponge is exposed to the LED panel, a green film will develop quickly. This algae steals vital oxygen and nutrients away from your young roots. Block the light from hitting the wet sponge directly by cutting a small square of aluminum foil and wrapping it around the base of the stem, covering the top of the net cup. For a broader look at keeping algae out of your jars long-term, the guide on controlling algae in hydroponic jars covers every prevention method worth knowing.
🟤 What to Do If Roots Turn Brown
Bright white roots are the ultimate sign of a healthy plant. If you notice the newly exposed roots turning slimy or muddy brown, you are dealing with an oxygen problem. This is the early stage of root rot, which occurs when roots are submerged with no air gap. First, verify that your air pump is actually running. If you are growing passively in a Kratky lettuce jar on a sunny windowsill, lower the water level slightly. The top half of the root mass must remain in the air to breathe. For the full recovery process, the guide on preventing root rot in small hydroponic systems covers early warning signs and step-by-step treatment.
🚨 Common Mistakes Beginners Make Timing the Transfer
Timing is a delicate balancing act. In my early days of indoor gardening, guessing the right moment led to a lot of wasted seedlings. Avoiding these frequent beginner traps will save you weeks of wasted effort. Pay close attention to the physical root mass, and you will rarely make a bad call.
🏃 Moving Plants Before Roots Emerge
Transferring a plug with zero visible roots poking out is a reliable path to failure. The sponge itself sits slightly above the water line in many deep-water systems. If there are no roots reaching downward, the plant has no way to drink. If you accidentally moved one too early, pull it back out. Return the sponge to your humid nursery tray and wait another full week. Keep the clear tray cover on to trap moisture while the taproot continues to elongate.
🐢 Waiting Too Long in the Nursery Tray
Leaving plants in a shallow germination tray for a month causes severe stunting. The roots hit the bottom of the plastic tray and begin to circle themselves, eventually forming a dense, tangled mat that tears when you try to separate it. A root-bound seedling struggles to adapt to the deep reservoir. Stagnant water in old nursery trays is also a prime breeding ground for harmful bacteria that will follow the plant into your main system.
🔥 Burning Young Roots with High EC
Pouring full-strength fertilizer into a fresh reservoir is a classic beginner error. Young root tissue is paper-thin and sensitive to strong mineral salts. A heavy dose of liquid plant food turns the delicate white tips brown and crispy within 48 hours. Always mix a very weak solution for the first two weeks. Use a calibrated EC meter for small hydroponic reservoirs to confirm you’re actually hitting EC 0.6 to 0.8 before inserting the net cups.
Gradually increase the feeding schedule only after you see vigorous new top growth. If you accidentally mix the basin too strong, act fast:
- Remove all net cups immediately and set them on a clean towel.
- Drain the overly strong nutrient water down your kitchen sink.
- Rinse the plastic reservoir with plain, lukewarm tap water.
- Refill entirely with fresh water, adding only a small fraction of fertilizer, and check EC before replacing the plants.
🌬️ Ignoring Air Circulation After Transfer
Many beginners think that once the plant hits the water, the job is done. Still air around your countertop system causes a host of invisible issues. Plants breathe through tiny pores in their leaves and need a constant exchange of fresh air to process nutrients. Set up a small clip-on fan nearby to keep the air moving gently. This slight breeze also evaporates excess moisture around the base of the stem, preventing the fungal infections that thrive in warm, humid, stagnant conditions.
→ University of Maryland Extension: Hydroponics for Home Gardeners
💬 A Word From Sarah
Learning exactly when to transplant hydroponic seedlings took me a solid year of frustrating trial and error. I will never forget my third attempt at growing mint on my kitchen island. I transferred the young sponges successfully, but mixed the nutrient reservoir to a whopping EC 1.8 right out of the gate. Within 48 hours, the edges of my mint leaves turned black and the white roots shriveled up completely. I drained the basin, dropped the concentration down to a mild EC 0.8, and trimmed the dead tissue above a leaf node. The next batch recovered within a week. Treat your young plants gently in those first few days after the move. They are tougher than they look, but they appreciate a smooth, gradual transition.
❓ Frequently Asked Questions
🌱 Which herb should a beginner transplant first?
Basil is the most forgiving herb for new apartment gardeners. It grows thick, sturdy roots quickly and recovers from minor transplant shock faster than delicate greens like cilantro. Start with basil to get comfortable with the timing and nutrient balance, then move on to slower growers once you feel confident with the process.
💦 Do I add nutrients before or after transplanting?
Always mix and balance your nutrients in the reservoir before adding the plants. This ensures the pH is stable and the salts are fully dissolved, preventing chemical burns on young roots. Mix at one quarter strength for the first week, then gradually increase as the plant establishes and shows vigorous new top growth above the net cup.
🔌 Should I run the water pump immediately after moving them?
Yes, turn the water pump on right away to keep the liquid oxygenated. Roots under transplant stress need as much dissolved oxygen as possible to recover quickly. If your system has a strong pump that creates noise, ensure the water level is high enough to muffle the loud splashing sounds coming from inside the reservoir.
🌤️ Can I put new transplants in direct window sunlight?
Direct afternoon sun through an apartment window is often too hot for fresh transplants. Stick to your controlled LED grow lights or a soft morning-sun window for the first week to limit heat stress. As the plant establishes over 5 to 7 days, it can gradually handle stronger natural light without wilting or showing crispy leaf edges.
🦒 Why are my seedlings stretching and falling over?
Leggy stems mean the plants are desperate for light in the nursery tray. Lower your grow light closer to the tray, or move them into your countertop system a few days sooner than planned. Adding a small fan on low helps strengthen the stems through gentle mechanical stress, producing sturdier plants that handle the transplant much better.
💧 How often should I change the water after transplanting?
Top off daily with plain pH-adjusted water to replace what the plant drinks. Do a full drain and refill every 2 weeks. For the first week after transplanting, check the reservoir pH every 2 to 3 days since young roots alter water chemistry faster than established plants. Keep EC at 0.6 to 0.8 until the plant has a full set of true leaves and shows new growth. The guide on how to top off small hydroponic systems covers the daily routine in detail.
🏠 Can I do this in a studio apartment or one-bedroom?
Yes. Countertop systems and small Kratky jars fit on a kitchen shelf or windowsill with a 1 to 2 square foot footprint. The transplant process itself takes under 10 minutes at your kitchen sink. You need a clean sponge, pH-adjusted nutrient water, and a net cup. No garden, no balcony, and no special drainage setup required for most beginner crops.
Happy growing! 🌿
— Sarah, Urban Hydro Space

Sarah is the founder of Urban Hydro Space and an indoor gardening enthusiast dedicated to helping apartment dwellers grow fresh herbs and vegetables in small spaces. With hands-on experience testing hydroponic systems, she shares practical tips and honest product reviews to make indoor gardening accessible for beginners.