⏳ 18 min read · Last updated: March 2026
Growing hydroponic mint on your kitchen counter is one of the most rewarding things I have done in a small apartment. Before I switched to water-based growing, I kept buying fresh mint in those plastic clamshells that wilted before I finished them. I tried a small dirt pot on the windowsill once. The soil brought fungus gnats into the kitchen, and the weak winter light turned the stems thin and pale. That pot went in the bin after three weeks.
Because of that failure, I started experimenting with small water-based setups. What I found is that mint in a hydroponic jar outperforms mint in soil almost every time. The roots grow fast, the leaves come back after every harvest, and the whole thing fits on one corner of the counter. Today I harvest fresh leaves for morning tea every single week from a basic jar setup. My counter stays clean, and I have not dealt with a single pest since switching.
Finding that success requires a few specific adjustments. Mint grows fast when given the chance, so it needs the right balance of light, nutrients, and containment to stay manageable indoors. This guide walks through every step, from choosing your container to cloning your best plants so you never have to buy seeds again. If you are brand new to growing without soil, the complete apartment hydroponics beginner guide is the best place to start before diving into a specific crop.
- Keep water balanced between pH 5.5 and 6.5, mint tolerates a wider range than most herbs.
- Target an EC of 1.6 to 2.0 mS/cm for strong growth without burning the roots.
- Provide 14 to 16 hours of light per day, a timer set once handles this automatically.
- Do a full reservoir change every 2 weeks to prevent salt buildup.
- Start from grocery store cuttings, not seeds, roots appear in 5 to 7 days.
- Strong flavor for hot teas → Peppermint
- Milder taste for cooking and salads → Spearmint
- Baking and sweet drinks → Chocolate Mint
- Fruity aroma for cold beverages → Apple Mint
- Unique variegated leaves → Pineapple Mint
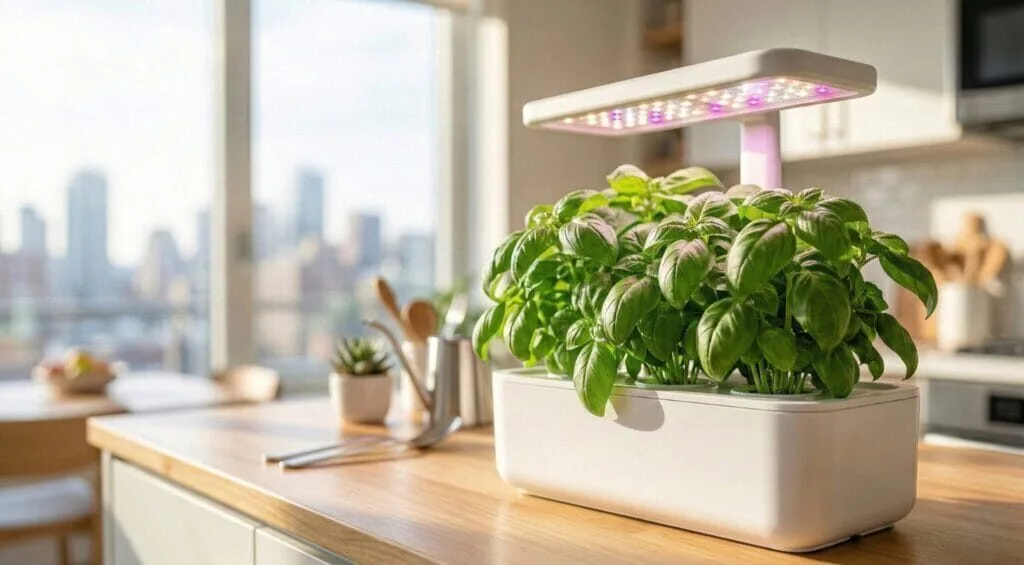
🌱 Setting Up Your Countertop Hydroponic Mint System
Starting a countertop mint garden does not require expensive gear or a dedicated grow room. Because space is limited in most apartments, small self-contained setups work best. The Kratky method is the right starting point, it operates without electricity, produces no noise, and fits inside a mason jar. Alternatively, a small countertop kit with a built-in pump provides faster growth if you want a more automated setup. The DWC vs Kratky comparison for apartment beginners breaks down exactly which suits your space and budget. For a complete kit recommendation, the 3 best countertop hydroponic systems for apartment beginners covers the plug-and-play options worth considering.
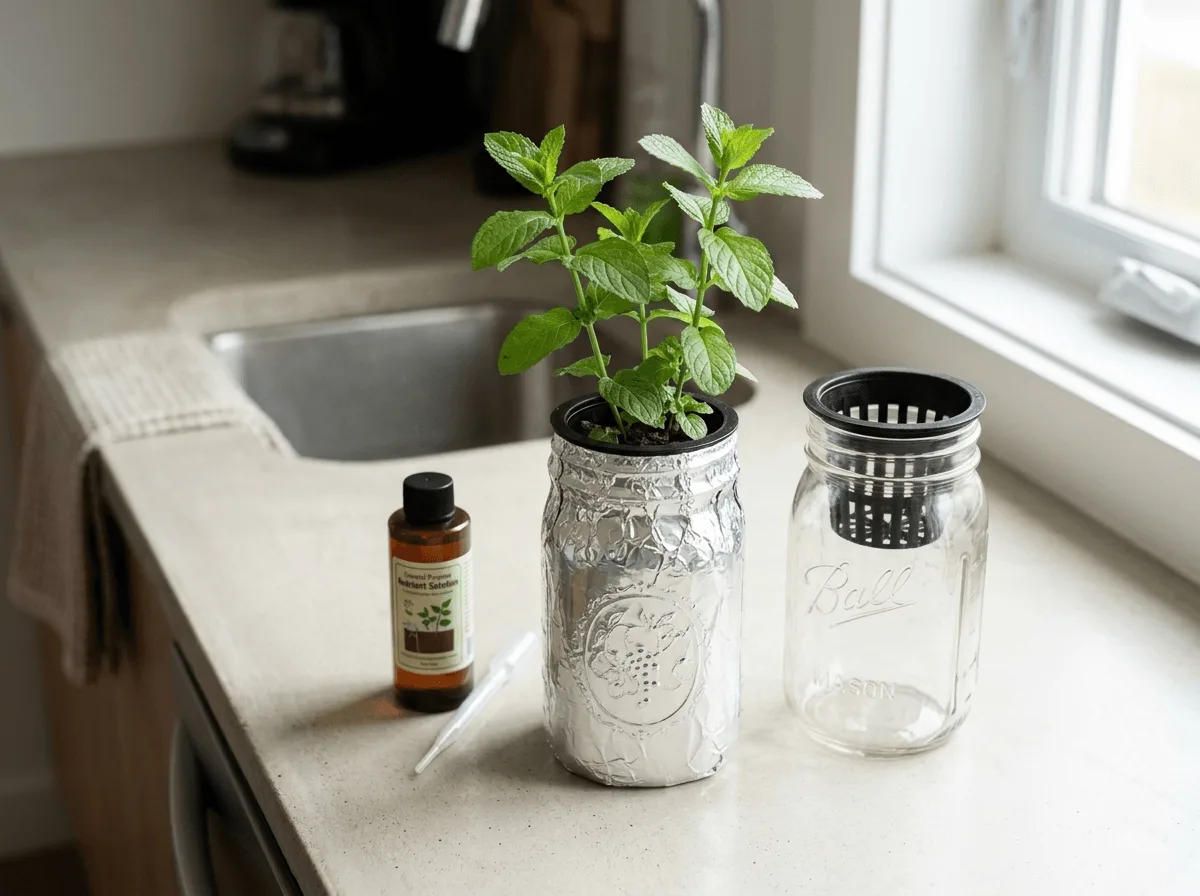
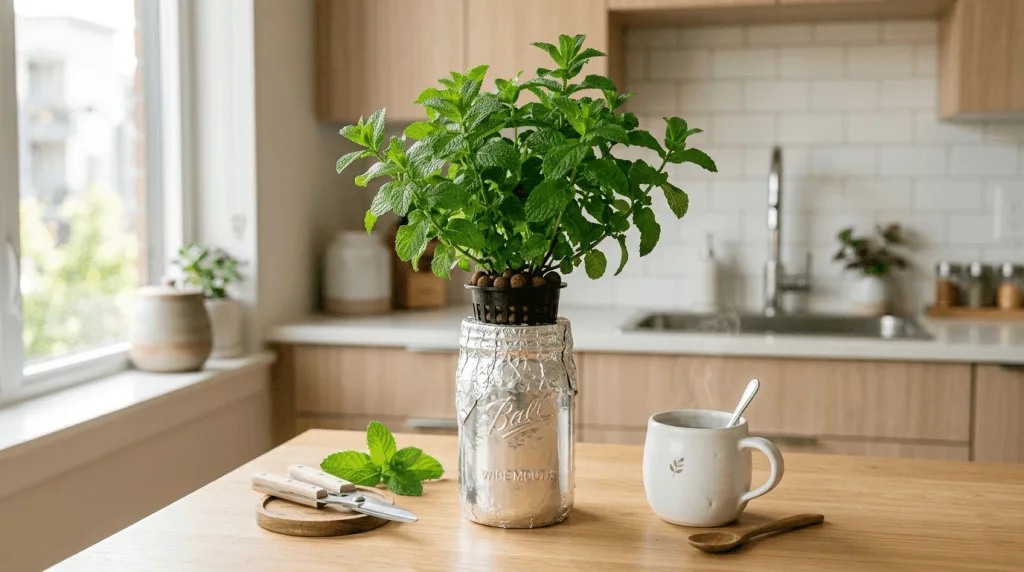
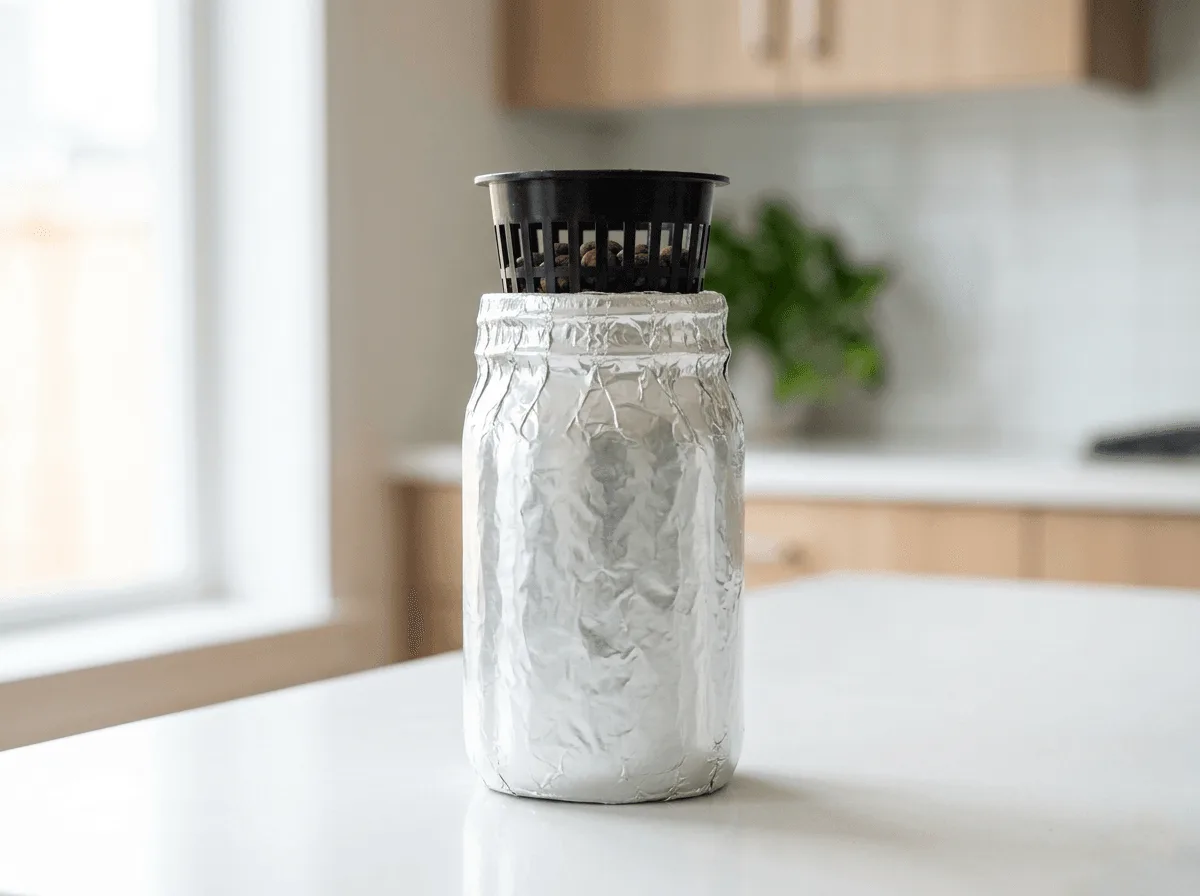
Before you begin, choose the right container. Glass jars are popular, but they require preparation. Light entering the root zone causes algae blooms that compete with the plant for nutrients, and stunted growth follows fast. Wrap the exterior with opaque tape or foil before filling.
Additionally, use the free shopping list builder to get an exact item list without guessing what to buy.
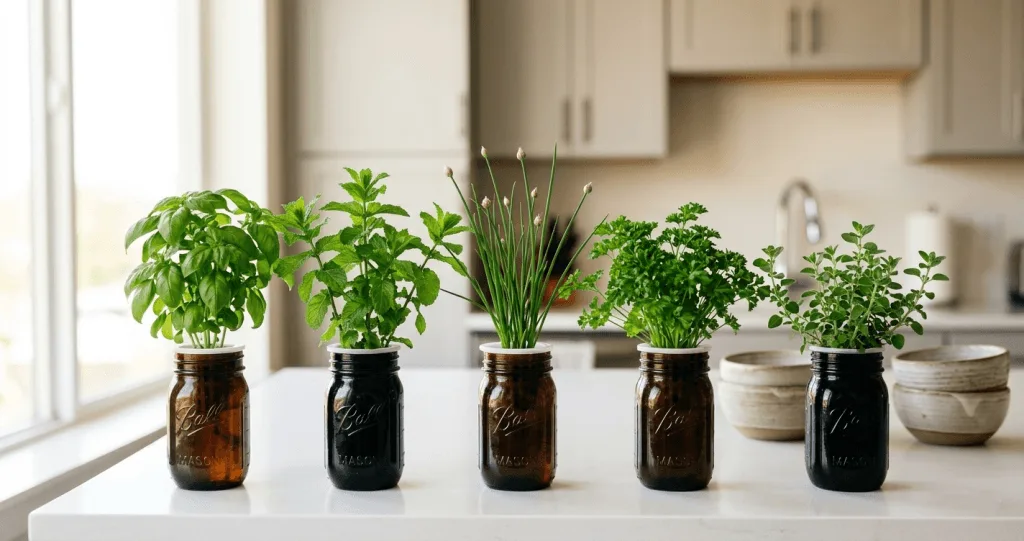
🫙 Choosing the Right Container Size
Mint develops an extensive root system faster than most other herbs. Using a container that is too small means refilling constantly. I recommend starting with at least a 32-ounce wide-mouth Mason jar. A larger reservoir gives the roots room to expand and provides a buffer if you miss a day of checking the water level.
To prepare your container, follow these steps before adding any plants:
- Wash the jar with warm soapy water to remove dust.
- Rinse the glass twice to ensure no soap residue remains.
- Wrap the exterior with opaque tape or foil to block all incoming light.
- Place a 2-inch plastic net cup securely into the mouth of the jar.
- Fill the net cup with growing media to support the plant stem.
The full setup walkthrough with photos is at the Kratky jar setup guide for apartments.
💧 Water and Oxygen Requirements
Plant roots need oxygen as much as they need water. If you submerge the entire root mass, the plant will suffocate. In a passive Kratky setup, always leave an air gap. Keep the nutrient solution about one inch below the net cup once the roots grow long enough to reach the water.
Because of that air gap, the roots adapt to pull oxygen from the humid air inside the jar. If you use a system with a pump, oxygenation happens automatically. However, water pumps create noise in small spaces. If the hum bothers you in a quiet studio apartment, try placing a thick silicone mat under the reservoir to dampen the vibrations.
🪨 Selecting the Best Substrate for Mint
Your plant needs something to hold it upright since there is no soil. Clay pebbles are the best choice because they drain well and provide plenty of airflow. As a result, they prevent the base of the stem from rotting. Clay pebbles are also reusable, rinse and sterilize them between grows and they last for years.
Rockwool is another excellent option for starting cuttings. Manufacturers spin molten rock into fiber that holds moisture while maintaining structure. You must soak rockwool in low-pH water before use to neutralize its natural alkalinity. The full process is covered in the guide on how to start hydroponic seeds in rockwool.
🍃 Rooting Grocery Store Stems
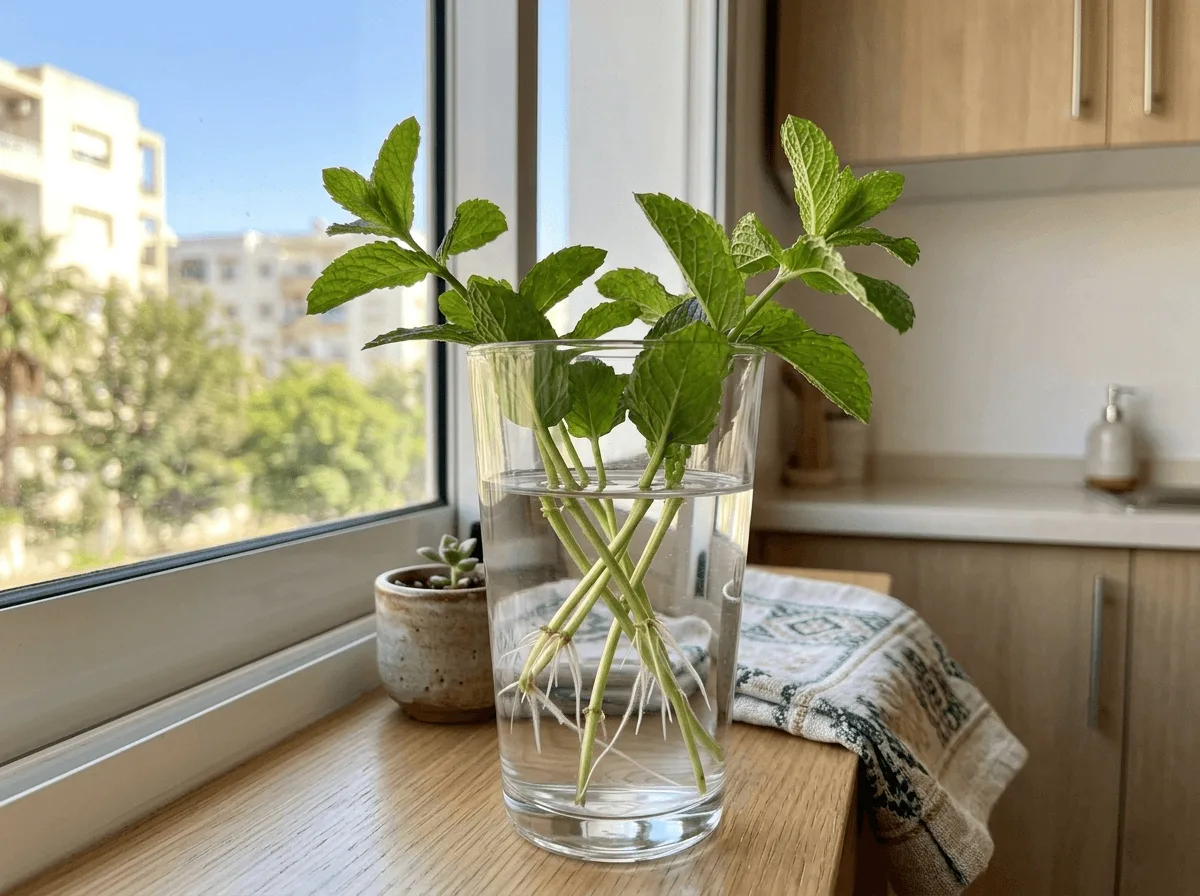
You do not need to buy seeds to start a mint garden. Cloning a fresh sprig from the grocery store saves time and guarantees a plant that already smells and tastes the way you want. Look for a healthy green stem with several intact leaf pairs.
First, trim the bottom of the stem at a 45-degree angle using sharp scissors. Next, strip the lower leaves so they do not rot in the water. Place the bare stem in a small glass of plain water on your windowsill. Within 5 to 7 days, tiny white roots will appear. Once those roots reach about 2 inches long, transfer the cutting into your hydroponic net cup.
☀️ Ideal Lighting and Temperature for Hydroponic Mint
Light determines how bushy and flavorful your mint becomes. A weak light source results in tall leggy stems with small, pale leaves that lack any real punch. A sunny kitchen window is useful during summer, but apartment windows rarely deliver enough direct light through winter months.
A small LED panel changes that for indoor growers. These fixtures consume very little electricity and fit well under kitchen cabinets. As a result, your plants receive the energy they need without affecting the electricity bill.
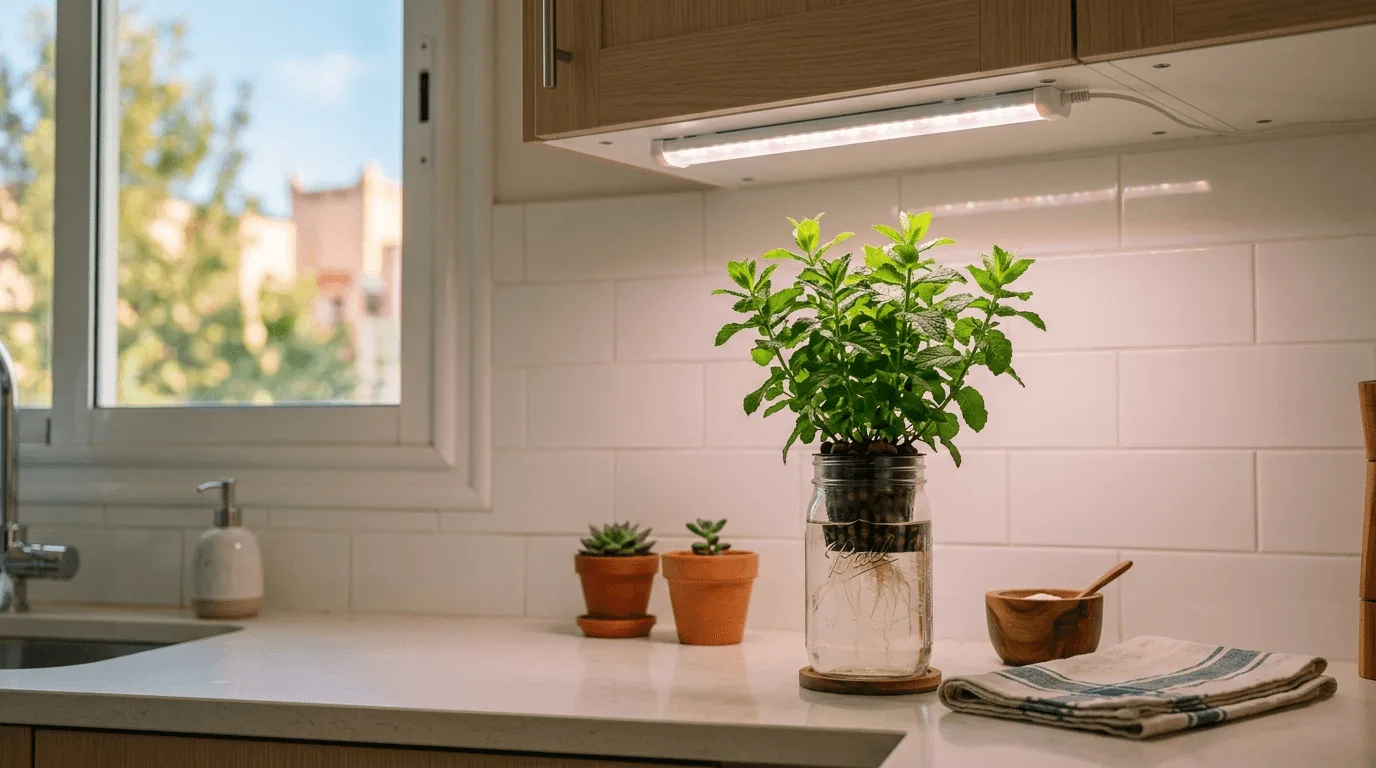
Good options at every price point are covered in the guide to the best grow lights for low-light apartment hydroponics under $50.
⏲️ Setting Your Grow Light Schedule
Mint needs long days to simulate summer growing conditions. Aim for 14 to 16 hours of light per day to keep the plant vigorous. A cheap mechanical outlet timer or a smart plug automates this so you never think about it again. I run my lights from 7:00 AM to 9:00 PM. That schedule gives the plants full energy through the day while letting the apartment stay dark at night.
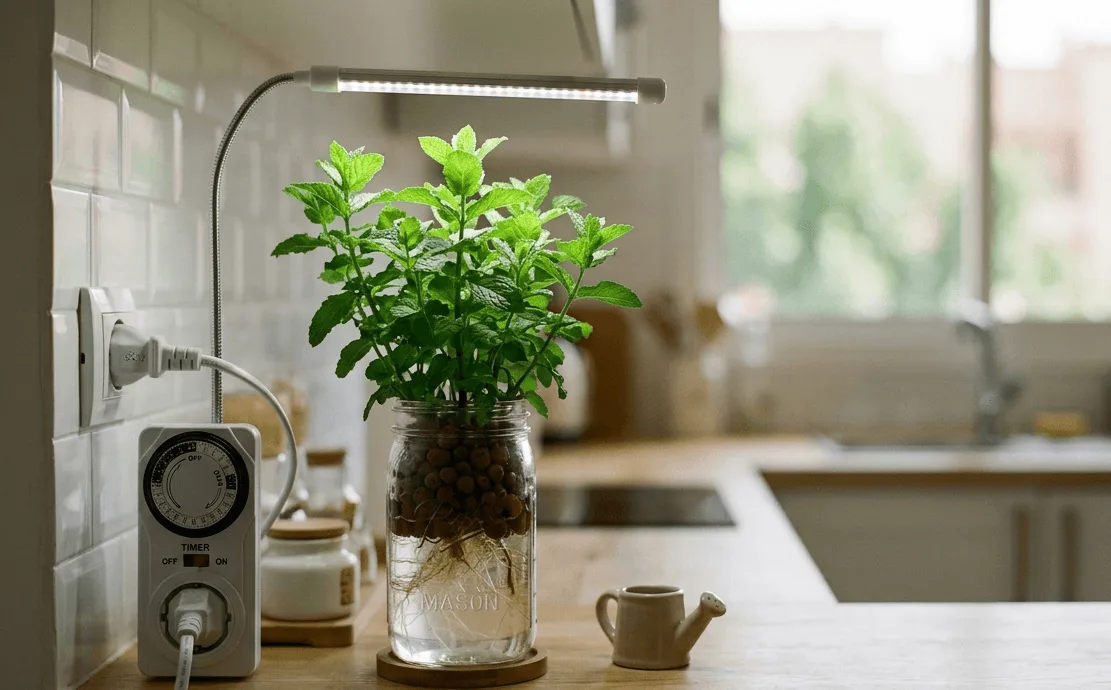
During the dark hours, the plant rests and processes the energy it gathered. Because of this, leaving grow lights on for 24 hours straight stresses most herbs over time and does not accelerate growth. The guide on the easiest light schedule for apartment hydroponics shows exactly how to set a timer around a work schedule.
🌡️ Managing Apartment Temperatures
Mint prefers a cool to moderate climate to produce the best flavor. Keep your apartment between 65°F and 75°F (18°C to 24°C) for optimal growth. High temperatures cause the water in your reservoir to heat up. Warm water holds less dissolved oxygen, which stresses the root zone and opens the door to root rot.
If your kitchen heats up while cooking, monitor the reservoir temperature and avoid placing jars directly next to ovens or radiators. A consistent environment helps the plant focus on producing the essential oils that give mint its signature strong aroma.
🔆 Measuring Light Intensity Without Expensive Tools
Professional growers use dedicated meters to measure Photosynthetic Photon Flux Density (PPFD). Beginners do not need that level of precision. A free light meter app on your smartphone gives a rough estimate using the phone camera. That is enough to catch obvious problems like a light that is too dim or positioned too far away.
Watch the plant instead of the meter. If leaves curl upward or develop crispy brown edges, the light is too close or too intense. If the stem stretches several inches between leaf nodes, the light is too far away or too weak. Use the free grow light calculator to find the exact wattage and hang height for your space.
📏 Adjusting Distance as Plants Grow
Position your LED panel about 6 to 8 inches above the canopy. As the plant grows taller, raise the light to maintain that safe distance. Mint can grow over an inch per week when conditions are ideal, so check the height every few days during peak growth. Specific margins by herb type are covered in the guide on how far grow lights should be from hydroponic herbs on a shelf.
🧪 Mixing Nutrients and Balancing pH for Mint
Water alone cannot sustain an adult herb for long. You must provide a balanced supply of nitrogen, phosphorus, and potassium. In soil, microbes break down organic matter to feed the plant. In a water-based system, you supply those minerals directly to the roots. That is why hydroponic mint grows faster, and also why the chemistry needs more attention.
Because you are eating the leaves, nitrogen is the most vital nutrient in the mix. Nitrogen fuels leafy green growth. However, adding too much fertilizer burns the roots and ruins the harvest. Finding the correct dosage is what keeps the plant healthy and productive.
→ Penn State Extension: Principles of plant nutrition in hydroponics
→ University of Minnesota Extension: Small-scale hydroponics overview
📈 Finding the Right EC Level
Electrical conductivity measures the concentration of salts in your water. Mint prefers a moderate-strength solution. Aim for an EC of 1.6 to 2.0 mS/cm. I learned this the hard way, I kept my first mint batch at EC 2.4 and the leaves curled at the edges within days. Dropping the strength to 1.8 fixed it within a week. For a deeper look at which nutrients work best in small reservoirs, the best hydroponic nutrients for small apartment systems guide covers the options worth considering.
To mix your solution properly, follow these steps:
- Fill your container with plain room-temperature water first.
- Add the required nutrient dose according to the manufacturer label.
- Stir well for at least 30 seconds.
- Check the final strength using a reliable EC meter.
The beginner hydroponic nutrients guide covers feeding schedules and how to adjust doses at each growth stage.
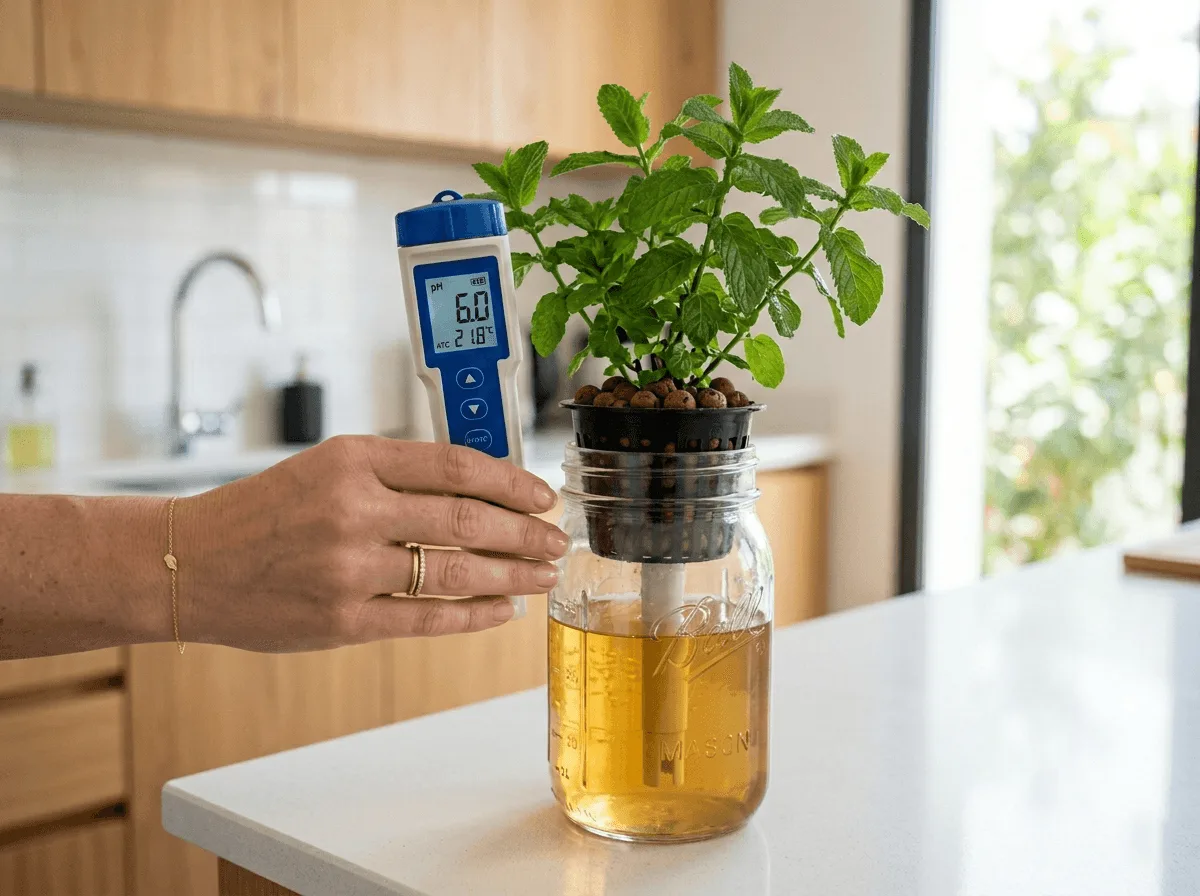
💧 Adjusting pH Without Stressing Plants
Even if your nutrient strength is perfect, plants cannot absorb the minerals if the pH is wrong. This condition is called nutrient lockout. Mint thrives when the water sits between pH 5.5 and 6.5. Tap water in most cities runs alkaline, often around 7.5 or 8.0, so adjustment is almost always necessary.
Test your water every few days to catch fluctuations before they cause visible damage. A digital tester is far more reliable than paper strips for this. The review of the best pH meter for beginners covers the Apera PH20, which is what I use. If the number is too high, add a few drops of pH Down, stir well, and wait five minutes before testing again. Use the free pH and nutrient calculator to get exact adjustment doses for your reservoir size.
If you prefer a natural alternative, diluted white vinegar or lemon juice will lower pH. However, these organic acids break down within 24 to 48 hours. As a result, the pH drifts back up and needs adjusting far more often than with commercial phosphoric acid.
🪣 Mixing Small Batches in Apartments
When you only have a few jars on the counter, mixing a large five-gallon bucket of nutrients wastes space. Instead, keep a dedicated one-gallon plastic jug under the sink. Mix your weekly nutrient batch in this jug, stir it fully, and let it sit for an hour before adding it to your jars. This allows the temperature to stabilise, adding cold tap water directly to a jar shocks the root system and can stunt growth.
🌊 Flushing the System to Prevent Salt Buildup
Over time, plants consume water faster than they consume minerals. As a result, leftover fertilizer salts concentrate at the bottom of the jar and burn the fragile root tips. To prevent this, perform a full reservoir change every 2 weeks.
Dump the old solution down the drain. Rinse the jar with clean water to wash away any white crusty residue. Then refill with a fresh, pH-balanced nutrient mix. This one habit prevents the majority of nutrient problems beginners encounter. The full schedule for every system type is in the guide on how often to change hydroponic water.
✂️ Pruning and Harvesting for Endless Mint Tea
Proper harvesting encourages the plant to grow wider instead of taller. If you leave hydroponic mint alone, it produces a single long stem that eventually falls over under its own weight. Regular pruning forces the plant to create side branches. As a result, you get a dense, bushy canopy that keeps producing for months.
Track your plant’s progress using the free seed to harvest countdown calculator. Once the plant reaches about 6 inches tall, it is time to make the first cut. Do not be afraid to snip the top off, the plant recovers fast and rewards you with double the foliage.
🔪 The Cut-and-Come-Again Technique
To keep the herb producing for months, harvest strategically. Never pull individual leaves off the main stem. Instead, always prune just above a leaf node, the small bump on the stem where new leaves emerge.
When you remove the top stem, you eliminate the dominant growth hormone. Consequently, the plant redirects its energy to the lower leaf nodes. Two new branches emerge where there was only one. Over time, repeating this process creates a dense sphere of foliage that looks far better than a single tall stem.
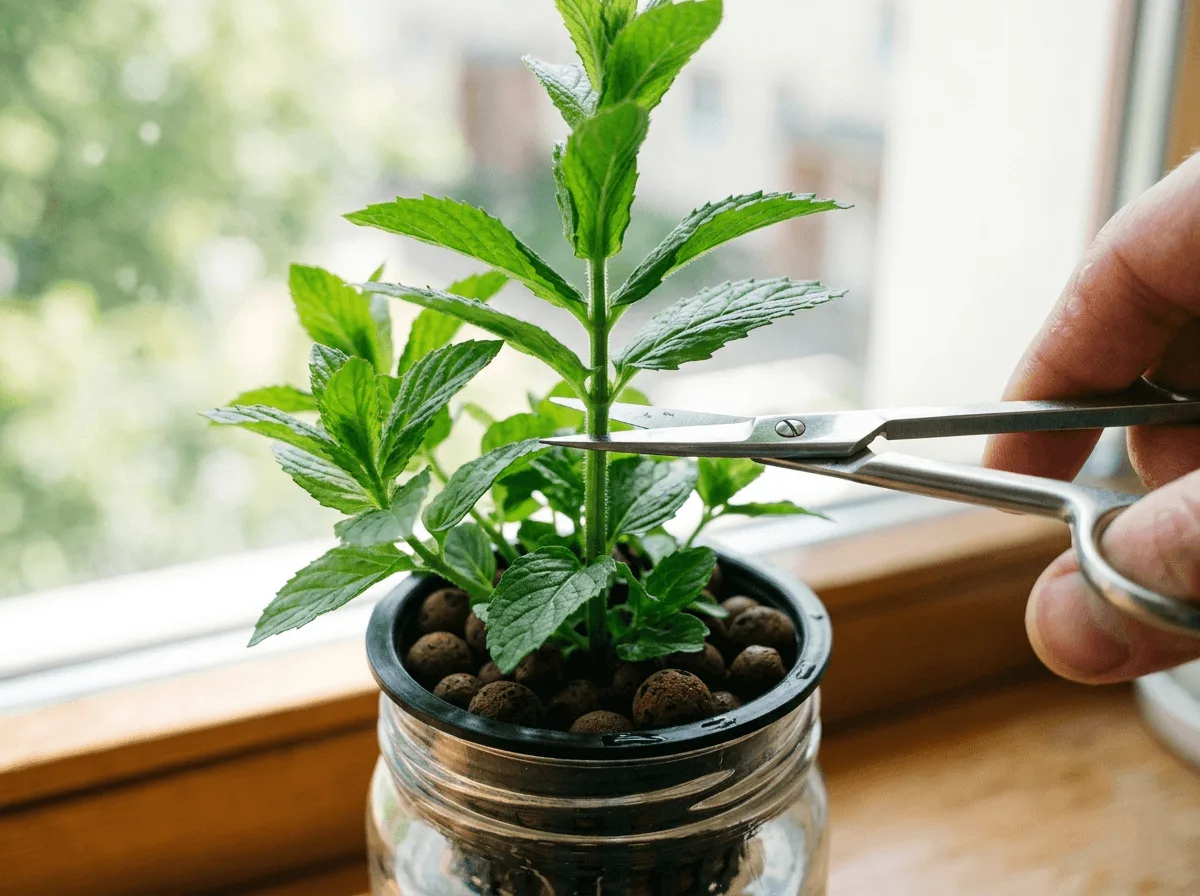
Here is the exact method for a clean harvest that promotes future growth:
- Locate a healthy vertical stem at least 6 inches long.
- Find a node about halfway down that shows tiny new leaf buds.
- Use sterilized scissors to snip the stem about a quarter-inch above that node.
- Leave at least one-third of the total foliage intact so the plant can still photosynthesize.
This is the same approach used for basil and most vigorous herbs. The guide on how to prune hydroponic basil so it keeps producing has clear visual examples of finding nodes and making clean cuts.
🧊 Drying and Freezing Your Harvest
If the system produces more leaves than you can use fresh, store them. Fresh mint lasts about a week in the refrigerator wrapped in a damp paper towel. For longer storage, air drying preserves the leaves for months.
To dry, tie small bundles of stems together with string. Hang them upside down in a dark, well-ventilated cabinet for about two weeks until the leaves turn brittle. Crumble them into a glass jar and store in the pantry for winter teas.
Alternatively, chop fresh mint into small pieces, place it in an ice cube tray, fill with water, and freeze. Drop the minty cubes directly into hot water for an instant tea whenever you need one.
🪴 Cloning Your Best Plants
Sometimes a plant tastes better than all the rest. Because mint declines after about 6 months in a jar, you will eventually need to start over. Instead of buying seeds, clone your favourite plant. Take a fresh top cutting, place it in a small cup of plain water, and within a week new roots appear. Move it into a fresh jar with clay pebbles and a diluted nutrient solution at EC 0.8 to 1.0. This continuous cloning cycle means you never need to buy seeds again.
🚨 Troubleshooting Common Hydroponic Mint Problems
Even well-maintained countertop systems hit problems occasionally. Because water-based systems lack the buffering capacity of soil, issues develop fast. However, if you catch the warning signs early, most problems are resolved in a few days without permanent damage.
The key to troubleshooting is checking your foundation first. Before applying any treatments, verify your pH, EC, and water temperature. More often than not, fixing a simple imbalance clears up the visible symptoms on its own.
- Not sure what is wrong → use the diagnosis table below
- Know the cause → jump to the relevant section further down
🔎 Quick diagnosis table
| What you see | Most likely cause | Check this first |
|---|---|---|
| 🟡 Yellow lower leaves | Nitrogen deficiency or pH drift | Test pH then check EC level |
| 🟤 Brown, slimy roots | Root rot | Smell the reservoir water |
| 🤢 Drooping stems | Lack of oxygen at roots | Check the water level and air gap |
| 🍂 Leggy thin stems | Insufficient light | Lower the light or increase hours |
| 🔴 Crispy brown leaf tips | EC too high, nutrient burn | Drain and refill with plain water 24h |
🩺 Preventing and Fixing Root Rot
Root rot is the most common killer in small hydroponic systems. Healthy mint roots are white and firm. If they turn brown, slimy, and smell foul, harmful bacteria have taken over the reservoir. Warm water and light leaks are the most common triggers.
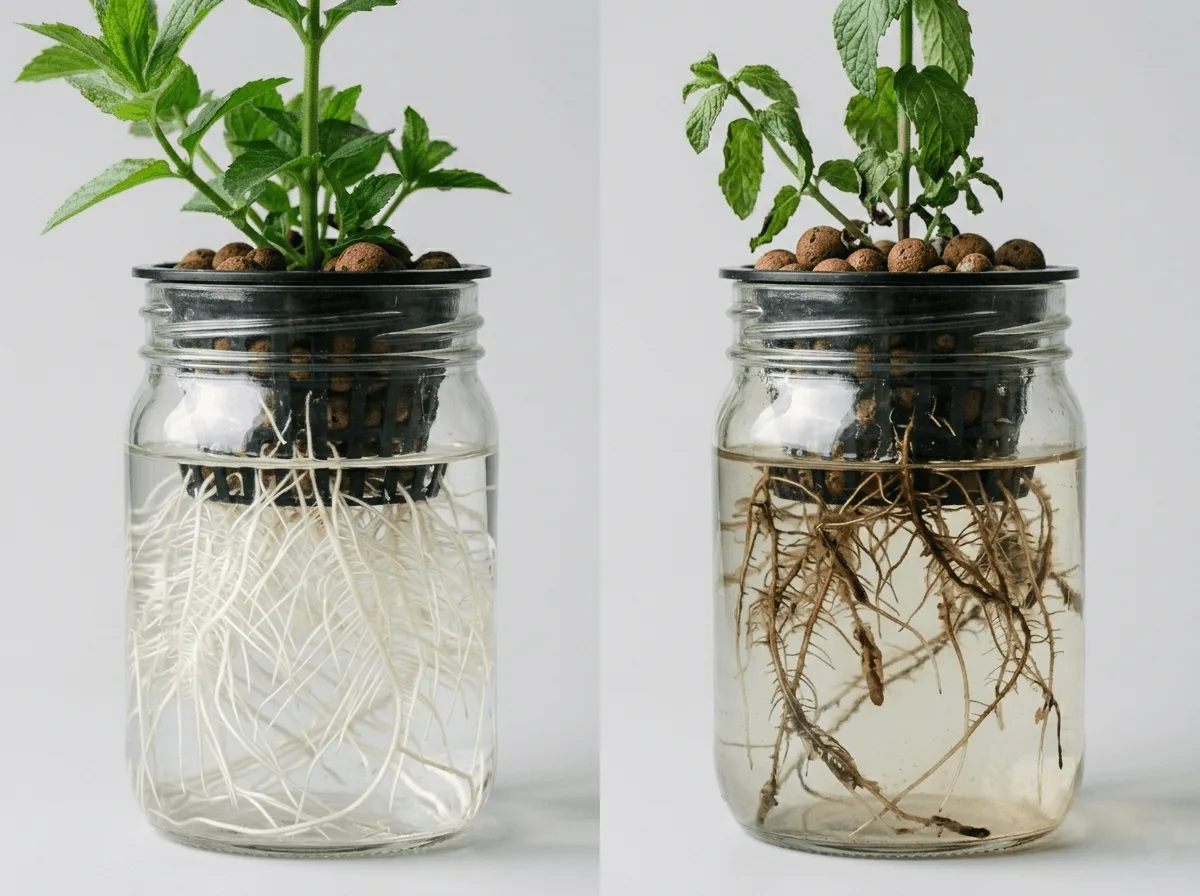
To fix root rot, act fast:
- Remove the plant from the jar.
- Rinse the roots under lukewarm tap water.
- Trim away the dead, mushy root sections with sterilized scissors.
- Sterilize the reservoir with diluted 3% hydrogen peroxide.
- Refill with fresh, pH-balanced nutrient solution at EC 1.4 to let roots recover.
The full cleaning process is covered in the guide on how to clean a small hydroponic system in an apartment. For prevention, the root rot prevention guide for small hydroponic systems covers every cause and fix in detail.
🍂 Fixing Yellow Leaves
Yellow leaves signal stress. If the older, lower leaves turn yellow and drop, the plant likely needs more nitrogen, check EC and raise it to 1.8 if it has dropped below 1.4. If the new leaves at the top yellow while the veins stay green, that pattern points to pH imbalance causing iron lockout, test pH first.
In either case, the fastest fix is a full reservoir change. Dump the old water, mix fresh nutrients to EC 1.8, adjust pH to 6.0, and refill. Plants release waste products into the water as they feed, and those invisible compounds alter the chemistry over time. A fresh reservoir resets everything. The full diagnosis process is in the guide on why apartment hydroponic plants turn yellow. For anything related to algae forming at the same time, the algae in hydroponic jars guide covers the light-sealing steps that prevent both problems at once.
🌫️ Managing Powdery Mildew in Humid Apartments
Mint transpires a lot of moisture through its leaves. If you crowd too many plants onto one small counter, humidity spikes and airflow drops. This creates ideal conditions for powdery mildew, the white flour-like dusting that appears on the top of affected leaves.
To prevent it, set up a small clip-on fan to keep air moving across the canopy. If white spots already appear, mix one part milk with nine parts water in a spray bottle and mist the affected leaves lightly. The proteins in the milk interact with sunlight to destroy the fungus without harming the plant.
🔇 What to Do If the Pump Stops Working
If you use an active system, pump failure is a risk worth preparing for. Water pumps can clog with root fragments over time. When the pump stops, the roots become stressed and the plant will decline if left uncorrected.
Unplug the unit first. Remove the pump casing and check the internal impeller for blockages. Use an old toothbrush to scrub away any slimy buildup and rinse the sponge filter under warm water. If the pump still will not run after cleaning, treat the setup like a Kratky jar temporarily, lower the water level to expose the top two inches of roots to air until the replacement pump arrives. More maintenance tips are in the guide on how to quiet a noisy hydroponic pump in an apartment.
💬 A Word From Sarah
Growing your own tea ingredients on the counter feels like a small daily luxury. When I first started with mint, I was so eager that I filled the jar all the way to the brim and drowned the roots in the first week. I had to learn the hard way that less water creates stronger plants. The air gap is not optional. It is the whole point. Watching those first white roots shoot down into the nutrient solution is still my favorite part of the process. My mornings changed once I stopped tearing open stale tea bags and started steeping fresh chocolate mint instead. Trust the setup, keep an eye on your pH, and you will have more leaves than you know what to do with.
❓ Frequently Asked Questions
⏱️ How long does hydroponic mint take to grow?
You can start harvesting leaves in about 4 to 6 weeks from a rooted cutting. If you start from seeds rather than cuttings, add another 2 to 3 weeks to that timeline. Starting from grocery store cuttings is faster and gives you a predictable flavour from the beginning.
🌿 Can I grow hydroponic mint from grocery store cuttings?
Yes. Place fresh mint stems in plain water until white roots appear, which takes 5 to 7 days. Once the roots reach about 2 inches long, transfer the cutting into your hydroponic net cup with clay pebbles and a diluted nutrient solution at EC 0.8 to 1.0.
🧪 What is the best pH for hydroponic mint?
The ideal pH for hydroponic mint is 5.5 to 6.5. This slightly acidic range ensures the plant can absorb all necessary nutrients. Check the water every 3 to 5 days and adjust with pH Down if the number climbs above 6.5.
🥀 Why is my hydroponic mint drooping?
Drooping stems almost always mean the roots lack oxygen. In a Kratky system, check that the water level has not risen to cover the entire root zone, the air gap must be maintained. In a pump system, check whether the air stone is clogged or the pump has stopped running.
💧 How often should I change the water for hydroponic mint?
Do a full reservoir change every 2 weeks. Empty the container, rinse it to remove any white salt crust, and refill with fresh pH-balanced nutrient solution. Between changes, top off with plain pH-adjusted water only, never add more nutrients when topping off.
💡 Do I need a grow light for hydroponic mint?
Unless you have a very bright south-facing window that gets 6 or more hours of direct sun, a grow light is necessary. Mint needs 14 to 16 hours of light per day to produce bushy, flavorful leaves. A 10W full-spectrum bulb in an existing desk lamp is enough for a single jar.
🌱 Can I grow mint and basil in the same hydroponic system?
You can, but it is not ideal. Mint grows aggressively and sends out runners that crowd out basil roots in a shared reservoir. It is better to give mint its own dedicated container. For a comparison of which herbs share systems well, the guide on the best herbs for small hydroponic systems covers compatibility and EC requirements for each variety.
🍃 Why does my hydroponic mint taste bitter?
Bitter leaves usually result from high temperatures or excessive nutrient strength. Keep your apartment below 75°F (24°C) and ensure EC stays at or below 2.0 mS/cm. Heat causes the plant to bolt and shift energy toward reproduction, which concentrates bitter compounds in the leaves.
Happy growing! 🌿
— Sarah, Urban Hydro Space

Sarah is the founder of Urban Hydro Space and an indoor gardening enthusiast dedicated to helping apartment dwellers grow fresh herbs and vegetables in small spaces. With hands-on experience testing hydroponic systems, she shares practical tips and honest product reviews to make indoor gardening accessible for beginners.