⏳ 27 min read · Last updated: March 2026
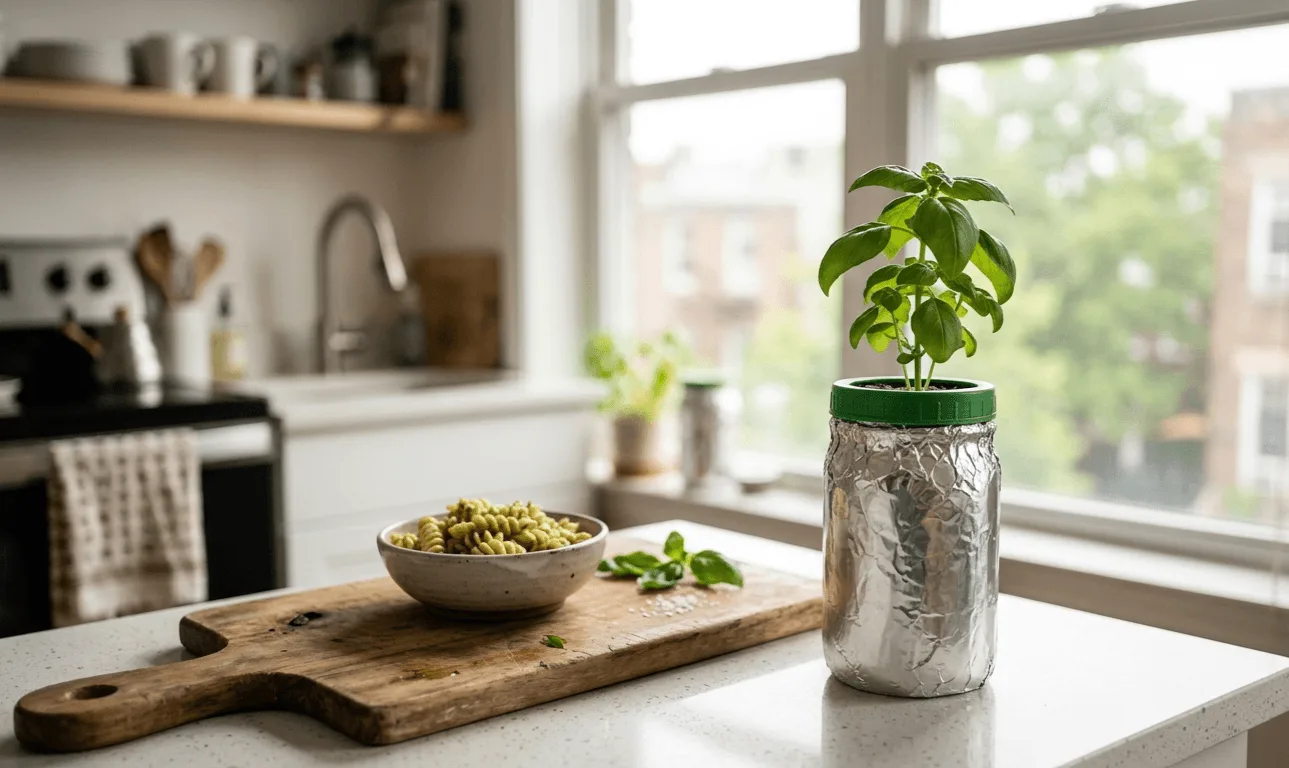
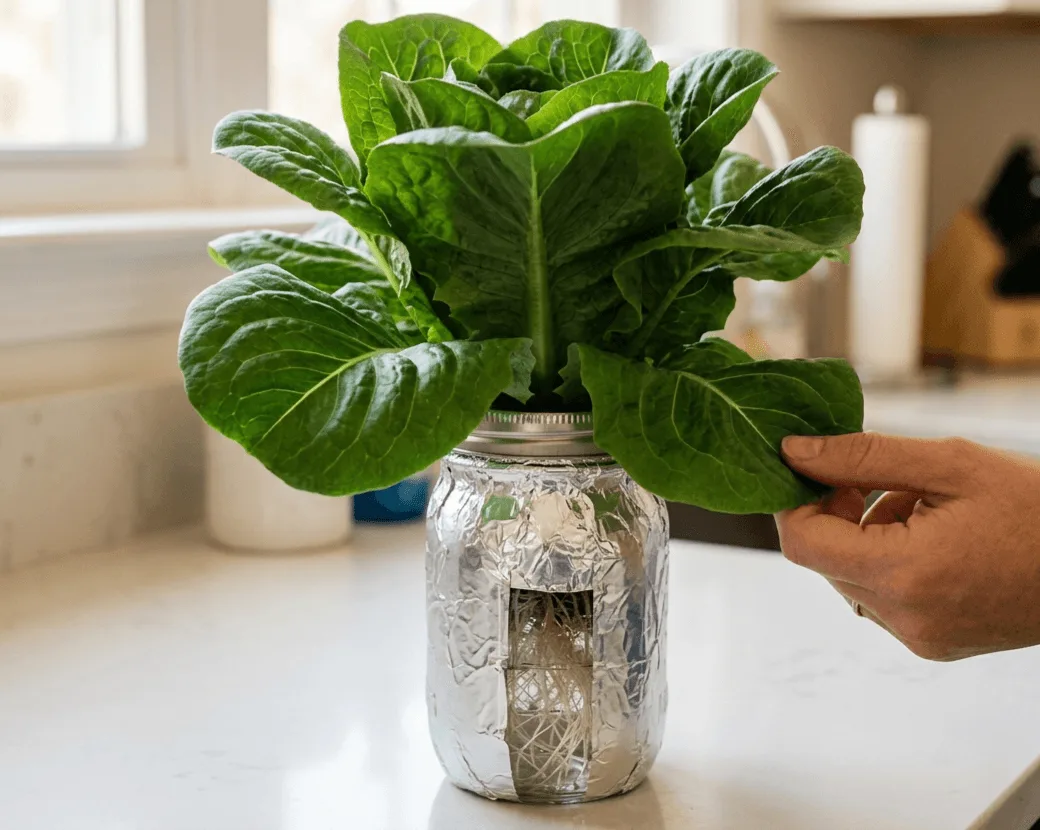
My first hydroponic plant was a mason jar of basil on a narrow kitchen windowsill. I had no garden, no balcony, no outdoor space at all. Just a one-bedroom apartment, a south-facing window, and a bag of seeds I had bought on a whim. I killed the first batch. Then the second. But by the third, something clicked. The roots hit the water, the leaves pushed out, and I snipped fresh basil into pasta I had made from scratch. That moment changed how I think about food, space, and what a small apartment kitchen can do. Now I run two shelves with six plants rotating through them. That single foil-wrapped jar started all of it.
This guide is the one I wish had existed when I started. Instead of scattered tips, it covers everything in one place: which system to pick, how lights work, what pH means and why it matters, which crops are the easiest wins, what will go wrong and how to fix it fast, and what it costs to get going. No jargon. No assumptions. Just honest, practical information for someone starting from zero in a small indoor space.
📋 What You Will Learn From This Guide
- Hydroponic plants grow 30 to 50% faster than the same plants in soil because roots absorb nutrients directly from water rather than digging through dirt to find them.
- The Kratky jar method is the best starting point. No pump, no electricity, no noise, and no experience required.
- Keep pH between 5.5 and 6.5 for almost every beginner crop. This single habit prevents more problems than anything else.
- Lettuce is ready in 4 to 5 weeks. Basil in 5 to 6 weeks. Green onions in as little as 2 weeks from scraps.
- A Kratky starter setup costs $25 to $36. A full two-shelf grow setup runs $130 to $175 and costs less than $6 a month in electricity.
- What You Will Learn From This Guide
- What Is Apartment Hydroponics and Why Does It Work So Well
- Choosing Your First System
- Three Mistakes I Made in My First Month
- Grow Lights: What You Need and What You Can Skip
- Nutrients and pH: The Two Numbers That Run Your Garden
- Best Beginner Crops for Apartment Hydroponics
- What It Costs to Start
- Common Problems and How to Fix Them
- Your First Week: What to Do Right Now
- A Word From Sarah
- Frequently Asked Questions
🌱 What Is Apartment Hydroponics and Why Does It Work So Well
Hydroponics is the practice of growing plants in water rather than soil. Instead of roots digging through dirt to find minerals, the roots sit directly in a nutrient solution that delivers everything the plant needs. The plant spends less energy searching and more energy growing. That is why hydroponic plants grow 30 to 50% faster than the same varieties in soil.
For apartment living specifically, hydroponics solves problems that soil gardening cannot. There is no bag of potting mix to store, no dirt on the counter, no fungus gnats hatching in damp soil, and no mess when you water. The reservoir holds the liquid, the plant sits in the lid, and the whole thing takes up less space than a coffee maker. You can grow in a kitchen corner, on a windowsill, on a shelf, or under a light in a living room, and the setup works the same way in all of those spots.
🏠 Why Apartments Are Good for Hydroponics
Most hydroponic guides assume you have a basement or a spare room. Apartment growers are usually skipped over. But apartment conditions suit hydroponics in ways most guides do not mention. Apartments stay at a consistent temperature year-round, temperature swings are modest, and there is no risk of frost or summer heat baking pots dry on a balcony. Those are good growing conditions for leafy herbs and greens.
However, the constraints are real too. You have limited vertical clearance between your counter and your light source. Your countertop space is shared with your actual kitchen. Noise matters. A loudly humming pump near a bedroom or home office is not acceptable. Aesthetics matter in a living space in ways they do not in a greenhouse. Every recommendation here was chosen because it works in an apartment specifically, not just in a controlled growing environment.
🥬 What You Can Realistically Grow
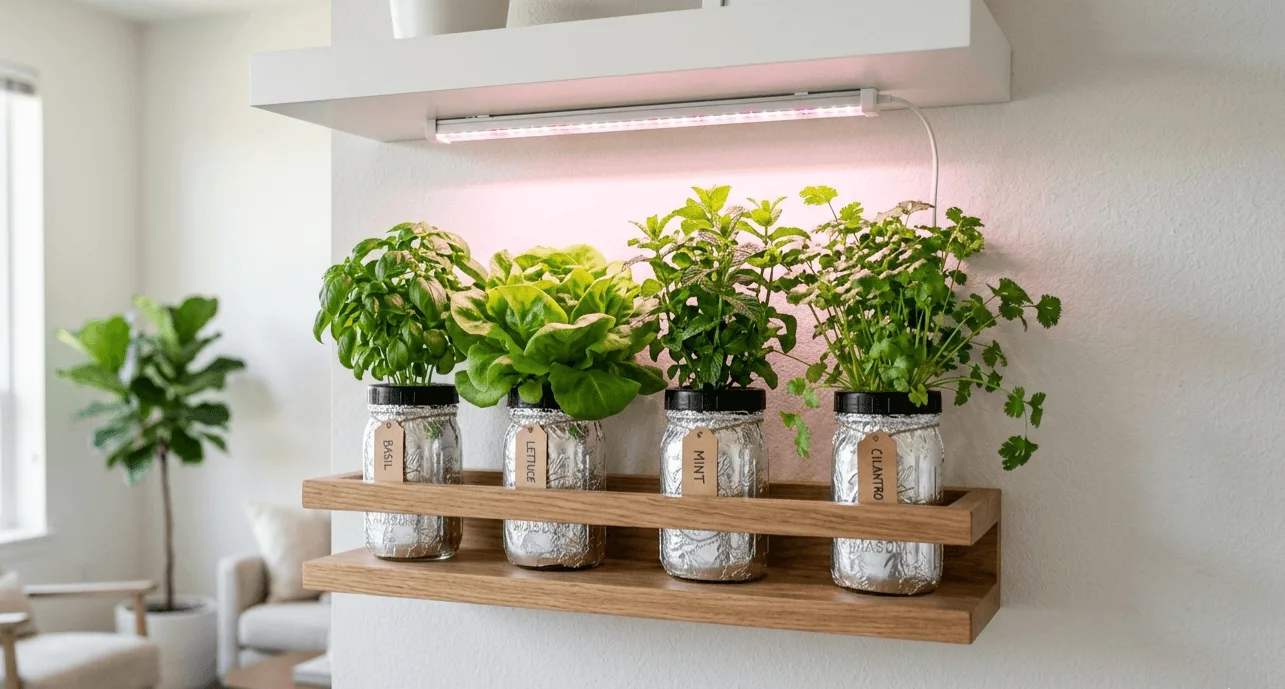
Any herb or leafy green grows in a small apartment hydroponic setup. Basil, mint, lettuce, spinach, cilantro, parsley, chives, green onions. All of them thrive in countertop-sized systems. Cherry tomatoes are possible with enough light and a slightly larger reservoir, but they are not a beginner crop. For that reason, start with leafy greens and herbs. They are forgiving, fast, and give you the feedback you need to learn the system before you try anything more demanding.
- Want the fastest result → Lettuce or green onions
- Want the most rewarding kitchen herb → Basil
- Want the most beginner-forgiving plant → Mint
- Want to grow multiple things at once → Lettuce + basil together
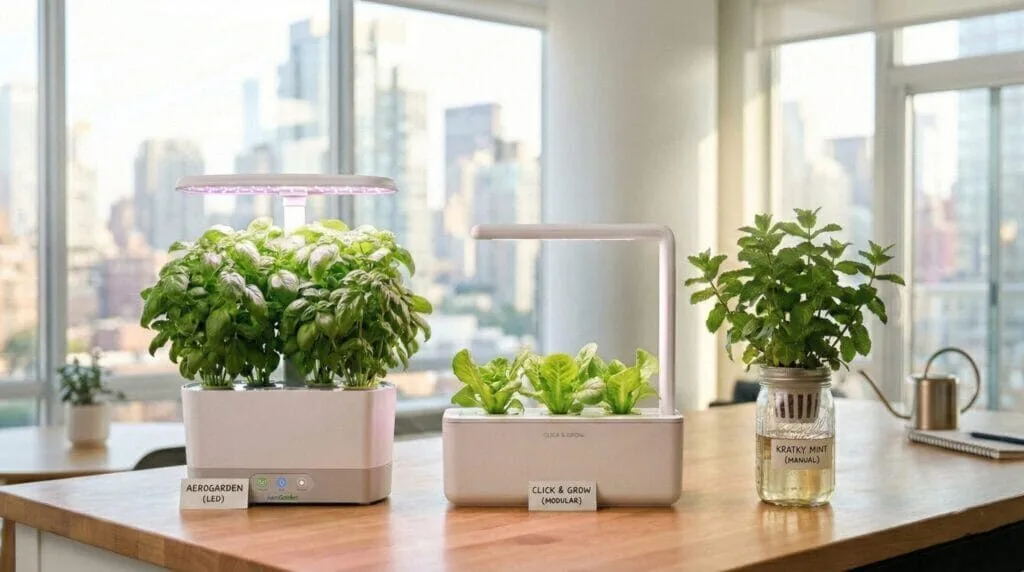
🧰 Choosing Your First System
There are dozens of hydroponic systems in the world. For an apartment beginner, three are worth knowing: the Kratky jar method, Deep Water Culture (DWC), and plug-and-play countertop kits. Everything else (NFT channels, ebb and flow, aeroponics) can wait until you have a few grows under your belt.
🫙 The Kratky Method: Best Starting Point
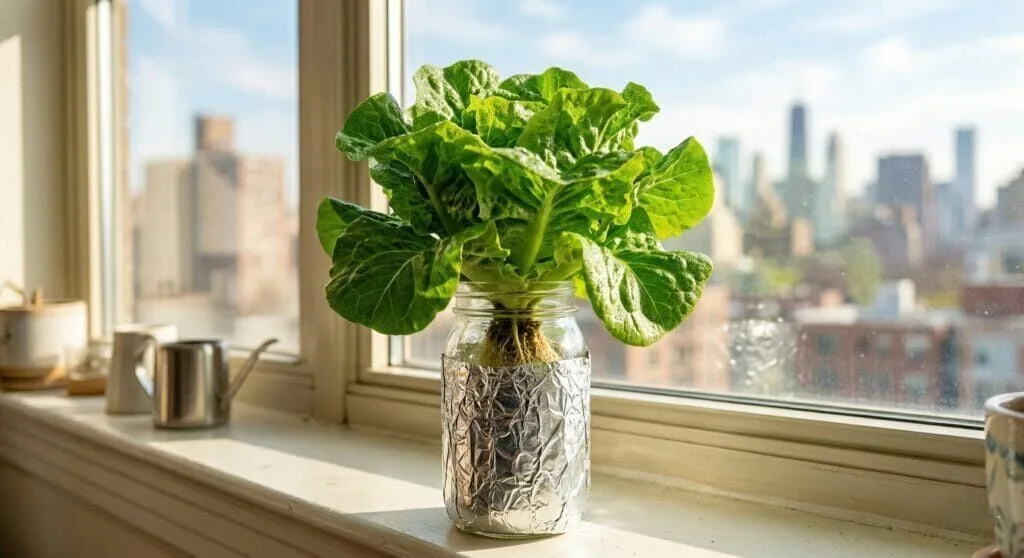
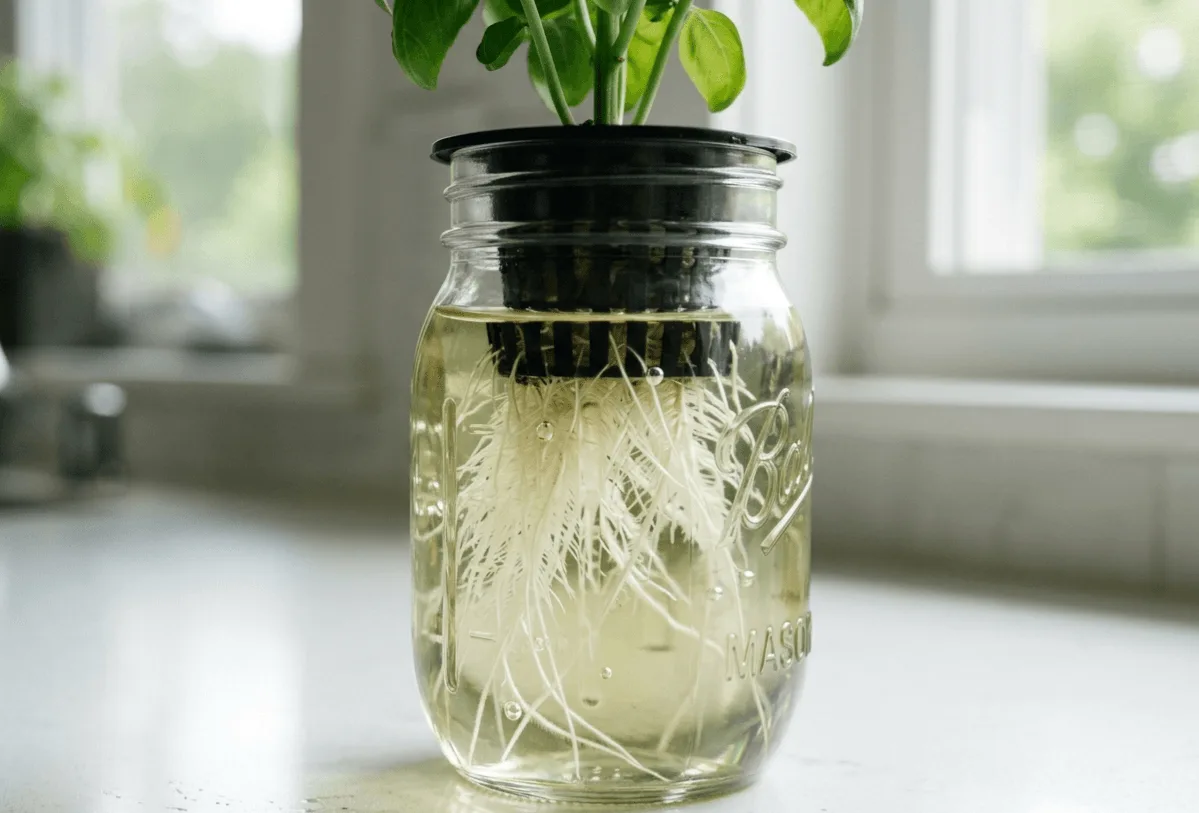
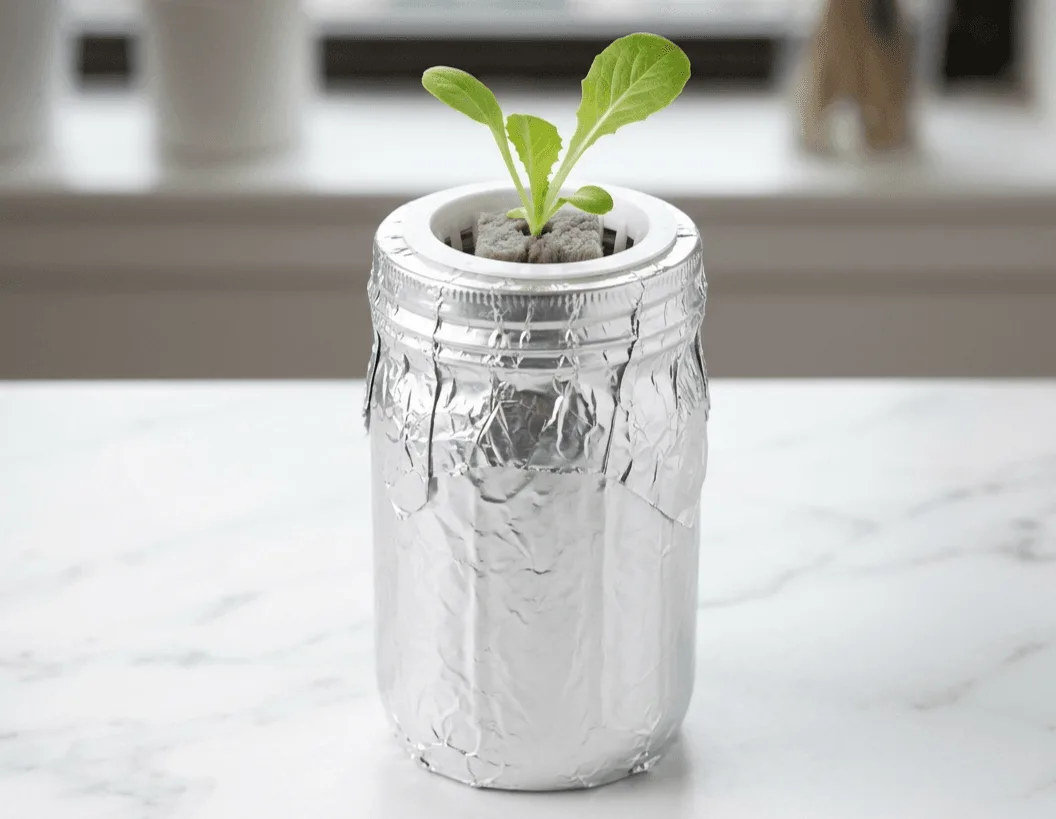
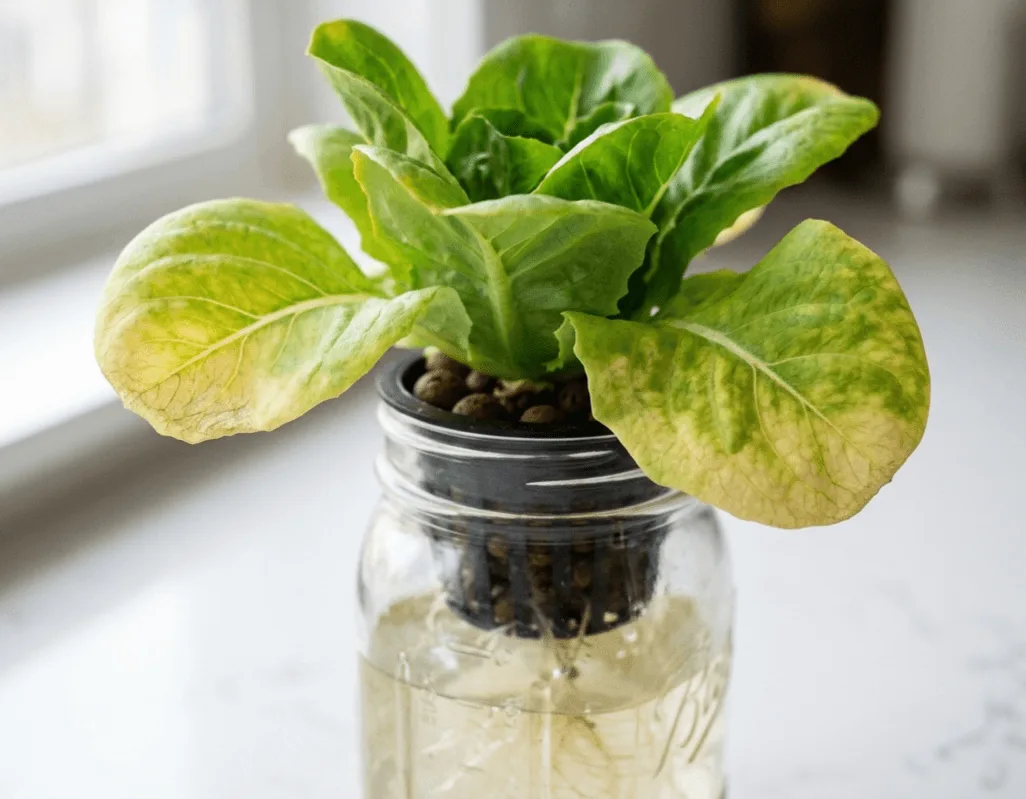
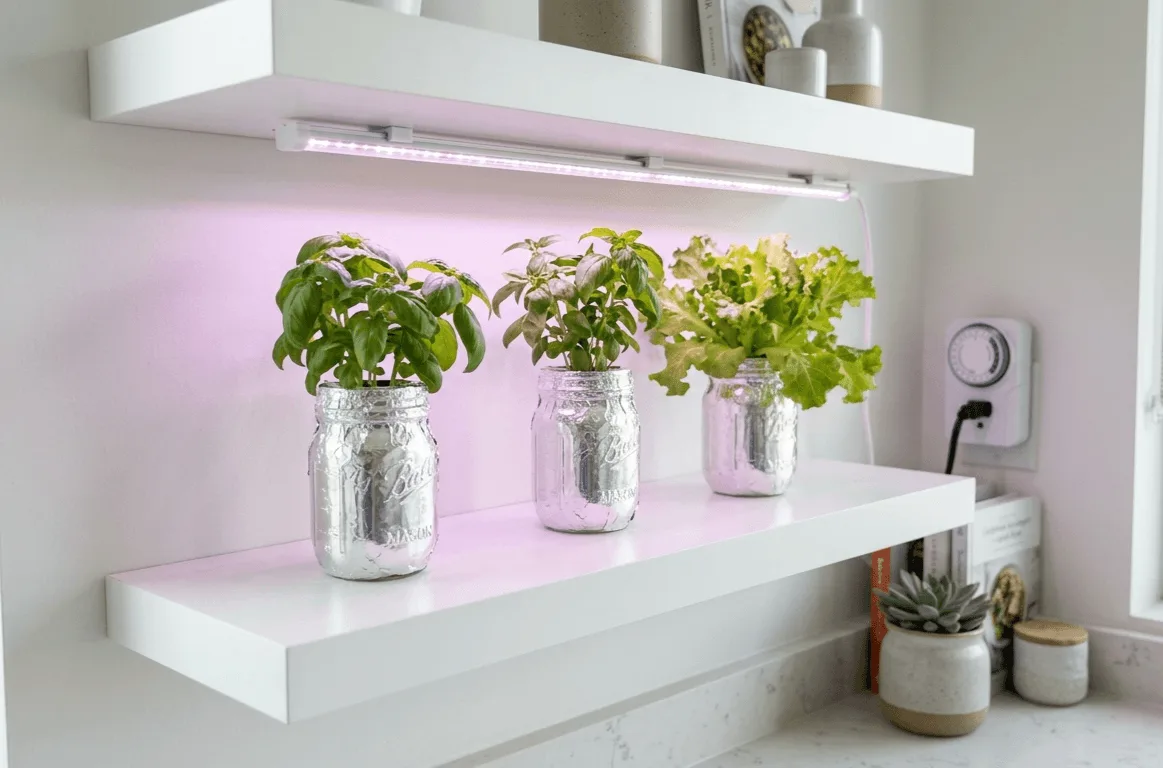
The Kratky method is a passive hydroponic system invented by Dr. Bernard Kratky at the University of Hawaii. You fill a jar with nutrient solution, drop a seedling in a net cup in the lid, and leave it. No pump, no electricity, no wiring, no noise. As the plant drinks the water down, an air gap forms between the waterline and the net cup. The roots that grow into that gap become oxygen-absorbing air roots. The plant feeds from below and breathes from above. You do almost nothing.
This is where I started, and it is where I recommend everyone starts. The full cost, including nutrients and a pH test kit, comes to around $25 to $36. You need a 32-ounce wide-mouth Mason jar, a 2-inch net cup, a rockwool starter cube, a small bottle of nutrients, and a pH test kit. That is the entire list. Wrap the jar in foil to block light, mix your first batch of solution, drop the seedling in, and put it on a windowsill or under a desk lamp. You will have a living hydroponic system running tonight.
The step-by-step build is covered in the Kratky jar setup guide for apartments, which includes photos of every stage. If you specifically want to grow lettuce in a jar on a windowsill, the Kratky lettuce jar windowsill guide walks through the full process from soaking rockwool to first harvest.
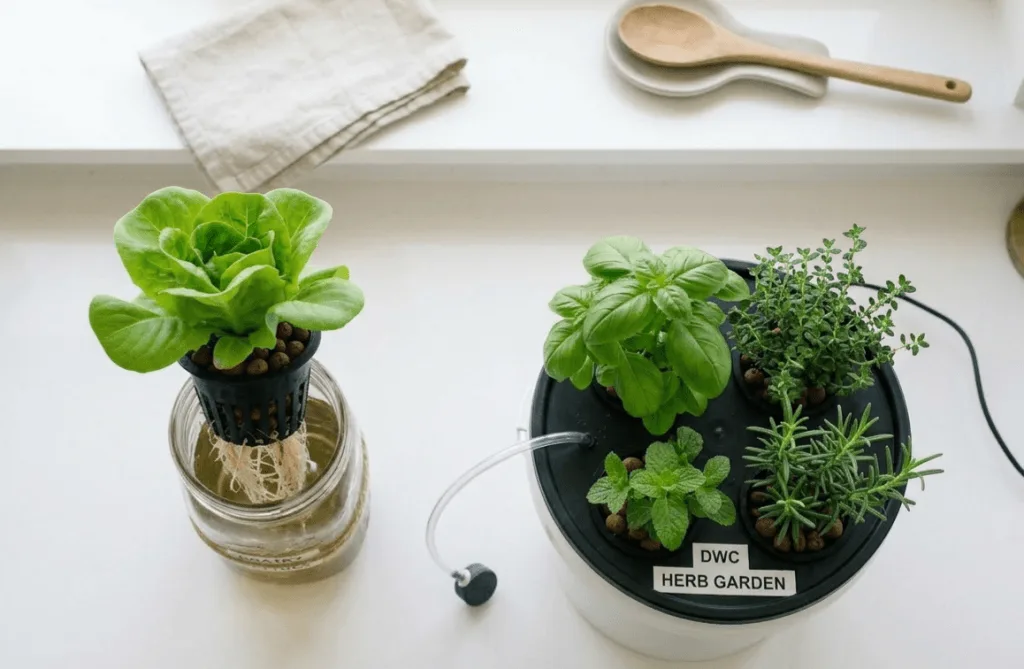
💧 Deep Water Culture: One Step Up
Deep Water Culture suspends plant roots in a reservoir of oxygenated nutrient solution. An air pump and air stone bubble oxygen into the water continuously, which prevents the roots from suffocating and produces faster growth than Kratky. A simple DWC setup (a small tote, a pump, an air stone, tubing, and net cups) costs around $30 to $50 to build from scratch.
DWC grows plants faster than Kratky because the roots have constant oxygen rather than relying on the air gap method. For basil in a DWC setup versus a Kratky jar, you will typically see your first harvest 5 to 7 days sooner. The trade-off is the pump. It adds a low hum to your space, and it adds one more thing that can fail or need maintenance. If you work from home or sleep near your growing area, noise is worth thinking about before you commit.
My recommendation: start with Kratky for your first grow. Once you understand pH management and reservoir changes, add a small DWC tote for your second or third system. The full comparison of both methods is in the DWC vs Kratky for apartment beginners guide.
🚀 Plug-and-Play Countertop Kits
Systems like the AeroGarden Harvest and the iDOO series remove the guesswork from the setup entirely. The light, the reservoir, the pod spacing, and the pump are already built in. You fill the reservoir, drop in the seed pods, plug it in, and follow the reminder prompts on the control panel. First-time growers who want the shortest path to a first harvest with the least amount of learning choose these.
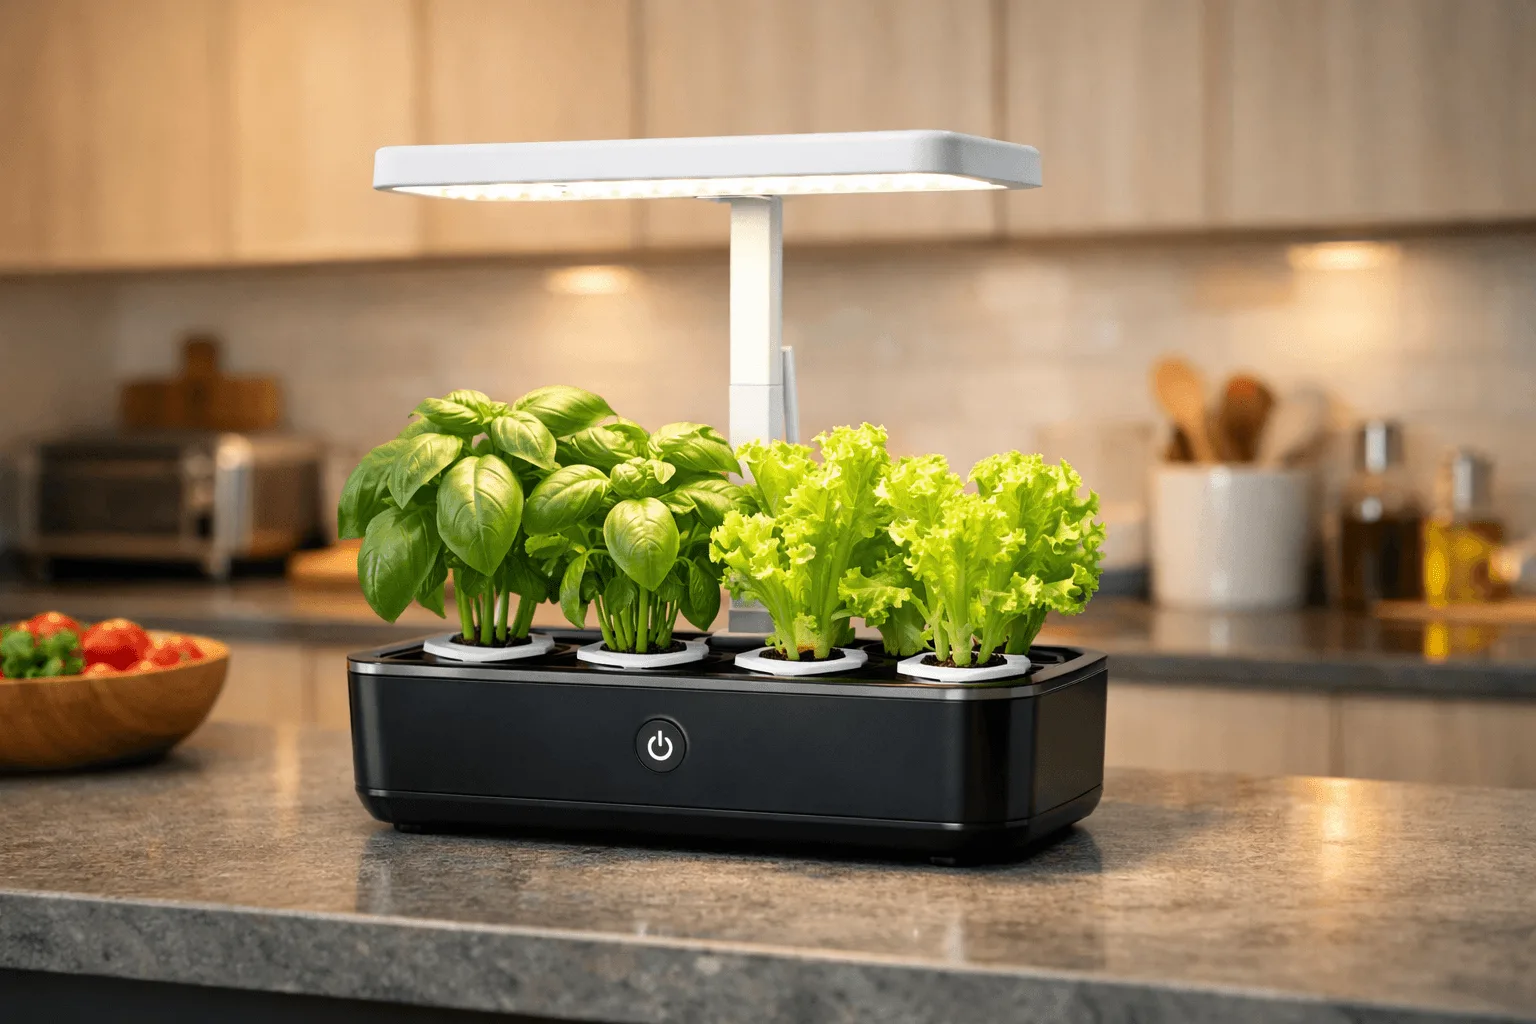
The AeroGarden Harvest holds 6 pods, has a 20W built-in LED, and costs around $80. The Click & Grow Smart Garden 3 holds 3 pods, is fully silent (no pump), and costs around $125. Both work well for a first grow. The downside of all countertop kits is proprietary seed pods. You pay a premium for the refill packs, and the selection is limited compared to buying your own seeds. Blank pod inserts let you use your own seeds, which fixes this once you are comfortable with the system.
A detailed side-by-side of the three best countertop options for apartment beginners is at the 3 best countertop hydroponic systems for apartment beginners. If you are looking for a full starter kit that includes everything you need, the best beginner hydroponic starter kits under $100 covers the options worth considering.
⚠️ Three Mistakes I Made in My First Month
Most beginner problems are not random. They are the same three mistakes, made in the same order, by almost every new grower. I made all three within my first four weeks. Knowing them upfront will save you at least one failed plant and probably two.
🟡 Mistake 1: Adding More Nutrients When Leaves Turned Yellow
Yellow leaves look like a hunger problem. The obvious fix, therefore, feels like feeding the plant more. It is wrong almost every time. When leaves yellow in a hydroponic system, the cause is nearly always pH drift, not nutrient deficiency. pH measures the acidity of your water, and when it drifts outside the 5.5 to 6.5 range that hydroponic plants need (explained fully in the nutrients and pH section below), the roots physically cannot absorb iron and nitrogen even when those minerals are sitting right there in the water. The plant starves on a full plate. I poured more fertiliser into a reservoir that already had plenty. As a result, the plant got worse. Testing pH first would have fixed it in 10 minutes. The yellow leaves fix guide walks through the full diagnosis process, but the short version is: always test pH before you change anything else.
🟤 Mistake 2: Filling the Jar Too Full and Drowning the Roots
In a Kratky system, the air gap between the waterline and the bottom of the net cup is not decorative. It is where the roots breathe. I filled my first jar right up to the net cup because I thought more water meant more food. What it meant was zero oxygen at the root tips. The roots went brown and slimy within a week. To fix this, fill the jar so the nutrient solution just touches the very bottom of the net cup, then let the plant drink it down on its own. That air gap builds itself as the water level drops. Do not refill it. Leave the gap. The plant will grow roots into it and use them to breathe.
🌙 Mistake 3: Running the Lights 24 Hours Because More Light Felt Like More Growth
It seems logical: plants need light to grow, so more light equals faster growth. It does not work that way. Most herbs and greens need a dark period of 8 to 10 hours each day to complete metabolic processes that support the next day’s growth. The grow lights section below covers the exact schedule, but the short version is 14 to 16 hours on, 8 to 10 hours off. Running lights around the clock, however, stresses the plant over time and produces slower, weaker growth than a proper cycle. My basil started looking pale and rigid after two weeks of 24-hour light. Switching to a timer set at 15 hours on, 9 hours off brought it back within days. A $12 outlet timer is one of the most valuable things in a small hydroponic setup.
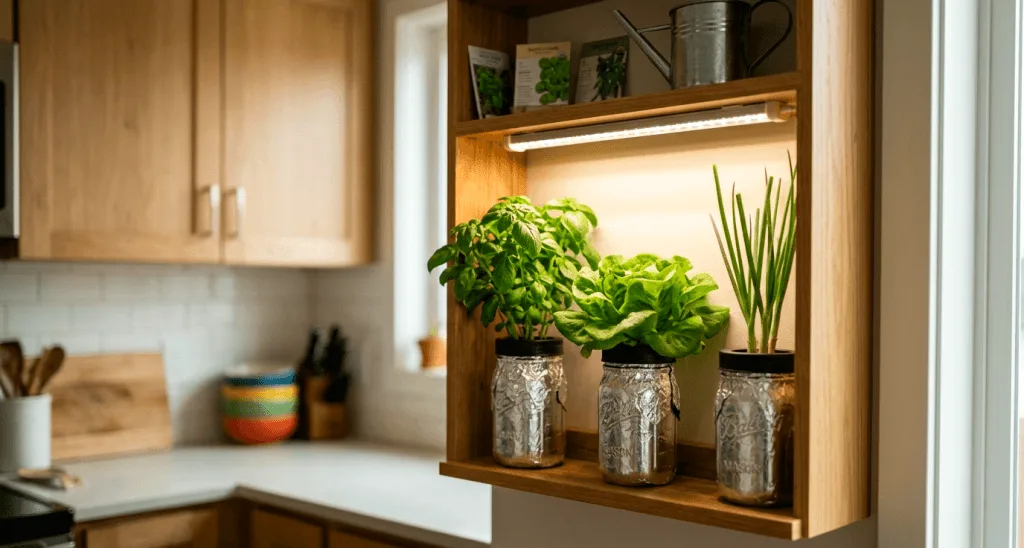
💡 Grow Lights: What You Need and What You Can Skip
Light is the energy source for your plants. Without enough of it, leaves go pale, stems stretch thin, and growth stalls. In an apartment, a south-facing window that gets 6 or more hours of direct sun can support herbs and lettuce through spring and summer. In winter, or in apartments with north-facing or blocked windows, a small supplemental grow light makes the difference between a plant that thrives and one that barely survives.
💡 Which Type of Light to Buy
Full-spectrum LED bar lights are the right choice for almost every apartment grower. A 2-foot (60 cm) bar at 20 to 30 watts costs $30 to $45 for a 2- to 4-pack and covers a full tray of leafy greens. They run cool, draw little electricity, and mount easily under a shelf or hang from an adjustable fixture. For a single Kratky jar on a desk, a 10-watt full-spectrum LED grow bulb in a standard E26 socket costs $10 to $20 and works well. Both are covered in the full grow lights for low-light apartment hydroponics guide.
If you want specific product picks with current prices, the 3 best LED grow lights for apartment countertop hydroponics covers the top options for small spaces.
⏰ How Many Hours Per Day
Most leafy herbs and greens need 14 to 16 hours of light per day. This sounds like a lot, but a simple $10 to $15 outlet timer set once means you never think about it again. The dark period, the 8 to 10 hours the light is off, is not wasted. Plants process sugars and complete metabolic functions during darkness that support the next day’s growth. Do not skip the dark period. Running lights 24 hours a day stresses most herbs over time and does not accelerate growth meaningfully.
The apartment hydroponic light schedule guide shows exactly how to set a timer around a 9-to-5 work schedule so the lights are on when you are home in the evenings and off while you sleep.
📏 How Far Away the Light Should Be
For seedlings and young plants: 12 to 18 inches (30 to 45 cm) above the canopy. For established leafy greens: 6 to 12 inches (15 to 30 cm). If stems stretch upward, the light is too far. If the top leaves bleach or go crispy, the light is too close. Adjust by 1 to 2 inches at a time and give the plant 24 hours to respond before adjusting again. The grow light distance guide for hydroponic herbs on a shelf covers specific margins for each herb. The free grow light calculator gives you exact wattage and hang height for your specific space and crop.
⚡ What Running Costs Look Like
A single 20W LED bar light running 15 hours a day costs roughly $1.44 per month at a standard US electricity rate. A full two-shelf setup with four bar lights costs under $6 per month. The lights will not register on your electricity bill in any meaningful way.
🧪 Nutrients and pH: The Two Numbers That Run Your Garden
Water chemistry in a small apartment system comes down to two numbers: pH and EC. Once you understand what each one does and how to check them, however, managing your reservoir takes under five minutes and happens every 3 to 5 days.
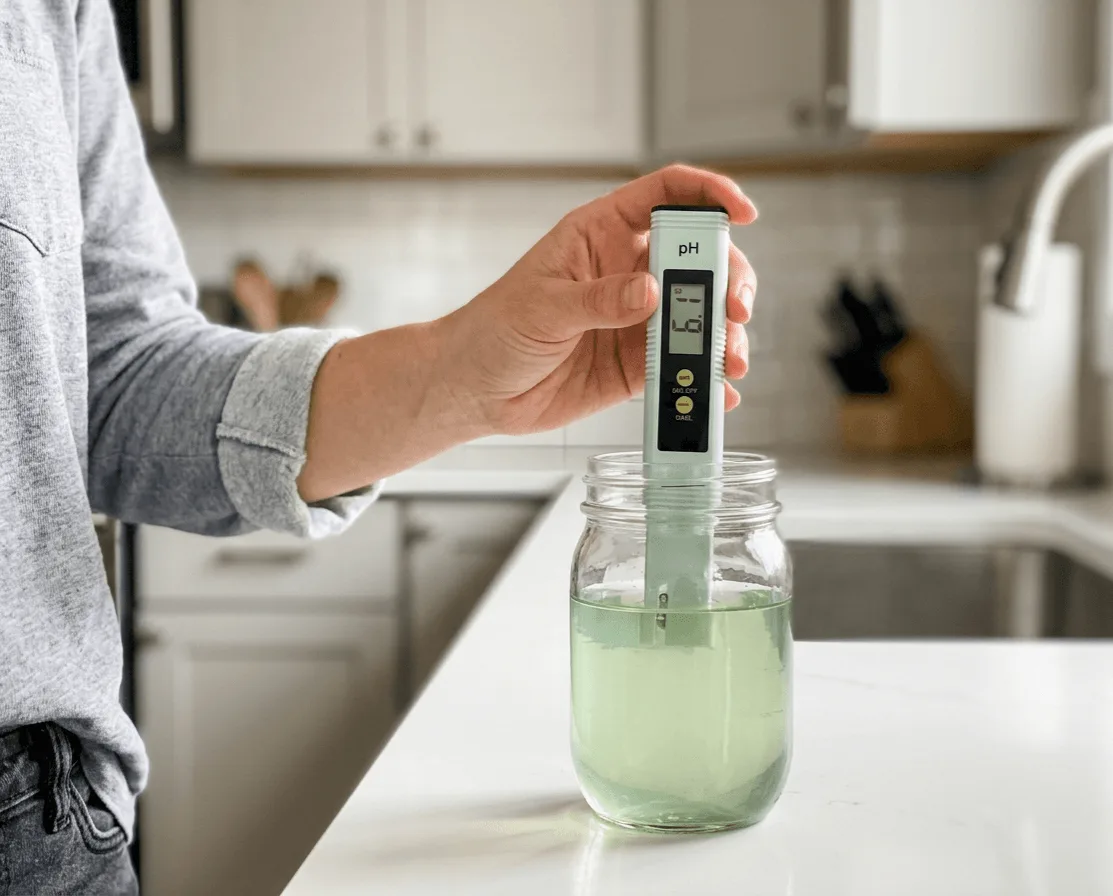
💧 What pH Is and Why It Matters
pH measures the acidity or alkalinity of your water on a scale from 0 to 14. Pure water is pH 7.0, neutral. Hydroponic herbs and greens grow best between pH 5.5 and 6.5. Within that range, the roots can absorb all the minerals they need from the solution. Outside that range, even if the solution is loaded with nutrients, the roots lock out specific minerals and the plant shows deficiency symptoms like yellow leaves, even though the water looks perfectly fine.
Before you add more fertiliser to a struggling system, always test pH first. The pH and yellow leaves section above explains why this is almost always the first fix. A reliable digital pH meter makes testing fast. The best pH meter for beginners review covers the Apera PH20, which is what I use every week.
🔎 pH quick reference for common apartment crops
| Crop | Target pH | Target EC |
|---|---|---|
| Lettuce | 5.5 to 6.0 | 0.8 to 1.2 mS/cm |
| Basil | 5.8 to 6.2 | 1.0 to 1.6 mS/cm seedlings / 1.6 to 2.2 mS/cm mature |
| Mint | 5.5 to 6.5 | 1.6 to 2.0 mS/cm |
| Spinach | 6.0 to 7.0 | 1.8 to 2.3 mS/cm |
| Cilantro | 6.0 to 6.5 | 1.0 to 1.4 mS/cm |
| Green onions | 6.0 to 6.5 | 1.4 to 1.8 mS/cm |
🧪 What EC Is and How to Use It
EC stands for Electrical Conductivity. It measures the total concentration of dissolved minerals in your water. The higher the number, the more nutrient salts are present. For seedlings and young plants, you want a low EC, around 0.8 to 1.2 mS/cm, because young roots are sensitive and can burn in a strong solution. For mature herbs in active growth, EC of 1.2 to 2.0 mS/cm is the working range for most apartment crops.
If EC is too high, you will see crispy brown leaf tips — that is nutrient burn. If EC is too low, on the other hand, growth slows and leaves go pale because the plant cannot find enough nitrogen or iron in the water. The free pH and nutrient calculator gives you the exact EC target and nutrient dose in millilitres for your specific crop, system type, and reservoir size. Use it before every mix.
🌱 What Nutrients to Start With
For beginners, a one-part liquid nutrient designed for hydroponics is the easiest path. The Miracle-Gro AeroGarden liquid fertiliser is the simplest: one bottle, one measurement. General Hydroponics FloraSeries (three bottles) gives you more control but more room to make mixing errors. General Hydroponics MaxiGro powder is the most cost-effective for small systems over time. All three work well. A full comparison with honest pros and cons is in the best hydroponic nutrients for small apartment systems guide. For exact doses and a week-by-week feeding schedule, the beginner hydroponic nutrients and feeding schedule guide takes you through every stage from seedling to full harvest.
💧 When to Change the Water
The baseline rule for every small apartment system is a full reservoir change every 14 days. Between changes, top off with plain pH-adjusted water only. Never add more nutrients when topping off, because the nutrients stay in the water while only the water evaporates, which means concentration is already rising. Adding more fertiliser to a concentrated tank burns the roots. The full guide on how often to change hydroponic water covers the schedule for every system type and what to do if the water smells bad before the two-week mark.
🥬 Best Beginner Crops for Apartment Hydroponics
Not all plants are equal for beginners. The crops below are forgiving, fast, and useful in a kitchen. They give you visible results within days of planting and reward regular harvesting with more growth. Start here, get confident, then try more demanding crops later. For a deeper look at the best herbs specifically, the 7 best herbs for small hydroponic systems guide covers varieties that thrive in apartment conditions.
🥬 Lettuce: Fastest First Harvest
Lettuce is the single best first crop for apartment hydroponics. It grows at lower light levels than most herbs, tolerates a wider EC range, and reaches harvest in 4 to 5 weeks from seed, roughly half the time it takes in soil. Loose-leaf varieties like Buttercrunch and Black-Seeded Simpson are the most forgiving for beginners. Harvest outer leaves first, leave the centre intact, and the plant keeps producing for weeks.
The full growing guide is at growing hydroponic lettuce in a countertop system.
🌿 Basil: Most Rewarding Kitchen Herb
Basil is what hooked most apartment growers, including me. It likes warmth, needs strong light (14 to 16 hours), and responds well to pruning. One well-managed basil plant can produce harvestable leaves every 10 days for months. The key is cutting above a leaf node so the plant branches outward instead of growing taller. Full basil-specific guidance is in the foolproof guide to growing hydroponic basil in a small apartment, and the pruning technique is covered in detail at how to prune hydroponic basil so it keeps producing.
☘️ Mint: Easiest Plant to Keep Alive
Mint is almost impossible to kill once rooted. It spreads fast, tolerates slight pH fluctuations, and produces continuously. The only management rule with mint is containment. It sends out runners and will take over a shared reservoir if you let it. Grow it in its own jar or keep it trimmed back from neighbouring pods. Start from cuttings rather than seed if you can: a 3- to 4-inch stem in plain water develops roots in 7 to 10 days, then produces its first harvest about 3 to 4 weeks after transplanting to nutrients. Total time from cutting to harvest is 4 to 5 weeks.
🍃 Spinach: Best for Nutrition
Spinach prefers cooler temperatures than basil and grows well in apartment kitchens that stay below 70°F (21°C). It likes a slightly higher EC than lettuce, around 1.8 to 2.3 mS/cm, and tolerates a broader pH band. First harvest comes around 5 to 6 weeks from seed. The hydroponic spinach apartment guide covers everything specific to getting spinach to thrive in small systems.
🧅 Green Onions: Fastest Return From Scraps
Green onions (scallions) are the gateway crop for anyone who wants results before they have even bought seeds. Save the white root ends from a grocery store bunch, place them in a small glass of water, and new green shoots emerge within 2 to 3 days. Move them to a nutrient solution after a week and you have a continuous supply. The full process is covered in the guide to regrowing green onions hydroponically.
💰 What It Costs to Start
Most guides either make hydroponics sound free or make it sound like a $500 investment. The reality is somewhere in the middle, and the range is wide depending on which path you take. Here is what a real setup costs at each level.
🟢 Tier 1: Mason Jar Kratky Setup
This is the true entry point. Everything you need for one growing jar:
- 32-ounce Mason jar: $2
- 2-inch net cup: $1
- Rockwool starter cube: $1
- Small bottle of liquid nutrients: $10 to $15
- pH test kit (liquid drops): $8 to $12
- Lettuce or basil seeds: $3 to $5
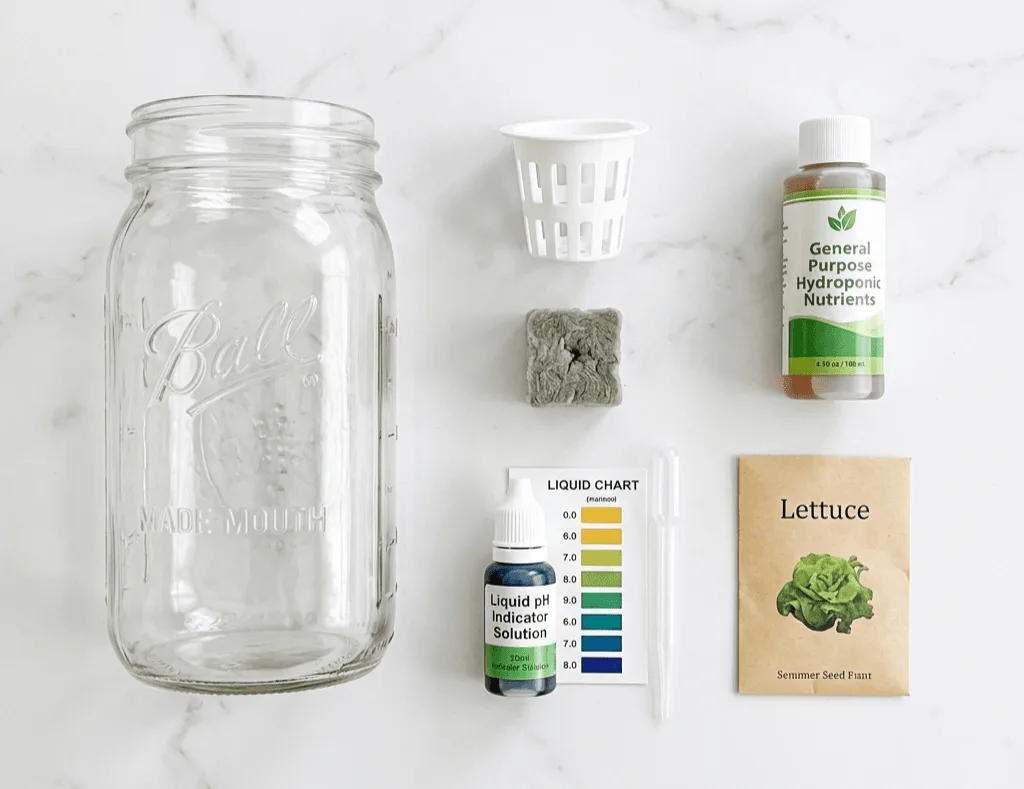
Total: $25 to $36. If you already have a desk lamp with a standard socket, add a $10 to $15 full-spectrum grow bulb and you have everything you need. No other purchases required for your first grow. Use the free shopping list builder to get a complete, prioritised list with current Amazon prices for exactly your setup and budget.
🟡 Tier 2: Proper Beginner Setup
This is what I would buy if I was starting today and wanted a setup I could grow with for the next year:
- 2-pack full-spectrum LED bar lights: $30 to $45
- Digital outlet timer: $12 to $15
- 2 to 4 Kratky jars or one small DWC tote: $15 to $30
- Liquid nutrients (starter bottle): $15 to $20
- Digital pH meter (Apera PH20): around $50
- Seeds, rockwool, net cups: $10 to $15
Total: $130 to $175. This setup gives you reliable light, accurate pH testing, and enough capacity to run 3 to 6 plants at once. Monthly running cost is under $6 in electricity.
🟠 Tier 3: Plug-and-Play Countertop Kit
If you want the simplest possible entry with everything already built in:
- AeroGarden Harvest (6 pods, built-in LED): around $80
- Nutrient solution (included in most kits): $0
- Seed pods or blank pod inserts + seeds: $15 to $25
Total: $95 to $105. Higher upfront cost but zero guesswork on light height, pod spacing, or reservoir design. Ideal for anyone who wants to skip the DIY phase entirely.
🗓️ Monthly Ongoing Costs
Once you are set up, the ongoing costs are modest. Nutrients cost $10 to $20 per month depending on your reservoir size and how often you change the water. Electricity runs $2 to $6 depending on how many lights you run and for how long. pH calibration solution is around $5 per quarter. Total monthly running cost for a typical apartment setup: $12 to $26 per month. That is less than a single grocery trip for the herbs you are replacing.
⚠️ Common Problems and How to Fix Them
Every new grower hits problems. Most of them are the same handful of issues, and most of them have fast, clear fixes once you know what you are looking at. The three most common (yellow leaves, root rot, and leggy growth) are covered in detail in the mistakes section above, including what causes them and how to catch them early. The table and notes below cover the full set of symptoms you may encounter, including ones that are harder to diagnose.
🔎 Quick diagnosis: what went wrong
| What you see | Most likely cause | Fix first |
|---|---|---|
| 🟡 Yellow leaves | pH out of range, roots locked out | Test pH before anything else. Adjust to 5.8 to 6.2. See Mistake 1 above. |
| 🟢 Green water or slime on roots | Algae, light reaching the reservoir | Wrap jar in foil, drain, clean, refill |
| 🟤 Brown slimy roots, foul smell | Root rot, warm water or no oxygen | Cool the water, clean system, check air gap. See Mistake 2 above. |
| 🍂 Tall thin stems, sparse leaves | Insufficient light, plant reaching upward | Lower light to 6 to 8 inches, increase hours. See Mistake 3 above. |
| 🔴 Crispy brown leaf tips | EC too high, nutrient burn | Drain reservoir, refill with plain water for 24 hours |
| 🤢 Wilting despite water in reservoir | Root rot or pH crash | Check roots for slime, test pH, clean system |
🟢 Algae
Green water or green slime on roots is always caused by light reaching the nutrient solution. Nutrient-rich water plus light equals algae, every time. Fortunately, the fix is simple: block all light from the reservoir. Wrap clear jars in foil or opaque tape, use dark containers, cover any gaps around net cup openings with tape. Algae itself does not kill the plant immediately, but it competes for oxygen and nutrients and makes the whole system messier and less stable. The full prevention and fix guide is at why algae keeps growing in hydroponic jars. Once you have cleared the algae, a full system clean prevents it from returning — the guide to cleaning a small hydroponic system in an apartment covers the full process step by step.
🔴 Nutrient Burn
Crispy brown tips on otherwise healthy-looking leaves are nutrient burn. The EC in your reservoir climbed too high, either because you added nutrients on top of a solution that was already concentrated from evaporation, or because you mixed at too strong a dose to begin with. Drain the reservoir fully. Refill with plain pH-adjusted water and run the plant on water only for 24 hours to let the roots recover. Then mix a fresh solution at the correct EC for your crop’s current growth stage. Use the EC target from the pH and crop table above as your reference, and measure before you pour.
🤢 Wilting With Water in the Reservoir
A plant that wilts despite a full reservoir is either dealing with root rot or a sudden pH crash, both of which cut off the plant’s ability to take up water even when water is present. Lift the net cup and inspect the roots immediately. White or tan roots that smell clean mean root rot is not the issue. Go straight to a pH test. Brown, slimy roots with a foul smell mean root rot has progressed. Empty the reservoir, rinse the roots gently with plain pH-adjusted water, clean the jar, and refill with a fresh solution. Add an air stone if you do not already have one. The full prevention and recovery steps are at how to prevent root rot in small hydroponic systems.
🏁 Your First Week: What to Do Right Now
Reading about hydroponics is useful. Starting is more useful. Here is the most direct path from reading this guide to having a living plant in a hydroponic system by the end of the week.
Day 1: Buy the basics
If you want the cheapest possible start, you need five things:
- A 32-ounce wide-mouth Mason jar
- A 2-inch net cup
- A small bag of rockwool starter cubes
- A bottle of liquid hydroponic nutrients
- A pH test kit or drops
All of these are available on Amazon or at a garden centre. Total spend: $25 to $36. If you want a plug-and-play setup, order an AeroGarden Harvest or an iDOO kit instead. It arrives with everything you need in one box.
Day 2: Soak rockwool and plant seeds
Soak your rockwool cube in pH 5.5 water for 30 minutes before planting. Drop 2 to 3 basil or lettuce seeds into the pre-drilled hole. Cover the hole loosely with a small piece of torn rockwool. Place the cube in a shallow tray with a clear cover or wrap loosely in cling film to hold humidity. Put it somewhere warm, 70°F (21°C) or above. The seeds need warmth and moisture to germinate, not light yet. For the full seed starting walkthrough, see how to start hydroponic seeds in rockwool without damping off.
Days 3 to 5: Watch for sprouts
Basil sprouts in 3 to 5 days. Lettuce takes 2 to 4 days. Once the seedlings emerge, remove the humidity cover and give them 14 to 16 hours of light per day. Do not add nutrients yet, because the seedling lives off energy stored in the seed for the first week and does not need fertiliser.
Day 7: Move to the hydroponic system
Once you see the first true leaves (the second set, not the initial seed leaves), mix your first nutrient solution. For seedlings: EC 0.8 to 1.0 mS/cm, pH 5.8 to 6.0. Fill your jar so the nutrient solution just touches the very bottom of the net cup. Drop the seedling in. Wrap the jar in foil if it is clear glass. Put it under the light. You are growing hydroponically.
Track your harvest date with the free seed to harvest countdown calculator. Enter your crop and planting date and it will show you exactly where you are in the growth cycle and what to look for at each stage.
Once one jar is producing reliably, this is the order I would build out the setup:
- A second jar for a different crop, so you always have something at a different stage of growth.
- A digital outlet timer if you are not already using one. Set it once and forget the light schedule entirely.
- An EC meter alongside your pH meter. Once you can measure nutrient concentration directly, you stop guessing at every reservoir change.
- A small DWC tote as your third system if you want faster growth and do not mind a low pump hum.
Build at your own pace. One jar working well is more valuable than three jars that are struggling.
→ University of Minnesota Extension: Small-Scale Hydroponics Overview
→ University of Maryland Extension: Hydroponics for Home Gardeners
→ Penn State Extension: Hydroponic Systems and Plant Nutrition Principles
💬 A Word From Sarah
The thing nobody told me about Kratky systems is that doing nothing is the hardest part. Every time I checked a jar in those first few weeks, I was opening the lid, letting bacteria in, disturbing the air gap, and poking at roots that did not need to be poked. The first grow I did not touch between planting and the two-week reservoir change was the best one. That lettuce was dense and dark green. Every root was white all the way down. Nothing had gone wrong because I had not given anything the chance to go wrong.
There is a real instinct, when you care about a plant, to do something. Check the water level again. Add a little more nutrient. Lift the net cup and look underneath. Most of the time, however, the best thing you can do is put the lid back on and walk away. Hydroponic systems are not fragile. They just need your numbers to be right and your hands to stay out of the jar.
❓ Frequently Asked Questions
🌱 How do I start hydroponics in an apartment with no experience?
Read the first week section above and follow the four-day plan. Day 1: buy a jar, net cup, rockwool, nutrients, and a pH kit. Day 2: soak rockwool and plant seeds. Days 3 to 5: watch for sprouts and give them light. Day 7: move the seedling to your nutrient solution. The Start Here page gives you a full reading path from zero to first harvest organised by topic.
💰 What is the cheapest way to start apartment hydroponics?
A Kratky mason jar setup. The itemised cost is around $25 to $36: a Mason jar ($2), a 2-inch net cup ($1), a rockwool cube ($1), a small bottle of liquid nutrients ($10 to $15), a pH test kit ($8 to $12), and seeds ($3 to $5). If you already have a window with 6 or more hours of direct sun, you do not even need a grow light for your first attempt. No other purchases are required to complete a full first grow.
💡 Can I grow without a grow light?
Yes, if your window gets 6 or more hours of direct south-facing sun during spring and summer. For north-facing windows, east-facing windows, or winter growing, a small full-spectrum LED grow light is necessary. A 20W bar light or a 10W grow bulb in a desk lamp costs $10 to $45 and makes the difference between a thriving plant and a pale, stretching one. If you are starting between October and March, plan for a grow light from day one.
🔇 Are hydroponic systems noisy in an apartment?
Kratky jars and the Click & Grow Smart Garden 3 are fully silent. No pump, no moving parts. The AeroGarden Harvest and DWC setups have a low pump hum that most people describe as similar to a small aquarium. For noise-sensitive spaces, Kratky is the obvious choice. If you already have an active system and the hum is bothering you, the quiet hydroponic pump guide covers the fastest fixes.
⏱️ Do hydroponic plants really grow faster than in soil?
Yes. Multiple studies have found that hydroponic plants grow 30 to 50% faster than the same varieties in soil. Lettuce that takes 60 days in soil can be ready in 30 to 35 days hydroponically. The reason is direct nutrient delivery. Roots absorb minerals from the water without expending energy searching through soil. With strong grow lights added, the speed advantage can be even larger.
🧪 Do I really need a pH meter or can I guess?
You need a pH meter or at minimum a liquid drop test kit. Tap water in most cities runs between pH 6.5 and 8.0, well outside the 5.5 to 6.5 range that most hydroponic plants need. Guessing leads directly to nutrient lockout, yellow leaves, and dead plants. A liquid drop kit costs under $12 and is accurate enough to get started. A digital meter like the Apera PH20 costs around $50 and makes daily testing fast enough that it becomes a non-event.
💧 How often do I need to change the water?
Every 14 days for small apartment systems under 3 gallons. Between changes, top off with plain pH-adjusted water only. Never add more nutrients when topping off. A full change flushes accumulated salts and refreshes the mineral balance. Letting old water sit longer than two weeks leads to pH crashes, salt buildup, and bacterial growth even when the reservoir looks clean from the outside.
📐 How much counter space does a hydroponic system take?
A single Kratky mason jar takes 3.5 to 4 inches square. The AeroGarden Harvest footprint is 11.89 x 7.84 inches, roughly the size of a coffee maker. A two-tier wire shelf setup with bar lights takes about the footprint of a large microwave but produces 6 to 12 plants at once. Most apartment growers start with one or two jars on a windowsill and expand once they are comfortable with the routine.
🥬 What is the best first crop for a complete beginner?
If you want the single fastest visible result, green onion scraps in a glass of water show new growth within 48 hours and need no setup at all. But for your first proper hydroponic grow, lettuce or basil is the better choice. Lettuce reaches first harvest in 4 to 5 weeks, tolerates a wider EC range, and needs less light than most herbs. Basil takes slightly longer but teaches you everything you need to know about pruning and plant management. Green onion scraps are a great confidence builder. Lettuce and basil are where you learn the system for real.
Happy growing! 🌿
— Sarah, Urban Hydro Space

Sarah is the founder of Urban Hydro Space and an indoor gardening enthusiast dedicated to helping apartment dwellers grow fresh herbs and vegetables in small spaces. With hands-on experience testing hydroponic systems, she shares practical tips and honest product reviews to make indoor gardening accessible for beginners.