⏳ 10 min read · Last updated: March 2026
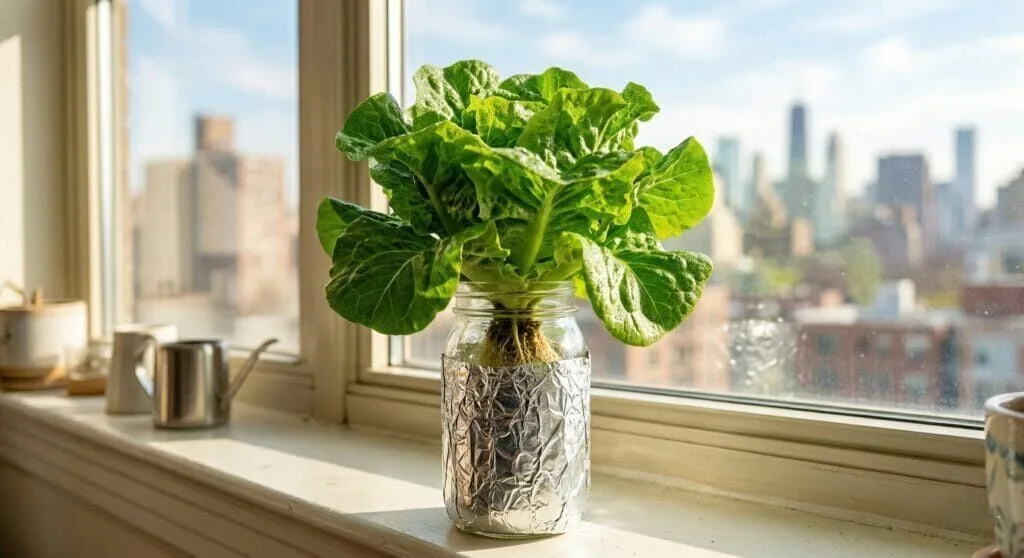
A Kratky lettuce jar was the first hydroponic setup that worked for me in an apartment. My early attempts with soil pots failed fast. The heat was intense, everything dried out fast, and my tap water pH was way off. Then I tried this simple jar method, and that switch changed everything. It gave me a quiet, low-cost way to grow fresh lettuce indoors without pumps, daily watering, or a bulky countertop system.
The whole thing fits on a windowsill. No wiring, no noise, no electricity bill. If you have a sunny south-facing window and an afternoon to spare, you can have lettuce growing by tonight. If you end up liking the Kratky method, the Growing Guides hub is the best next step. I keep all my apartment-friendly tutorials there so you can move from one small win to the next.
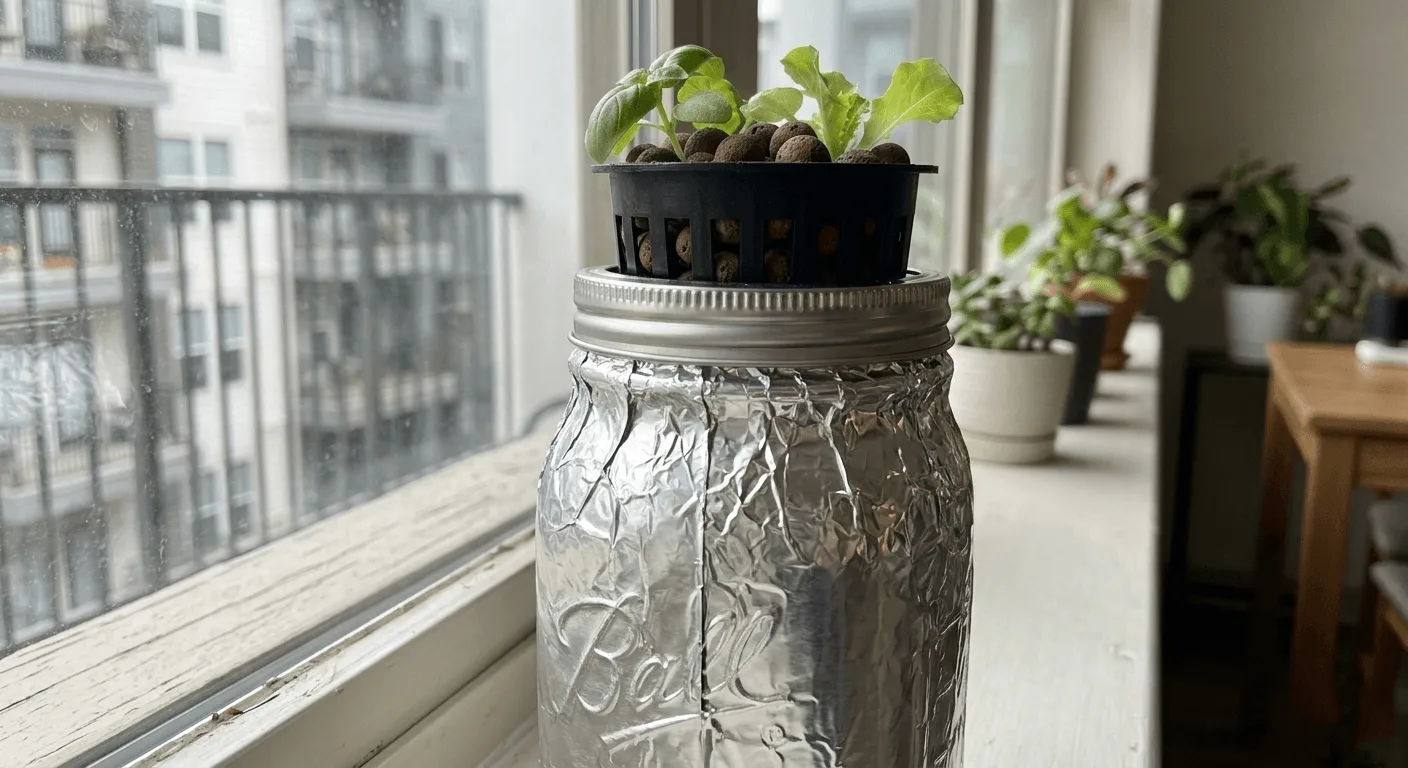
- Use a 32-ounce wide-mouth Mason jar so the roots have enough nutrient solution and better protection from daily heat swings.
- Keep your nutrient solution between pH 5.5 and 6.0 for healthy lettuce growth.
- Block 100 percent of light from hitting the jar to prevent algae and root problems.
- Start with the water level just touching the net cup, then let it drop as the roots grow.
- If you ever top up the jar later, stop at about one-third of the jar height to preserve the air gap.
- No hydroponics experience → follow the steps in order below
- Tried soil on a windowsill and killed it → this method is more forgiving
- Jar already running but lettuce is pale or leggy → jump to the problems section
💡 Why a Kratky Lettuce Jar Works So Well on a Windowsill
Apartment growers usually have one bright zone to work with, and that is often a windowsill. The problem is that small soil pots dry out fast, especially in a sunny south-facing window. A Kratky jar solves that by giving the roots a larger, more stable water reserve. No pump, no wiring, no constant noise in the background.
The roots sit in nutrient solution at first, then an air gap forms as the water level drops. That little gap is the whole magic of the method. Dr. Bernard Kratky’s original research at the University of Hawaii College of Tropical Agriculture demonstrated that this non-circulating method can grow lettuce effectively without pumps or moving water — a practical fit for small apartment setups.
Heat is still the thing to respect most. Warm root zones increase disease pressure and make root problems more likely. That is one reason a larger jar helps — it gives you more buffer than a tiny pot or cup. If you want to understand the root side of things better, the guide on how to prevent root rot in small hydroponic systems covers every preventive step.
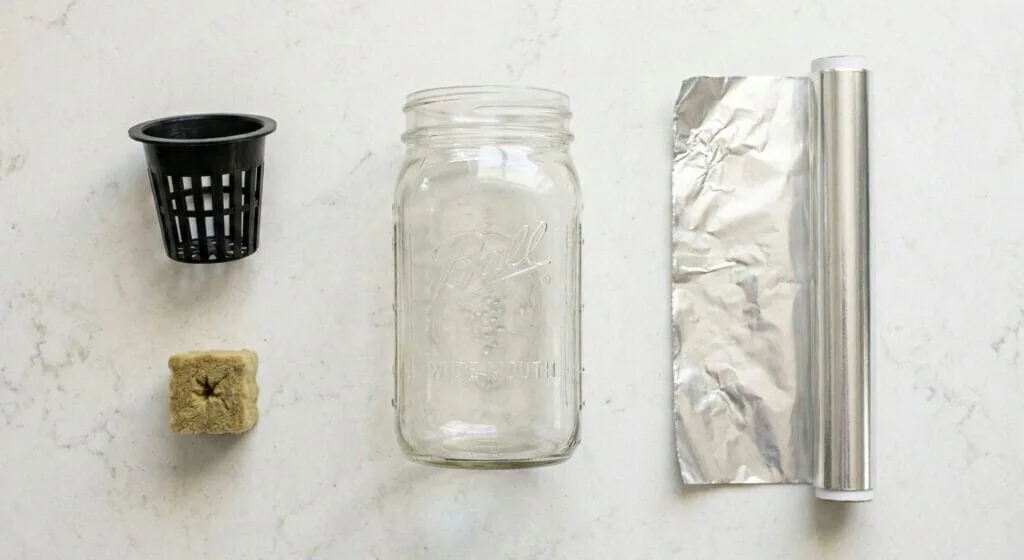
🧰 What You Need to Set Up a Kratky Lettuce Jar
You do not need much, but the few things you use do matter. This is one of those setups where simple beats fancy every time. Use the free shopping list builder to put together a complete kit based on your budget — it takes under a minute.
🦠 Keep the jar clean
Before you build anything, wash the jar, net cup, and tools well. Hydroponic systems are simple, but they are not forgiving when dirty equipment introduces problems from day one. The Penn State Extension’s hydroponics guide emphasises sanitation because clean equipment reduces plant disease pressure — and in a tiny jar setup, that matters even more.
🟢 Block light — all of it
Light hitting nutrient water is how you get algae. Wrap the jar tightly with thick foil, use an opaque sleeve, or paint it. Whatever method you choose, the goal is clear: no light gets in. My guide on why algae keeps growing in hydroponic jars covers every wrapping method and what to do if algae has already started.
💧 Start with decent water
If your tap water is heavily chlorinated or your pH runs high, test it before you trust it. That one habit would have saved me a lot of failed seedlings. Use the free pH and nutrient calculator to get exact pH targets and EC doses for lettuce before you mix your first batch. If you are still working out feed strength more broadly, the beginner hydroponic nutrients guide for small apartment systems covers exactly where to start.
📋 How to Set Up Your Kratky Lettuce Jar Step by Step
1. Soak the rockwool
Start by soaking your rockwool cube in water adjusted to about pH 5.5. Rockwool tends to start out alkaline, so this step helps avoid problems early on. For a full breakdown of working with rockwool starter cubes — including how to avoid damping off — see my guide on how to start hydroponic seeds in rockwool.
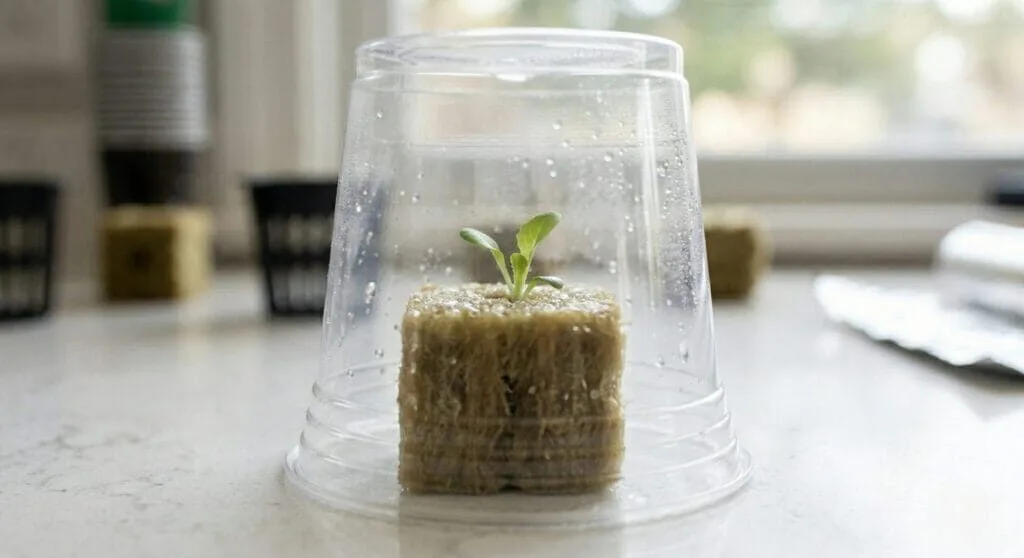
2. Germinate the seed
Place one lettuce seed in the cube. Buttercrunch and Black-Seeded Simpson are both good beginner choices. During germination, you can use a clear cup as a humidity dome for a short time, but remove it as soon as the seedling emerges.
3. Mix a light nutrient solution
Once the seedling has visible roots coming through the cube, mix your nutrient solution. Lettuce is a light feeder, so start gentle. Keep the EC around 0.8 to 1.2 mS/cm and bring the pH into the 5.5 to 6.0 range. Both the Penn State Extension and the University of Minnesota Extension point to that pH range as a good target for hydroponic leafy greens.
4. Fill the jar correctly
Pour the solution into your wrapped jar until it just barely touches the bottom of the net cup. That gives the cube enough moisture to wick water upward without drowning the seedling.
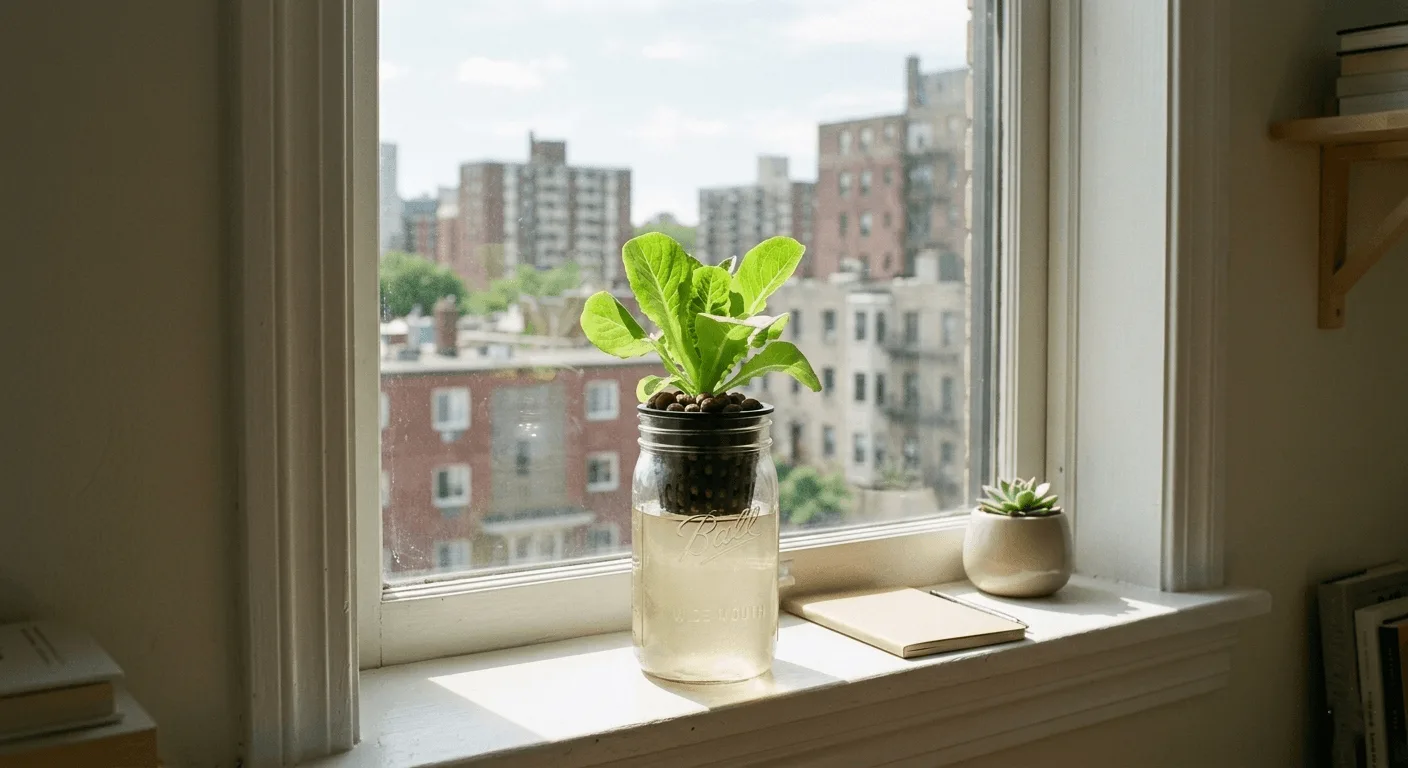
5. Put it in your brightest window
Place the jar in your brightest sunny window. South-facing windows work best in the northern hemisphere. If the lettuce starts stretching with thin pale growth, it needs more light — the University of Minnesota Extension describes this as etiolation, which happens when plants reach for more light than they are receiving. If that starts, add a small supplemental light. The guide to the best grow lights for low-light apartment hydroponics under $50 can help if your window is not enough.
6. Let the jar do its job
As the lettuce grows, the water level drops and the upper roots are exposed to air. That is exactly what you want. Do not keep refilling it to the top just because the jar looks low.
You can usually start harvesting in about 4 to 6 weeks, depending on variety, light, and room temperature. Harvest the outer leaves first and leave the center intact so the plant keeps producing. Use the free seed to harvest countdown tool to track your exact growth stage and harvest date from day one.
🥬 Best Lettuce Varieties for a Sunny Apartment Windowsill
Not every lettuce handles apartment conditions the same way. If you want easier wins, start with softer leaf types rather than big dense heads.
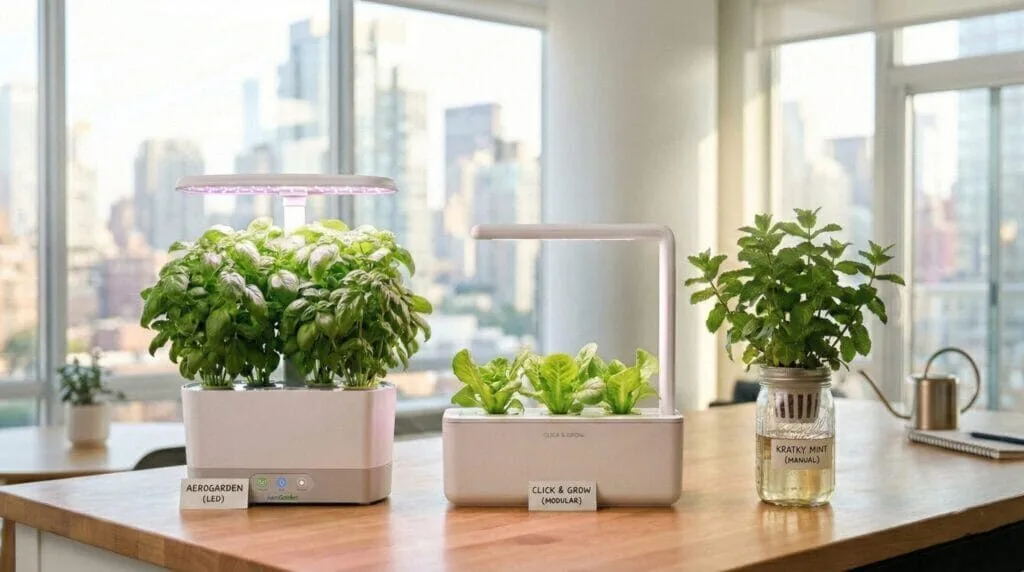
If you want to branch out after lettuce, follow this up with the foolproof guide to growing hydroponic basil in a small apartment. For a comparison of Kratky against active systems, read my breakdown of DWC vs Kratky for apartment beginners before expanding your setup.
⚠️ Common Kratky Lettuce Problems and Simple Fixes
Green water or slime in the jar
That is algae. Re-wrap the jar so no light gets in, clean everything with diluted hydrogen peroxide, and restart with fresh solution. Algae is always a light leak problem, not a nutrient problem. Clean the jar, re-wrap it so no light gets in at all, and refill with fresh solution.
Tall weak lettuce
Your plant needs more light. Move the jar closer to the brightest part of the window or add a small grow light. Thin, stretching stems mean insufficient light intensity, not a watering or nutrient issue.
Yellow leaves
Check pH first. If the solution drifts too far out of range, the plant cannot use nutrients properly even when the reservoir is full. For a detailed fix, read why apartment hydroponic plants turn yellow and how to fix it.
Bitter leaves
That usually means too much heat, too much age, or bolting has started. Harvest sooner and try to keep the root zone cooler. Lettuce bolts fast once temperatures rise above 75°F consistently.
Roots fully submerged after refilling
Lower the level again. Those exposed upper roots need access to air. Full submersion collapses the air gap that makes the Kratky method work in the first place. For the complete water top-up rules, read my guide on how often to change hydroponic water — it covers when to top off vs when to do a full reservoir change.
→ Penn State Extension — Hydroponic Nutrient Principles
→ University of Minnesota Extension — Small-Scale Hydroponics Guide
💬 A Word From Sarah
My first successful Kratky lettuce jar was on a sunny apartment windowsill, and I still remember how surprised I felt when it worked. No pump. No fancy gear. Just one jar, one seedling, and a setup clear enough to repeat. The moment the roots hit the air gap and the plant took off was when I realised this method was different from anything I had tried before. If you have been telling yourself that apartment growing is too hard or too limited, start with one jar. That little win changes a lot.
❓ Frequently Asked Questions
☀️ How much light does a Kratky lettuce jar need on a sunny windowsill?
A Kratky lettuce jar does best with strong bright light for 12 to 14 hours daily, and a sunny south-facing window is usually the easiest apartment option. If the plant gets leggy or pale, add a small grow light to extend the day and strengthen growth. North-facing windows rarely provide enough light for lettuce without supplemental LED support.
🧪 What is the best pH and EC for hydroponic lettuce in a Kratky jar?
For most lettuce varieties, aim for a pH of 5.5 to 6.0 and an EC of about 0.8 to 1.2 mS/cm. That keeps nutrients available without overfeeding a crop that prefers a lighter touch. If you see yellowing despite a full reservoir, check pH first — it is almost always the cause before nutrients run out.
💧 How high should the water level be in a Kratky Mason jar?
At the start, the nutrient solution should just touch the bottom of the net cup so the growing medium can wick moisture upward. After that, let the level drop as the plant drinks. If you top up later, stop at about one-third of the jar height. Filling higher than that collapses the air gap the roots depend on for oxygen.
⏱️ How long does Kratky lettuce take to grow indoors on a windowsill?
In a bright apartment window, most Kratky lettuce jars reach harvest size in about 4 to 6 weeks. Cooler apartments or weaker light usually push you toward the longer end of that range. Loose-leaf varieties like Black-Seeded Simpson tend to reach first harvest faster than denser varieties like Buttercrunch or Romaine.
🔌 Does the Kratky method really work without a pump or electricity?
Yes. The Kratky method is entirely passive. No pump, no air stone, no electricity required. As the plant consumes the nutrient solution, the water level drops and creates an air gap. The roots that grow into that gap absorb oxygen directly. This passive oxygenation is what makes the method viable without any powered equipment.
🟢 Why is there algae in my Kratky jar and how do I fix it?
Algae in a Kratky jar is always caused by light reaching the nutrient solution. Empty the jar, clean it with a diluted hydrogen peroxide solution, wrap it more thoroughly with foil or opaque tape so zero light gets through, and refill with fresh nutrients. Algae itself will not kill the plant right away, but it competes for nutrients and oxygen in the reservoir.
🔄 Should I refill the Kratky jar as the water level drops?
Only if the water level drops very low near the end of the grow cycle. For most of the plant’s life, let the level drop on its own. That falling water level is what creates the air gap the roots need. If you do top up, use plain pH-adjusted water rather than fresh nutrient solution, and stop at one-third of the jar height to preserve the air gap.
Happy growing! 🌿
— Sarah, Urban Hydro Space

Sarah is the founder of Urban Hydro Space and an indoor gardening enthusiast dedicated to helping apartment dwellers grow fresh herbs and vegetables in small spaces. With hands-on experience testing hydroponic systems, she shares practical tips and honest product reviews to make indoor gardening accessible for beginners.