⏳ 14 min read · Last updated: March 2026
Finding the right kratky jar setup apartment layout changed everything about how I approach indoor gardening. A few years ago, my tiny studio kitchen felt cramped for any kind of indoor garden. I wanted fresh basil for my cooking but had zero counter space for bulky trays or complex equipment. Then I looked at the empty pasta sauce jars sitting in my recycling bin and realized those basic glass containers were exactly the right size for passive growing.
Using recycled containers removes the high entry cost of indoor farming. You don’t need to buy expensive reservoirs or specialty buckets to get started. Everything comes from your weekly grocery run. This guide shows you how to build a lush jar garden on a windowsill in under thirty minutes, with no electricity and no pump required.
📦 Why a Kratky Jar Setup Works for Apartment Gardens
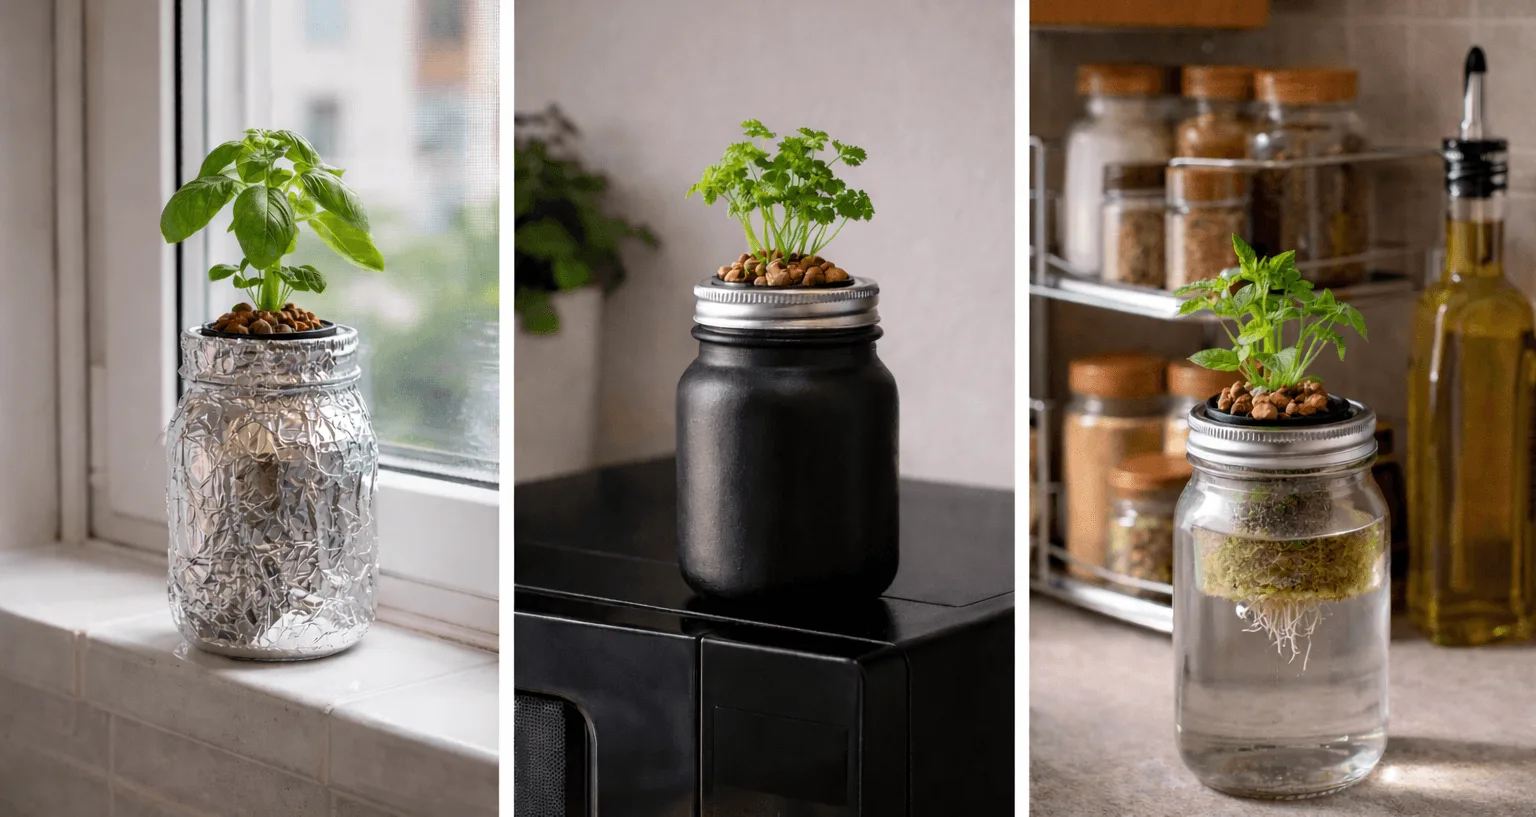
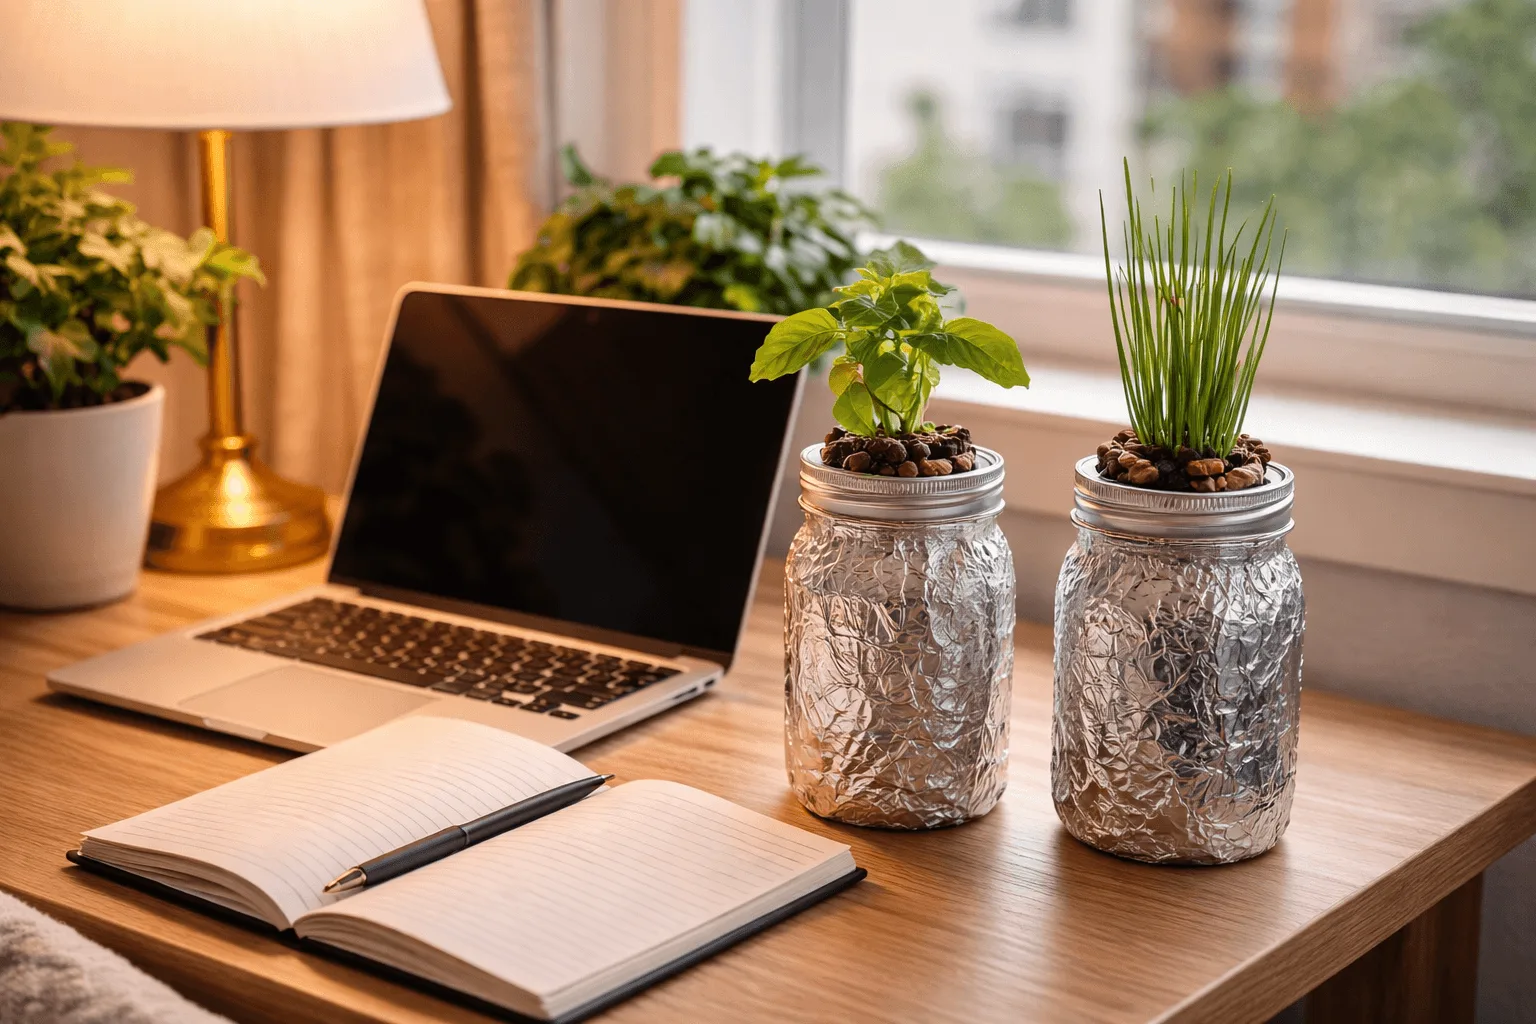
A kratky jar setup apartment garden is one of the few growing methods that works within the tight constraints of rented living. Traditional indoor farming often involves heavy water tanks, complex electrical timers, and loud air pumps that take up too much room. The Kratky method uses no electricity or moving parts whatsoever, which means you can place these passive systems anywhere with six inches of flat space. A narrow bathroom windowsill, the top of a microwave, a tiered spice rack. All are good options.
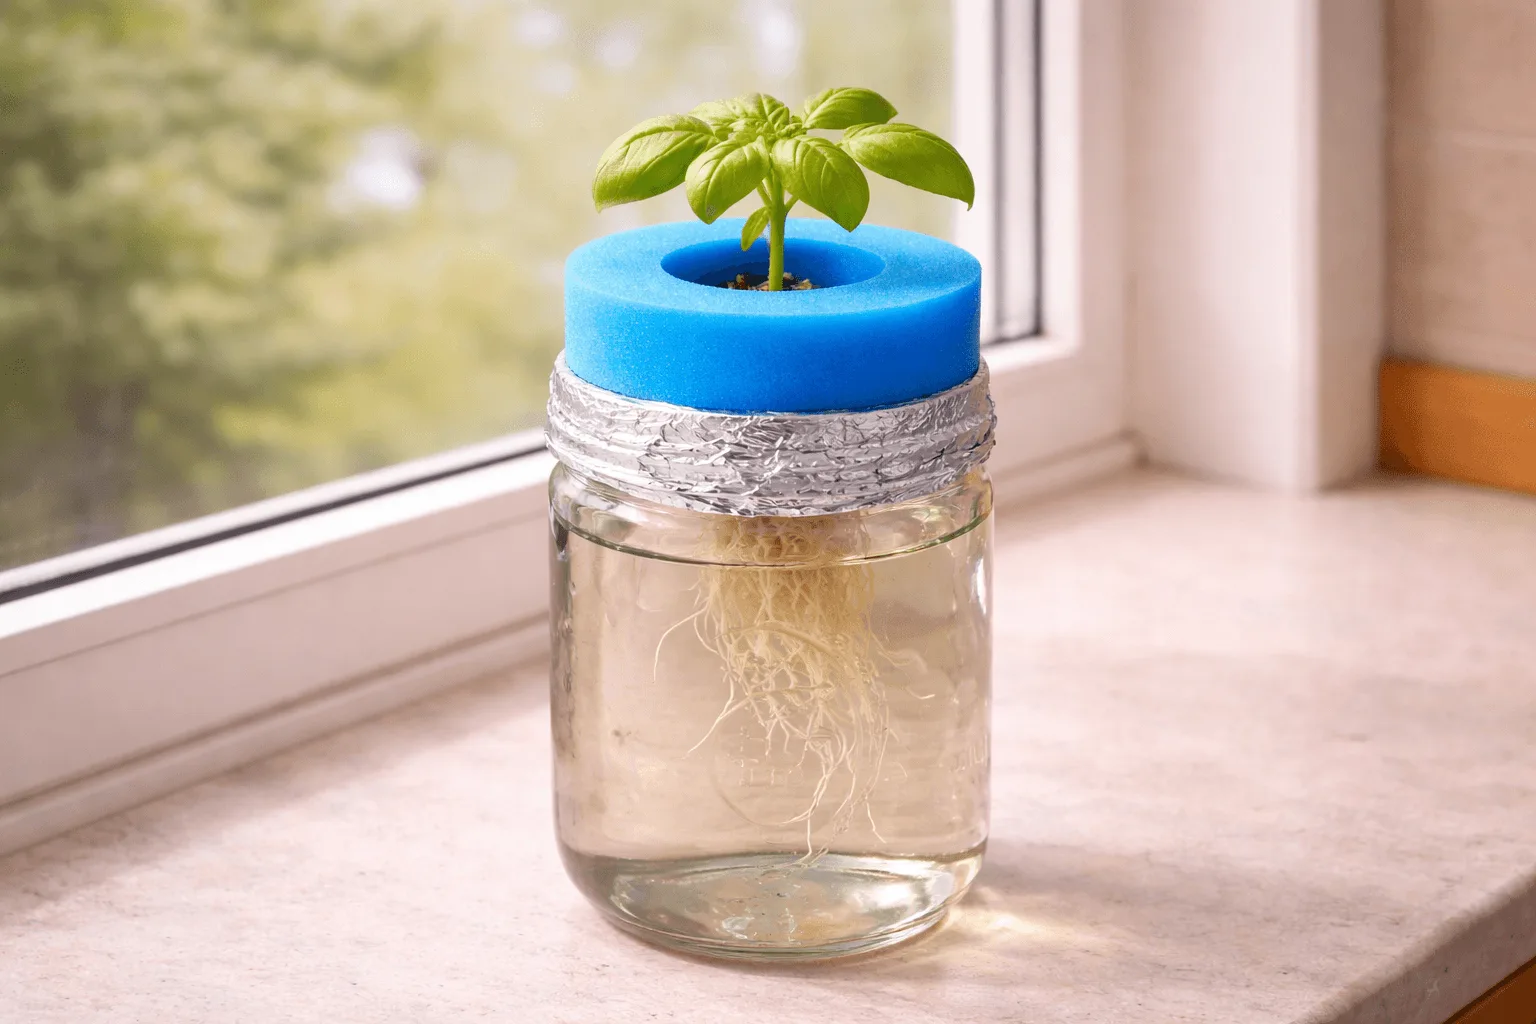
The method relies on a declining water level to deliver oxygen to the roots. As the plant drinks the nutrient solution, an air gap forms between the net cup and the liquid surface. The top portion of the root system absorbs oxygen while the bottom portion drinks water. Your plants sustain themselves as long as liquid remains in the jar, with no power outages to worry about.
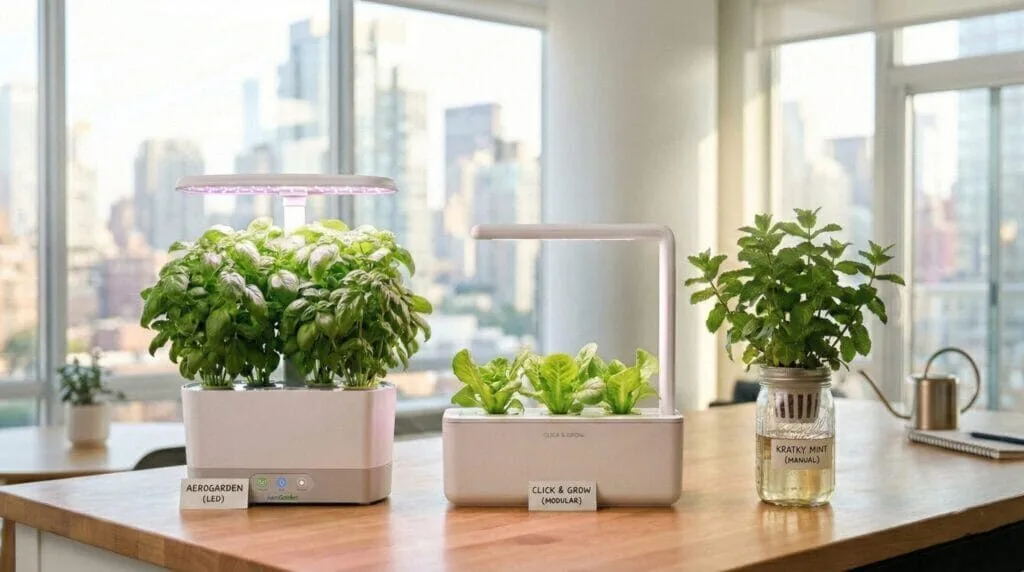
If you’ve tested a powered countertop system and want to compare approaches, my roundup of the best hydroponic starter kits for apartments covers four plug-and-play options with verified specs for each.
🔇 The Benefit of a Completely Silent System
Noise is a real concern in shared living spaces. Active hydroponic setups use bubbling air stones or trickling pumps that run continuously. That humming can irritate you while sleeping or working from home. A passive jar system produces no sound at all.
If you’ve ever tried to quiet a noisy hydroponic pump in an apartment, you know how frustrating vibrations against a hard counter can be. Kratky jars sit in total silence. You can keep multiple plants in a bedroom or home office without any distraction.
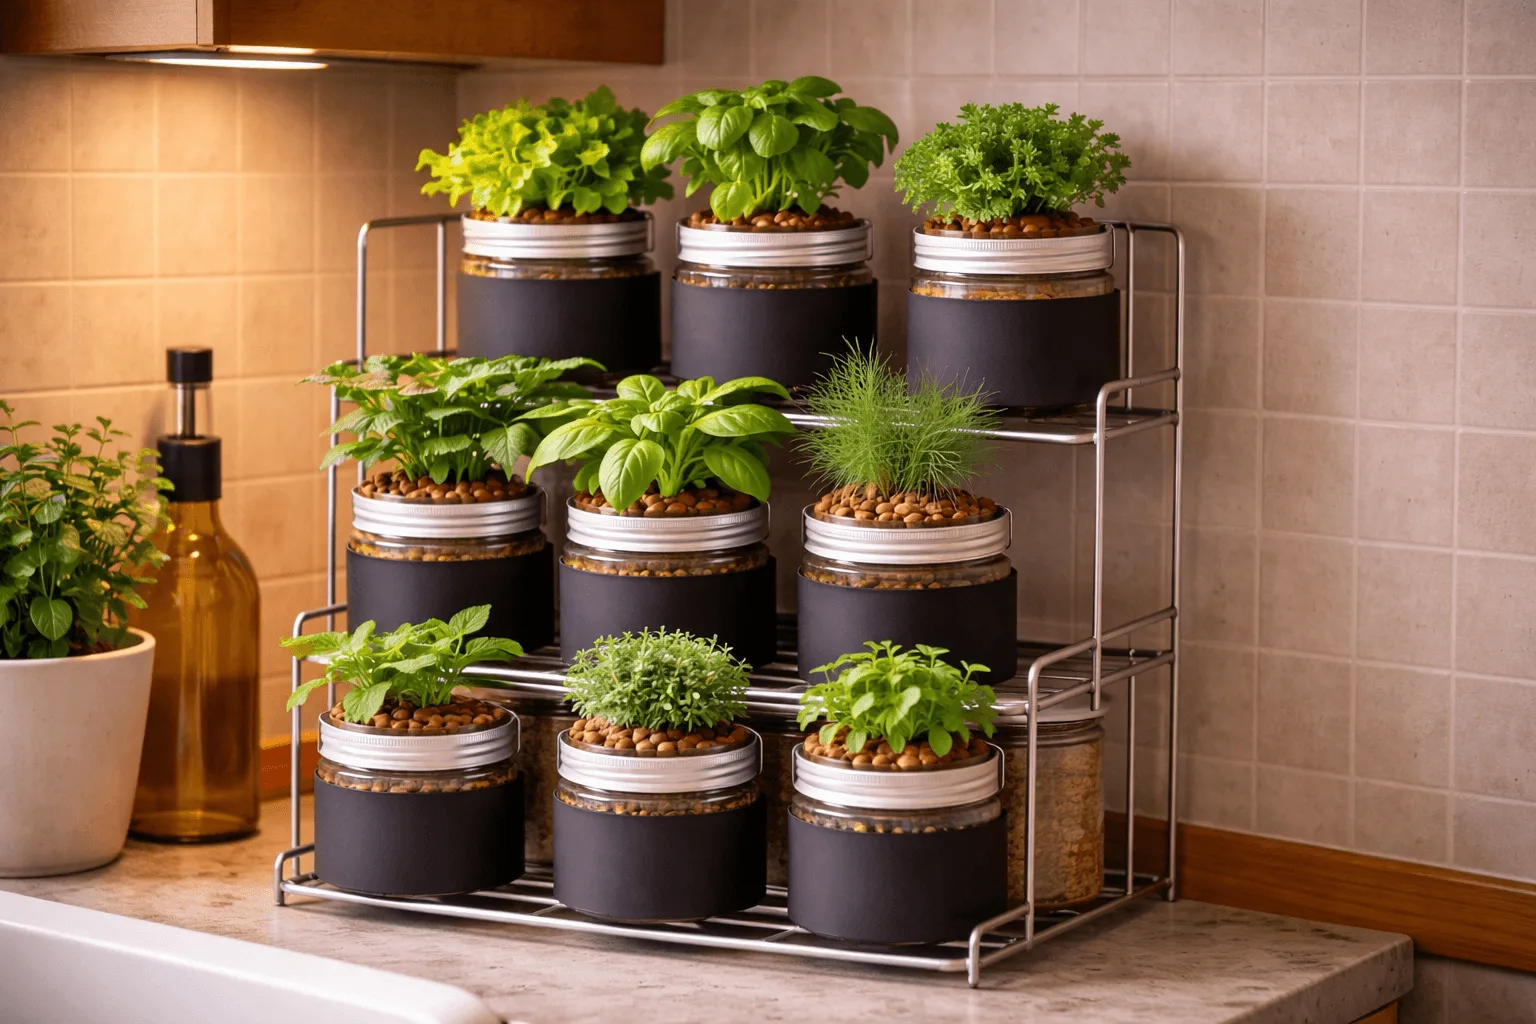
📐 Making the Most of Small Counters
Counter space is valuable real estate in most modern kitchens. Standard grow trays require wide, flat surfaces and make cleaning underneath them difficult. Kratky jars solve this by using vertical volume rather than horizontal spread.
A typical pasta jar occupies about three square inches of counter space. You can line up half a dozen herbs along the back edge of your sink or place jars on a tiered spice rack to grow an entire salad garden in a single corner. Stacking plants vertically lets you fit three times the food in the same footprint.
- Convert any clean 32-ounce jar into a passive hydroponic garden in under ten minutes.
- Maintain pH 5.5 to 6.5 to ensure proper nutrient absorption in stagnant water.
- Block all light from the root zone to prevent algae blooms inside the glass.
- Do a full nutrient solution change every 2 weeks to prevent salt buildup.
🍅 How to Build a Kratky Jar Setup Apartment Farm from Kitchen Scraps
Building your first kratky jar setup apartment garden takes under thirty minutes once you gather your supplies. You don’t need to order specialized equipment from garden supply stores. Your weekly grocery run likely provides everything you need. That said, proper preparation of recycled materials prevents failure down the line, so don’t skip the cleaning step.
Small mistakes during the building phase create bigger problems weeks later. A jar with residual tomato sauce oils will introduce bacteria into your nutrient water within days. Taking ten minutes to sanitize properly protects weeks of growing effort.
🧼 Cleaning and Prepping Your Containers
Cleanliness determines success in passive water systems. Before using any recycled container, strip away old food oils and sticky label residue. A hot soapy wash is often not enough to kill lingering mold spores from old tomato sauce, so follow this sterilization sequence:
- Peel off the paper label and scrub away any remaining adhesive with baking soda.
- Wash the interior with hot water and mild dish soap, then rinse thoroughly.
- Rinse again with a diluted hydrogen peroxide solution to kill mold spores.
- Let the container air dry completely before adding nutrient water.
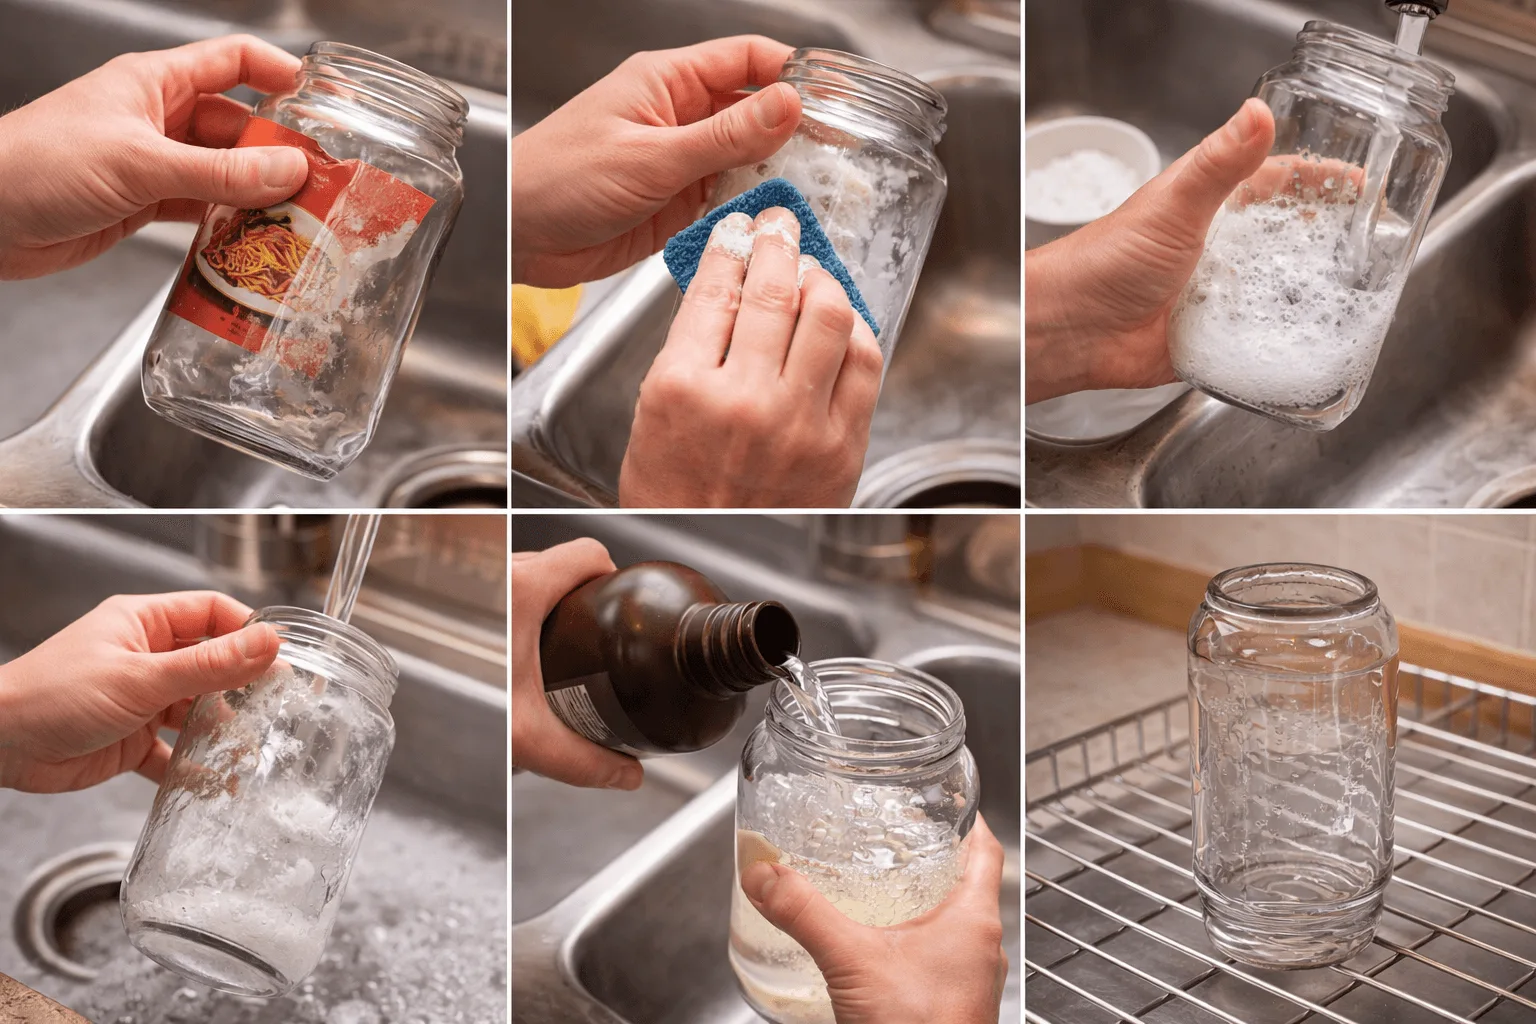
For anyone managing hygiene in a tight space, my guide on how to clean a small hydroponic system without making a mess covers the full maintenance routine between crops. Always remember that residue harms delicate roots if left behind. White vinegar works as a final rinse if you run out of hydrogen peroxide.
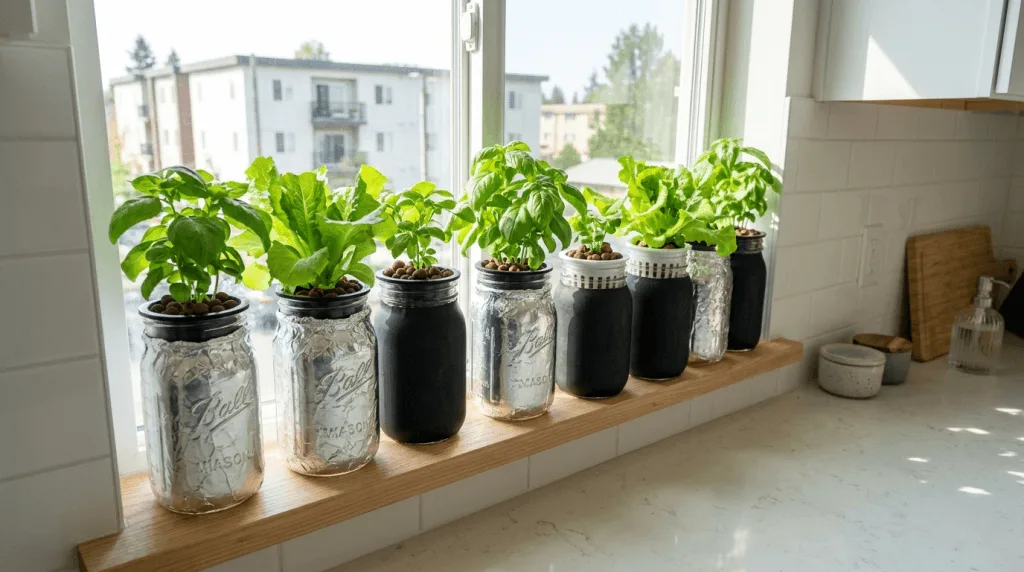
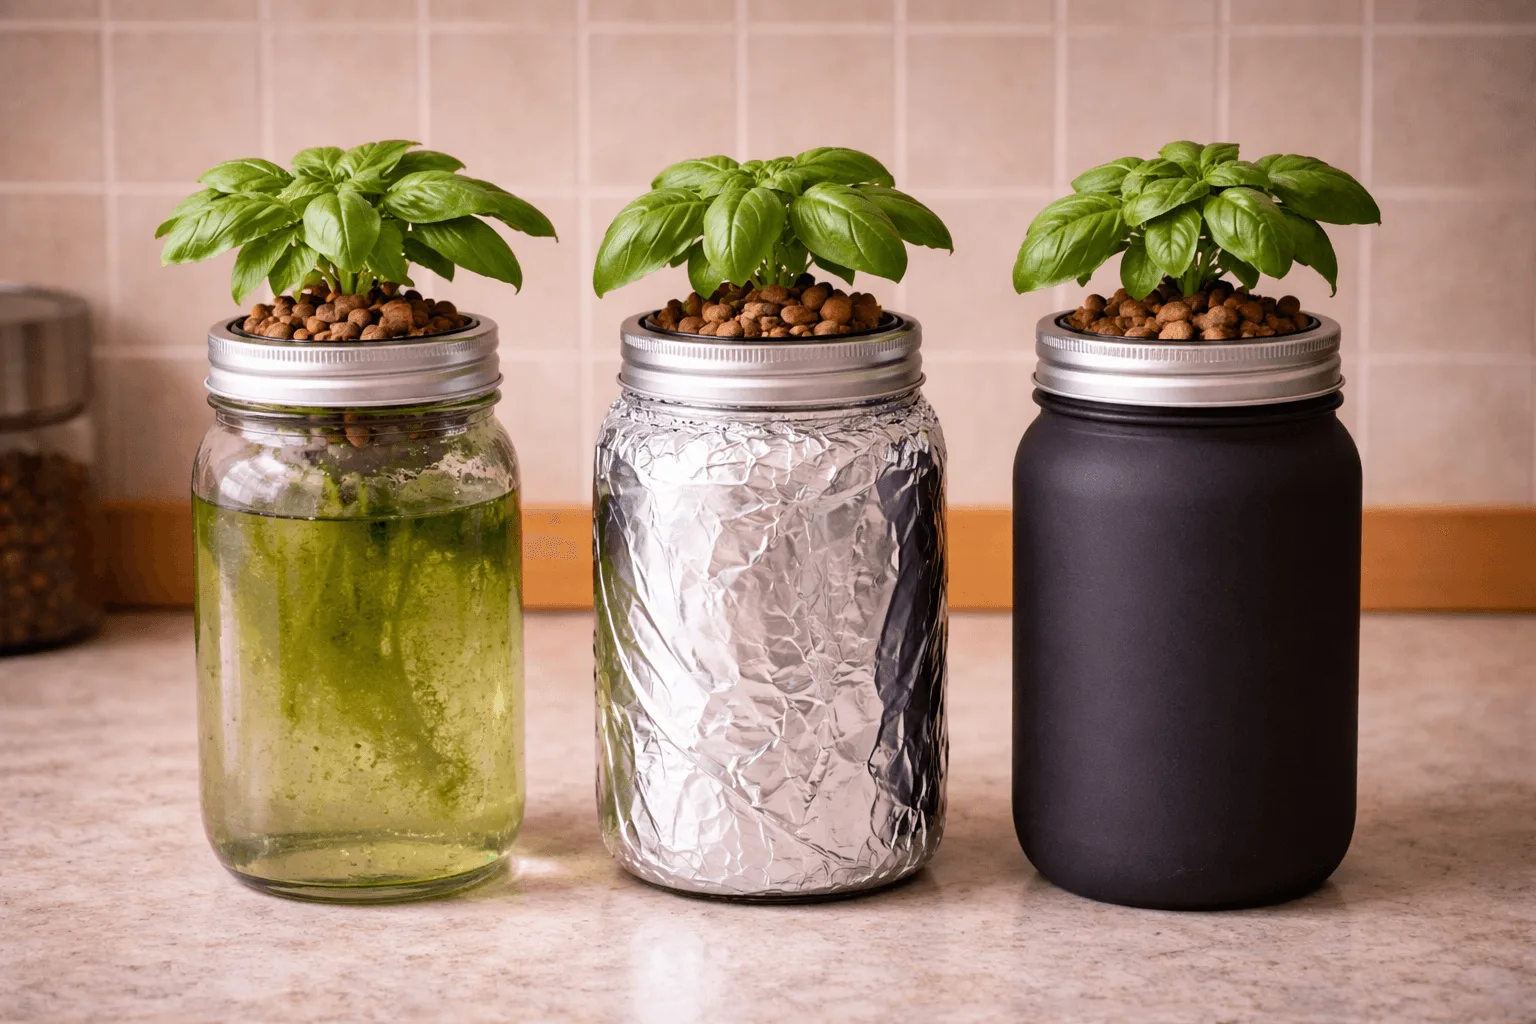
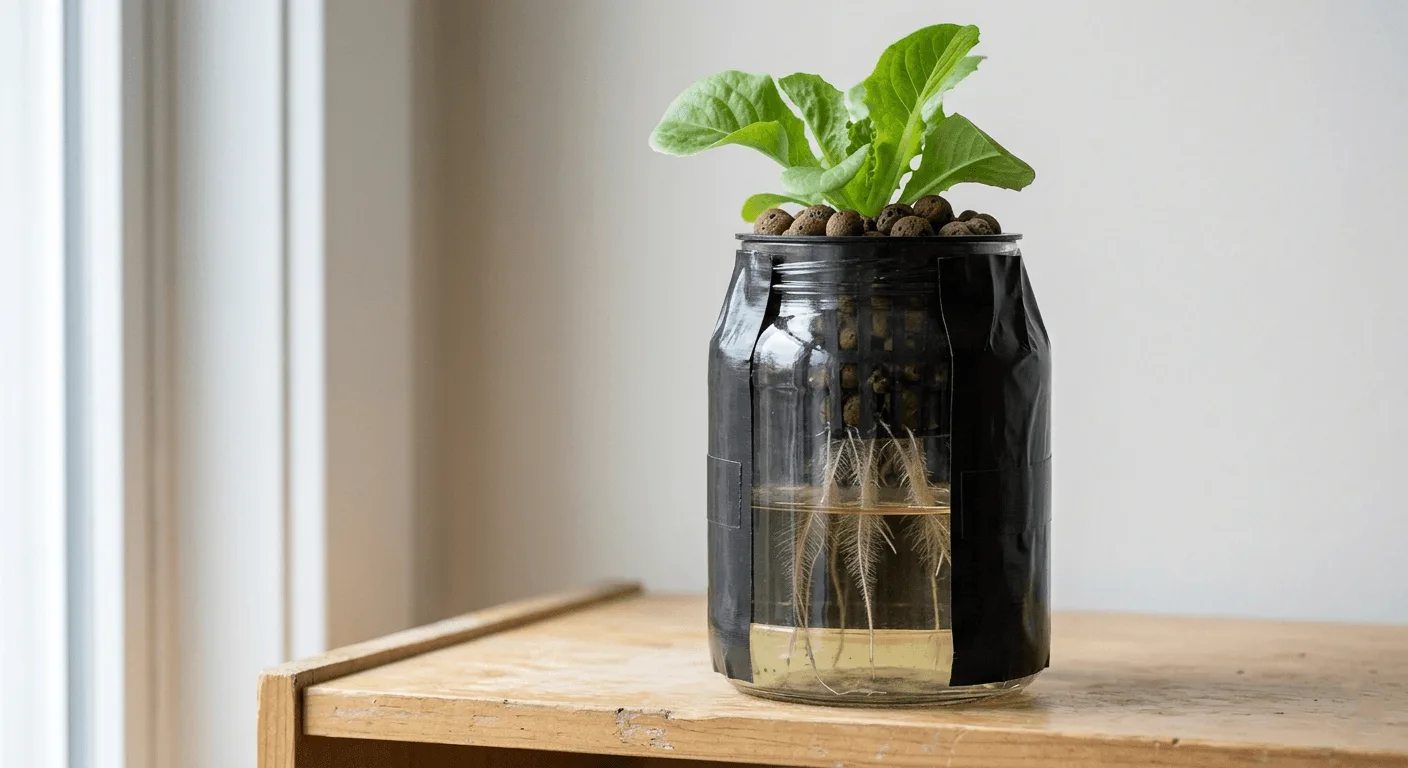
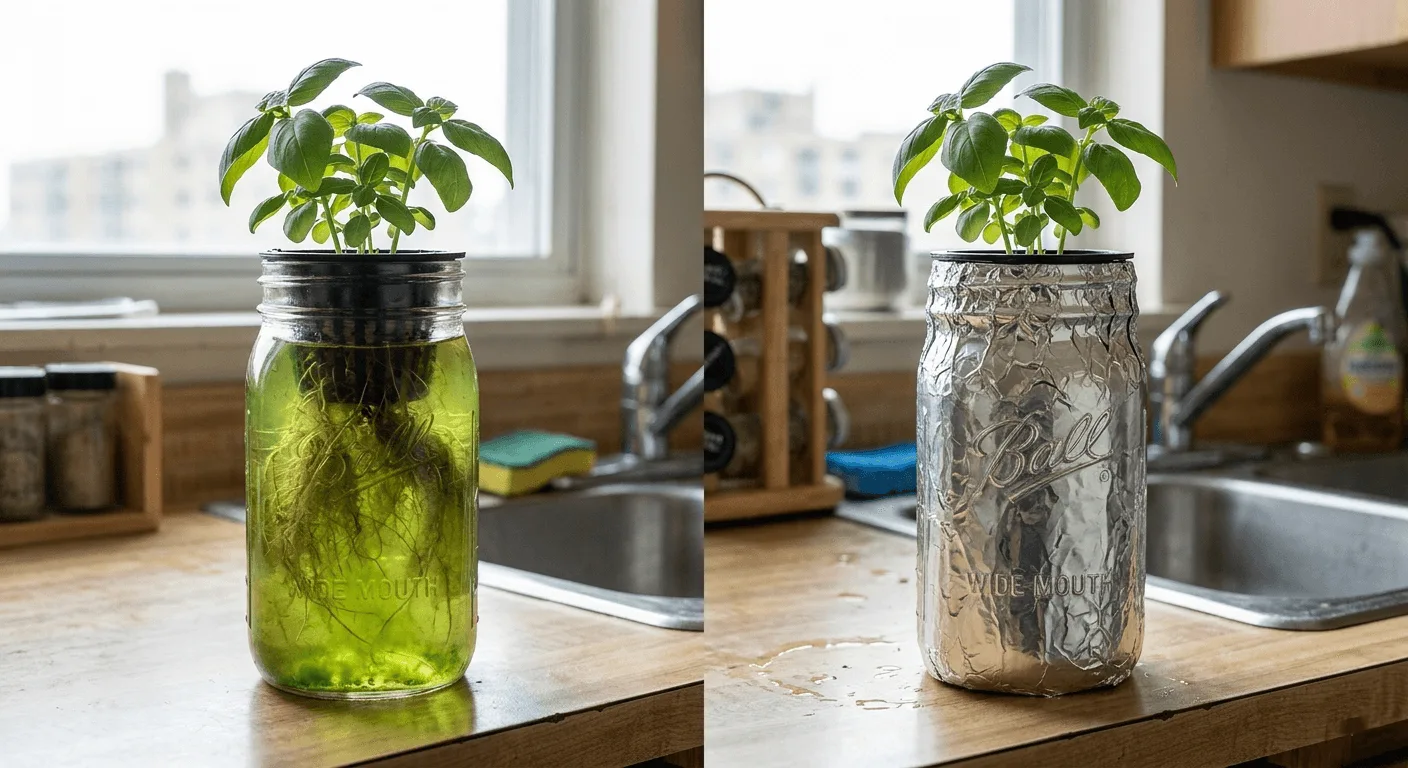
🌑 Blocking Light with Paint or Foil
Roots evolved to grow in total darkness beneath soil. When hydroponic water gets exposed to sunlight, microscopic algae spores multiply rapidly. The green slime steals oxygen and nutrients away from your plant, so wrapping the glass completely to block all light is non-negotiable.
Aluminum foil is the cheapest and fastest blackout option. It tears easily and can look messy, so matte black spray paint on the exterior is a cleaner long-term solution. Wrapping the jar in thick construction paper secured with rubber bands also works well if you want something removable.
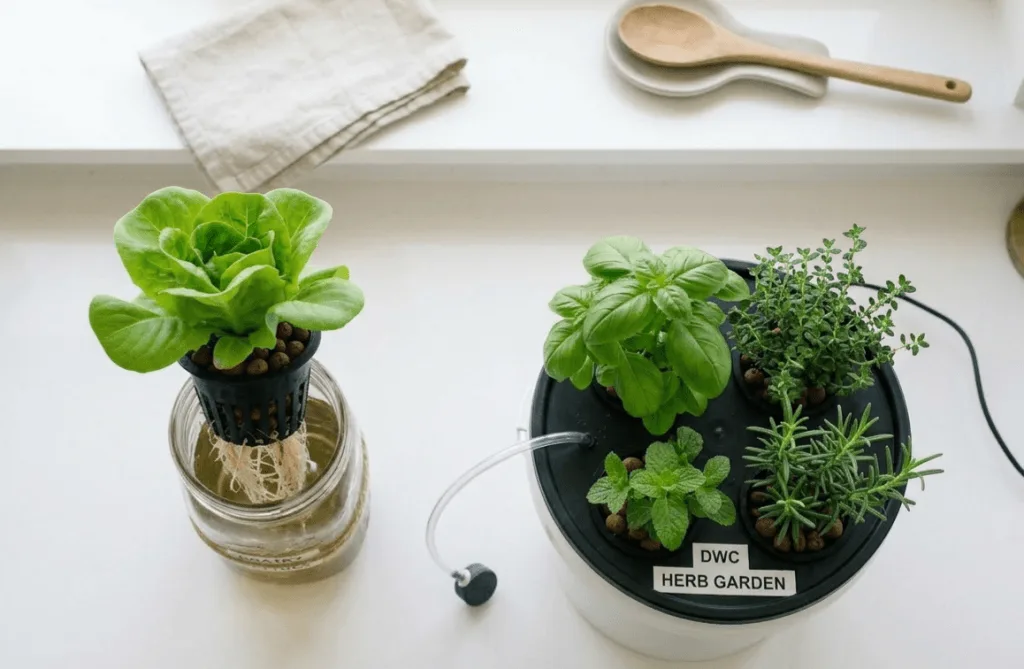
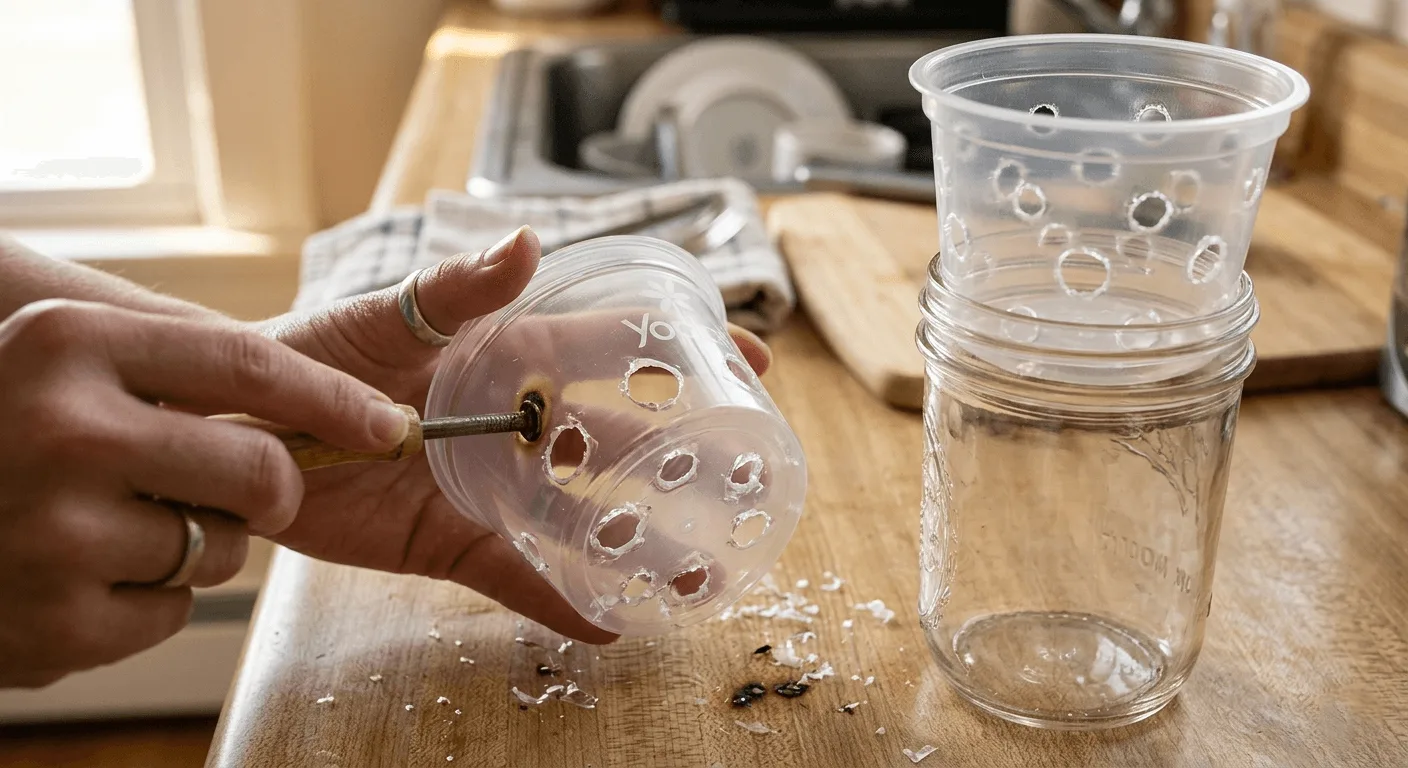
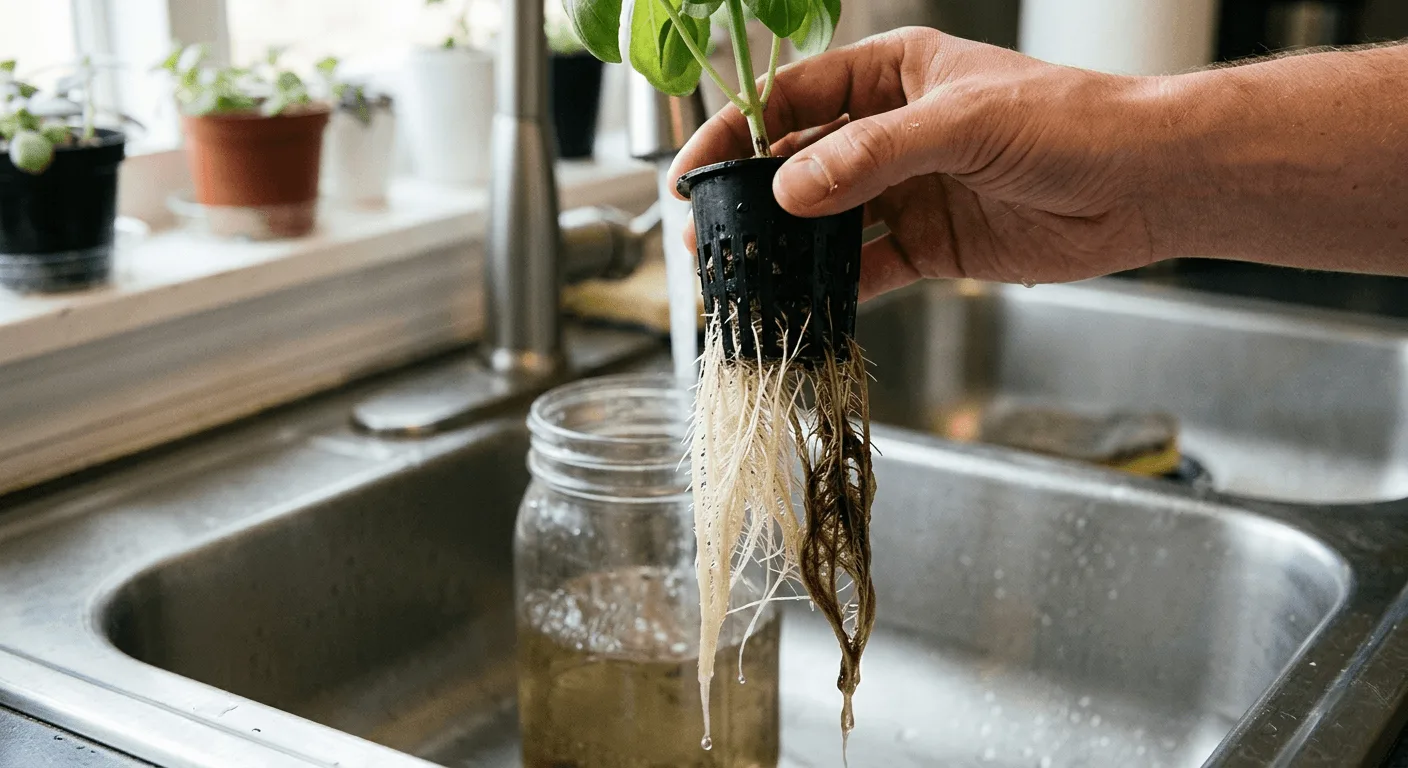
🧽 Choosing the Right Net Cup Alternative
A net cup holds your plant above the water while letting roots dangle down into the nutrient solution. You can buy plastic net cups online, but empty single-serve yogurt cups fit perfectly into the mouth of most wide-mouth jars. Small plastic condiment cups work well for narrower openings.
To make a homemade net cup:
- Wash your empty yogurt or condiment cup with hot water and dish soap.
- Poke several large holes in the bottom and sides using heavy scissors or a heated nail.
- Make the holes wide enough for roots to escape but small enough to hold your growing medium.
- Rest the cup in the jar opening to confirm a snug fit before adding the plant.
If you prefer to skip plastic entirely, slice a thick pool noodle into rings. The foam ring pinches the base of the plant stem and wedges securely into the jar neck, eliminating the need for loose growing media.
⚗️ Nailing the Nutrient Solution in a Small Space
Managing water in a kratky jar setup apartment system requires more precision than a large DWC bucket. The mineral balance must be accurate from the start because the water doesn’t circulate. Overfeeding young plants in a small volume causes severe tissue damage quickly. Small containers also experience faster temperature and concentration swings than larger reservoirs, which makes understanding basic chemistry essential.
As the plant drinks pure water, the remaining fertilizer salts become more concentrated. This leads to nutrient lockout if you don’t monitor levels. Letting the jar drop to a half-inch of liquid spikes the salt content to dangerous levels.
⚖️ Mixing the Right Ratios for Jars
Proper nutrient ratios determine how fast your herbs produce harvestable foliage. Always use a liquid fertilizer designed for hydroponics, not soil. Soil fertilizers lack essential micro-nutrients needed for water-based growing and can cause pH swings. My guide to the best hydroponic nutrients for small apartment systems covers the specific products that work well in jars and small reservoirs.
I learned about ratios the hard way in my first year. I killed my first mint batch by keeping the nutrient strength at EC 2.4. The fragile leaves crisped up and dropped off overnight. Dropping the EC back to the correct range and flushing with plain water let the plants recover within a week.
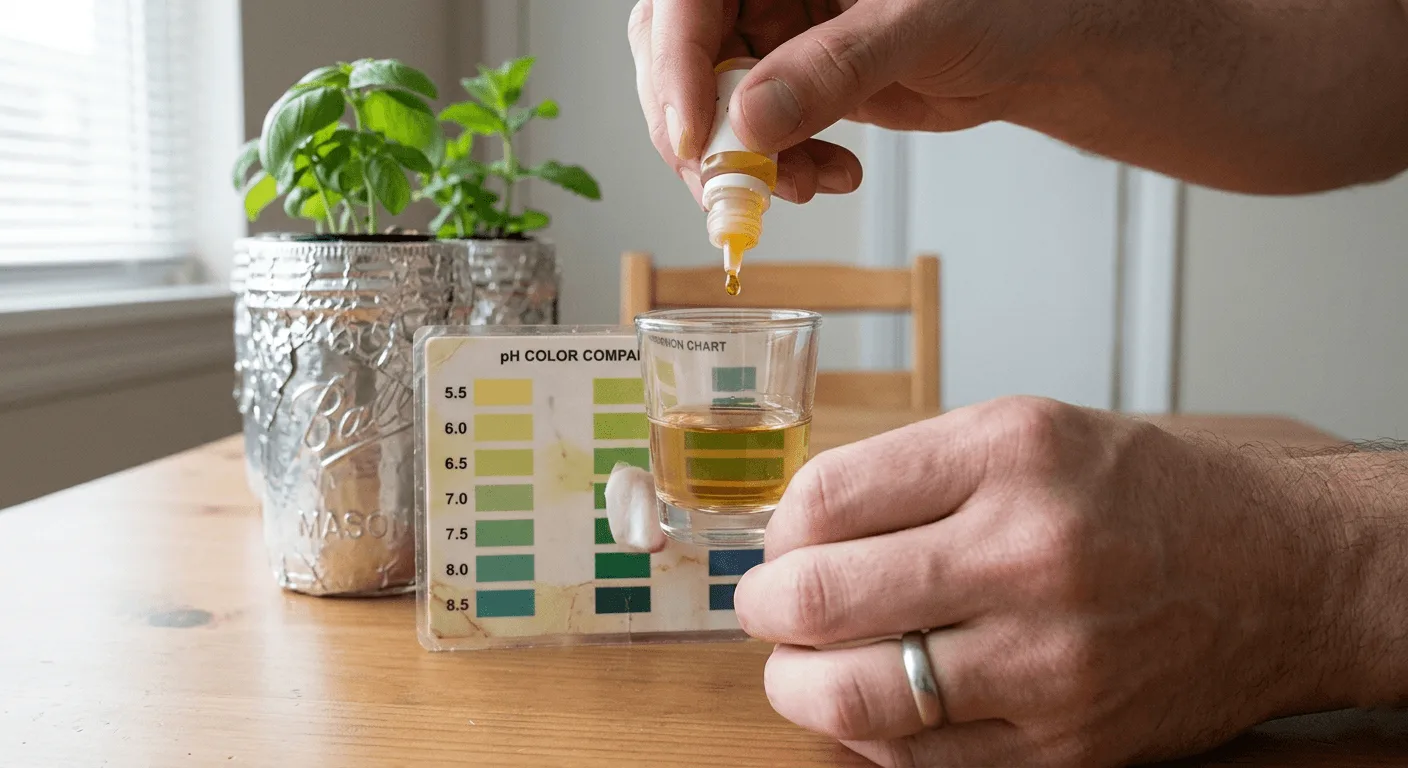
📉 Managing pH Drops Over Time
The acidity of your water determines whether roots can absorb the nutrients you’ve added. For most herbs, keep the water between pH 5.5 to 6.5. Water that’s too basic locks out iron, leading to pale growth. Water that’s too acidic burns the delicate root hairs.
In stagnant jar systems, pH naturally drops as the plant consumes specific minerals. Check acidity every week using simple liquid test drops. If the level falls below 5.5, add a few drops of pH Up solution to balance it. Replacing the entire water volume every 2 weeks also prevents wild pH swings from building up over time.
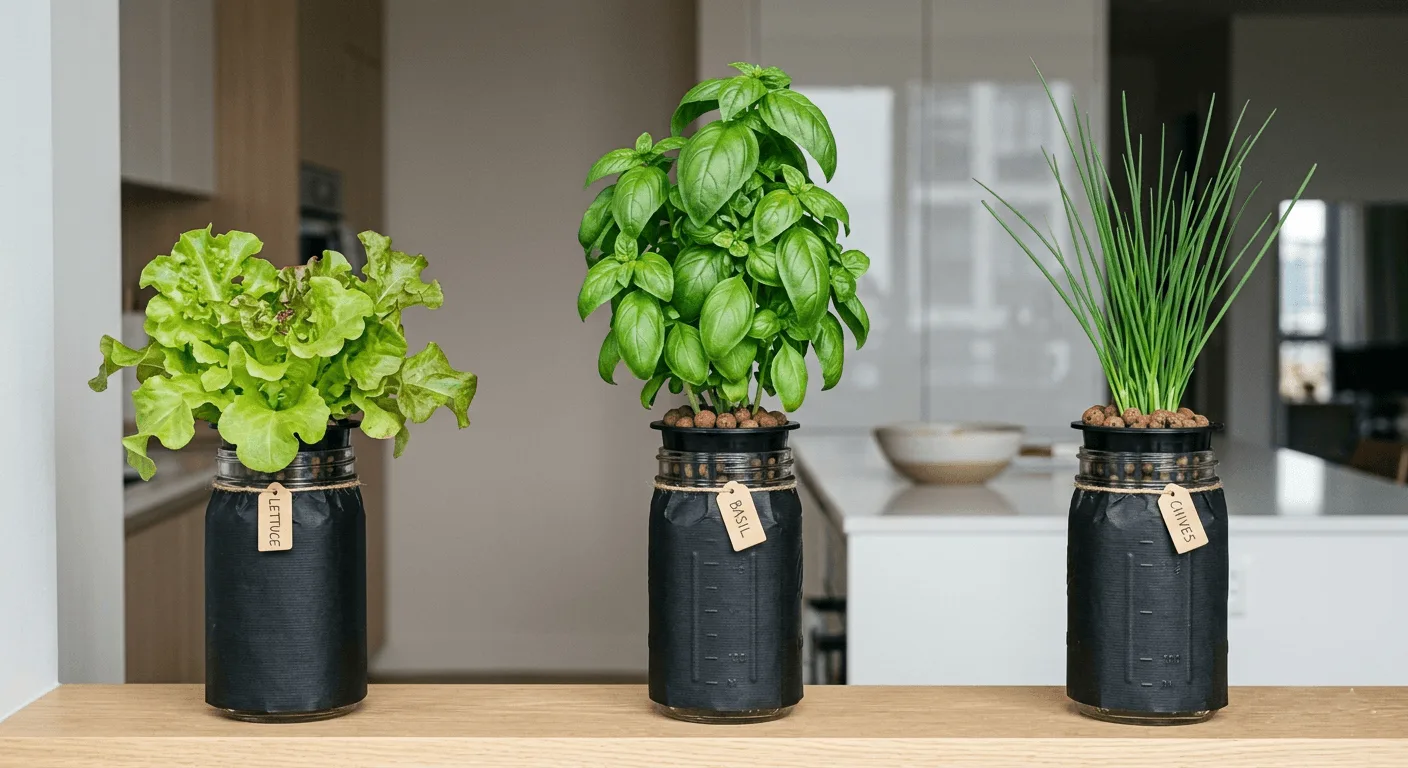
🌱 Top Plant Choices for Your Kratky Jar Setup Apartment Counter
Selecting herbs for a kratky jar setup apartment space requires some strategy. Not all plants thrive in confined, passive environments. Large fruiting crops like tomatoes drink too much water for a quart-sized jar to sustain. Stick to fast-growing leafy greens and resilient herbs, and match the plant to your specific light conditions. Choosing a sun-loving plant for a shady window leads to leggy, weak stems and a disappointing harvest.
| Plant Variety | Light Requirement | Ideal EC Range |
|---|---|---|
| Basil | High (12 to 14 hours) | 1.8 to 2.2 |
| Loose-Leaf Lettuce | Medium (10 to 12 hours) | 1.2 to 1.8 |
| Chives | Low to medium (12 to 14 hours) | 1.8 to 2.0 |
🌿 Basil: The Fast Rooter
Basil grows aggressively in passive water setups. The stems shoot out thick, fuzzy white roots within days of touching the nutrient solution, making it highly rewarding for impatient beginners. Frequent harvesting also encourages the plant to grow bushier rather than taller, so the more you clip, the more it produces.
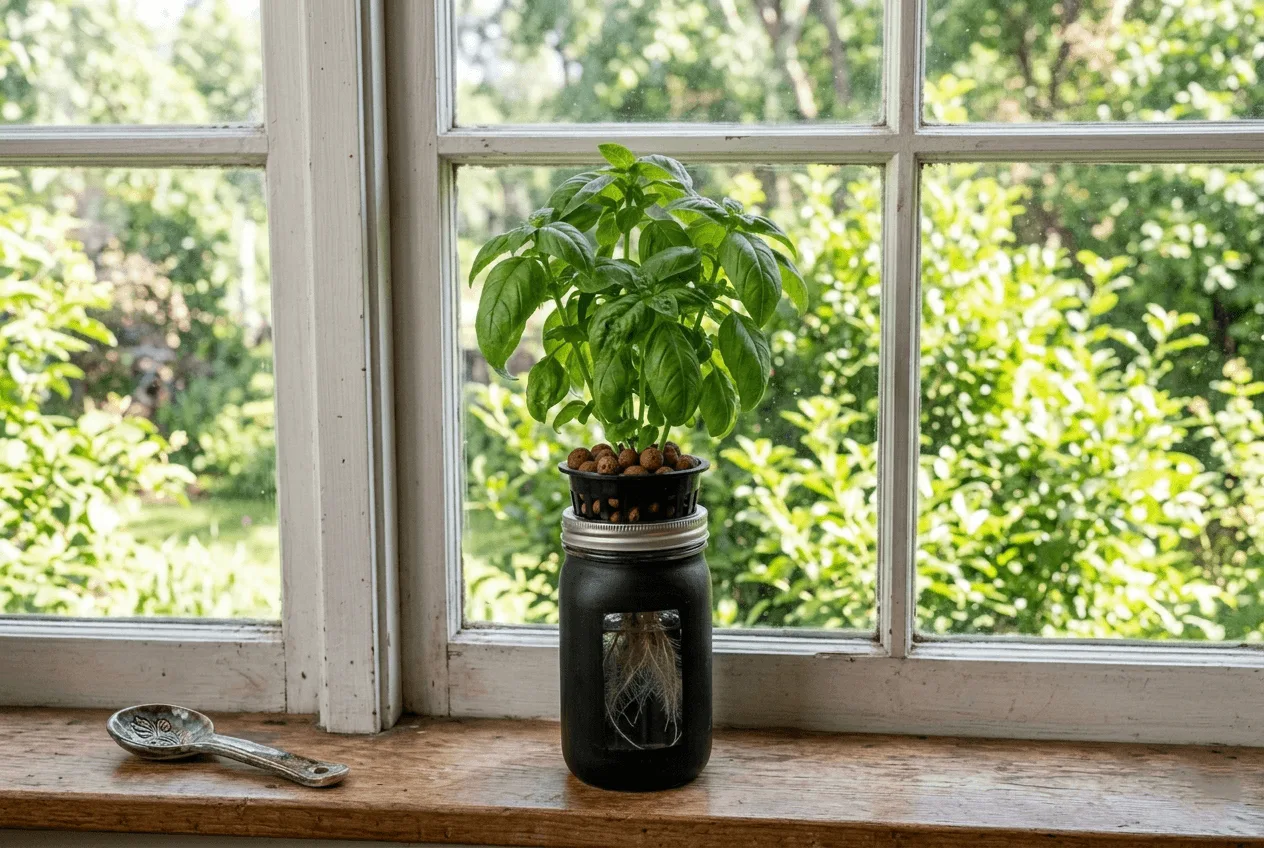
To keep basil compact, prune above a leaf node every two weeks. This forces the stem to split into two new branches, doubling your future yield. For advanced trimming techniques and a full care timeline, see my foolproof guide to growing hydroponic basil in a small apartment.
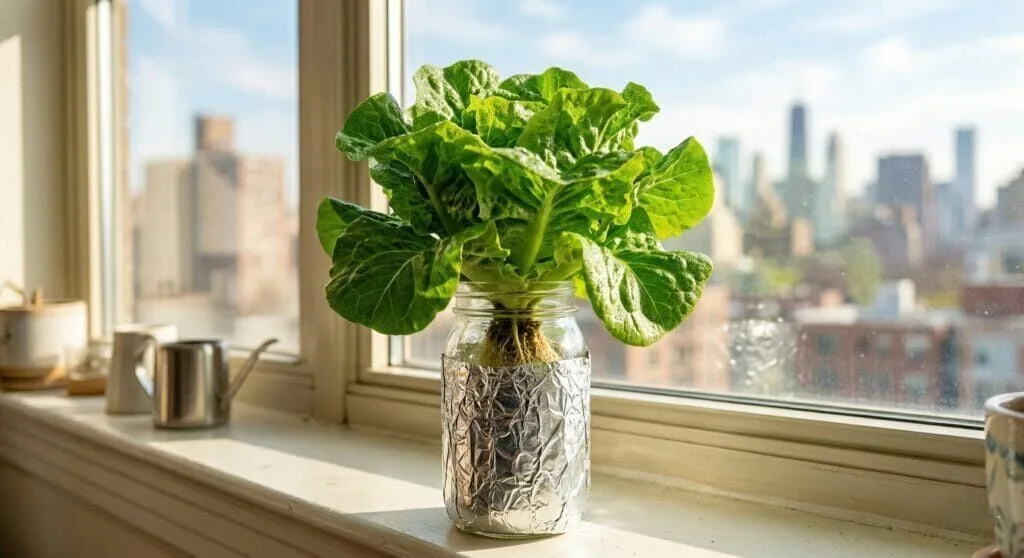
🥗 Loose-Leaf Lettuce: The Shallow Drinker
Varieties like Buttercrunch and Black Seeded Simpson thrive in shallow, stagnant water. These greens prefer cooler temperatures, making them perfect for drafty apartment windowsills in autumn and winter. Their root systems stay relatively small, so they won’t quickly outgrow a standard pasta jar. You can enjoy continuous harvests by plucking outer leaves as needed without pulling the whole plant.
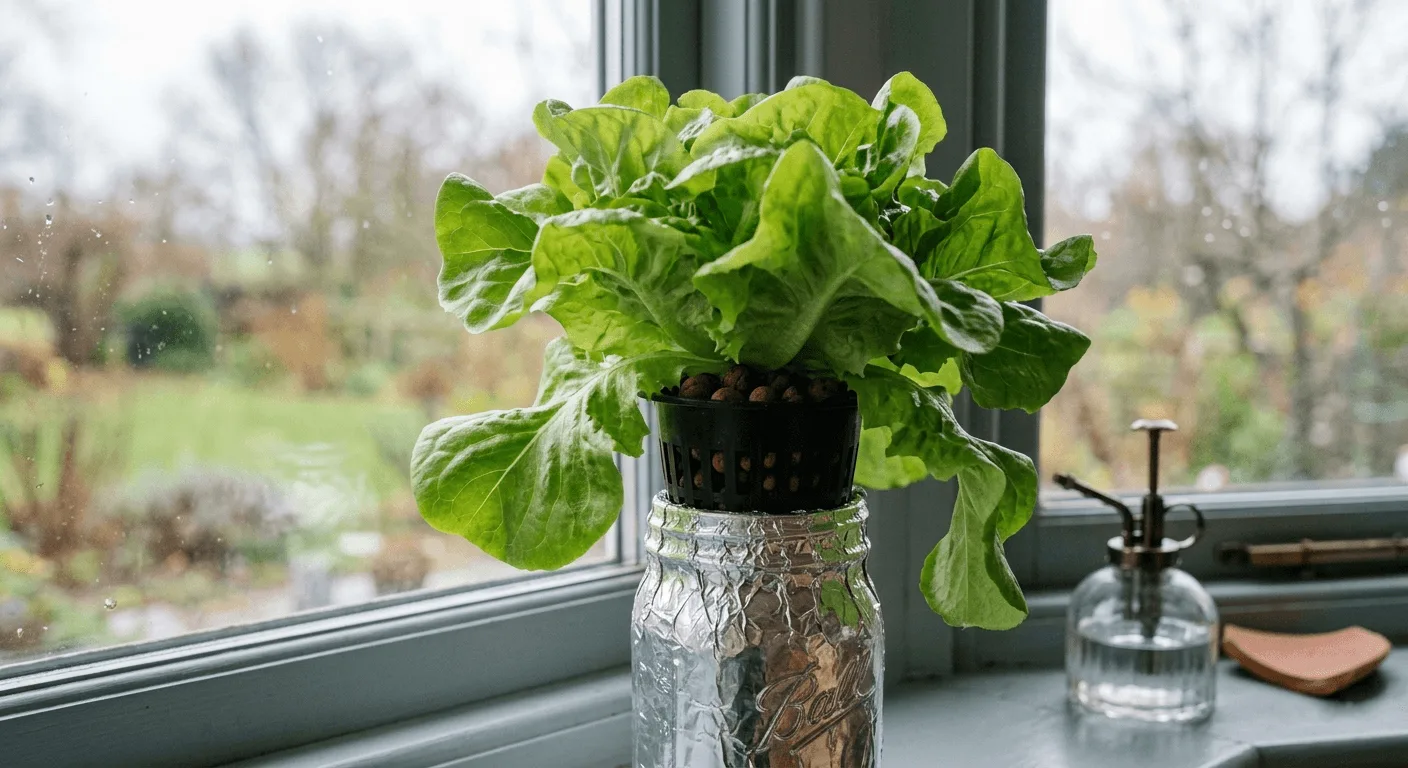
For best results, keep your grow area below 75°F (24°C). High heat causes leaves to turn bitter and prompts premature flowering. For a deeper dive into leafy greens, see this beginner guide to growing hydroponic lettuce in a countertop system.
🌴 Chives: The Low-Light Survivor
Chives are the right choice for dark kitchens with limited natural sunlight. While basil demands intense light, chives push up bright green spears with minimal illumination, making them reliable for north-facing windows or shaded corners. They also require very little nutrient food compared to other herbs, which makes them forgiving when you miss a water check.
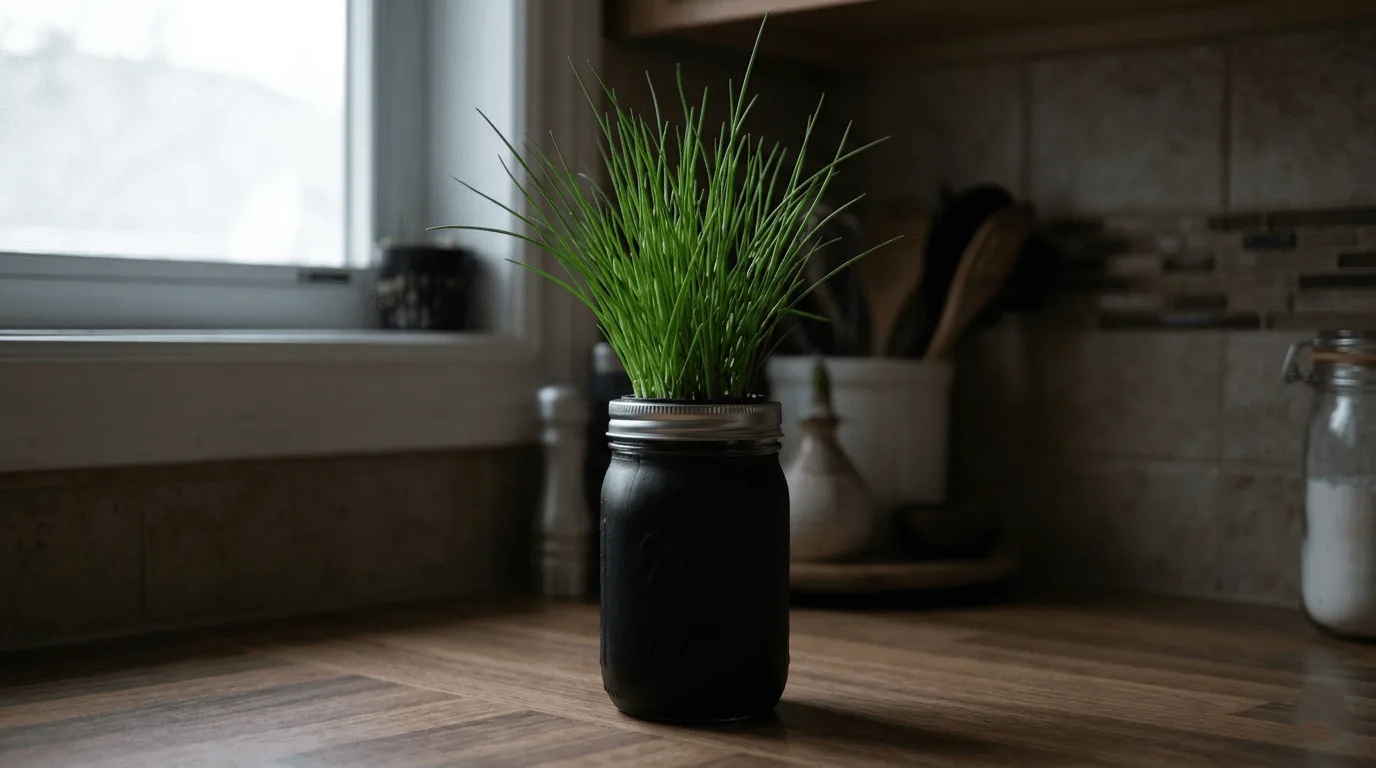
When harvesting, use sharp scissors to cut the spears about one inch above the base. This leaves enough cellular material for rapid regeneration. Change the water every 2 weeks to prevent salt buildup around the sensitive bulb base, and top off with plain pH-adjusted water between full changes.
🚨 What to Do When Your Kratky Jar Garden Struggles
Even the best kratky jar setup apartment plan hits problems occasionally. Small containers leave little room for error, so issues show up visibly on leaves faster than in larger systems. Most passive system problems come down to water quality or light leaks. Diagnosing the issue early almost always saves the plant.
Don’t panic if your plant droops or changes color. Hydroponic plants react quickly to stress but also bounce back fast once you correct the environment. Adjusting the water level often revives a wilted plant within a few hours.
🪡 Treating Early Signs of Root Rot
Brown, slimy roots signal root rot. This fungal condition occurs when the air gap disappears or the water temperature climbs above 72°F (22°C). Healthy roots should always look pale white or slightly tan. If you spot brown slime, act immediately:
- Remove the affected plant from the jar carefully.
- Rinse roots under lukewarm water to wash away the slime without shocking the plant.
- Sterilize the glass reservoir with diluted hydrogen peroxide and rinse clean.
- Refill the jar with fresh nutrient solution, leaving a generous two-inch air gap.
For recurring infections, my guide on preventing root rot in small hydroponic systems covers water temperature management and the specific additives that keep roots healthy long-term.
🦠 Stopping Green Algae Blooms
Green water means light is penetrating your container walls. Algae alters the pH of your water and competes with your plant for dissolved oxygen. Severe blooms can clog delicate root hairs and stunt growth significantly.
To fix an algae problem, dump the green water immediately. Scrub the inside of the jar with hot soapy water until clear, then rinse with diluted hydrogen peroxide. Check your light-blocking cover for gaps or thin spots. A second layer of aluminum foil over the first usually solves the problem permanently.
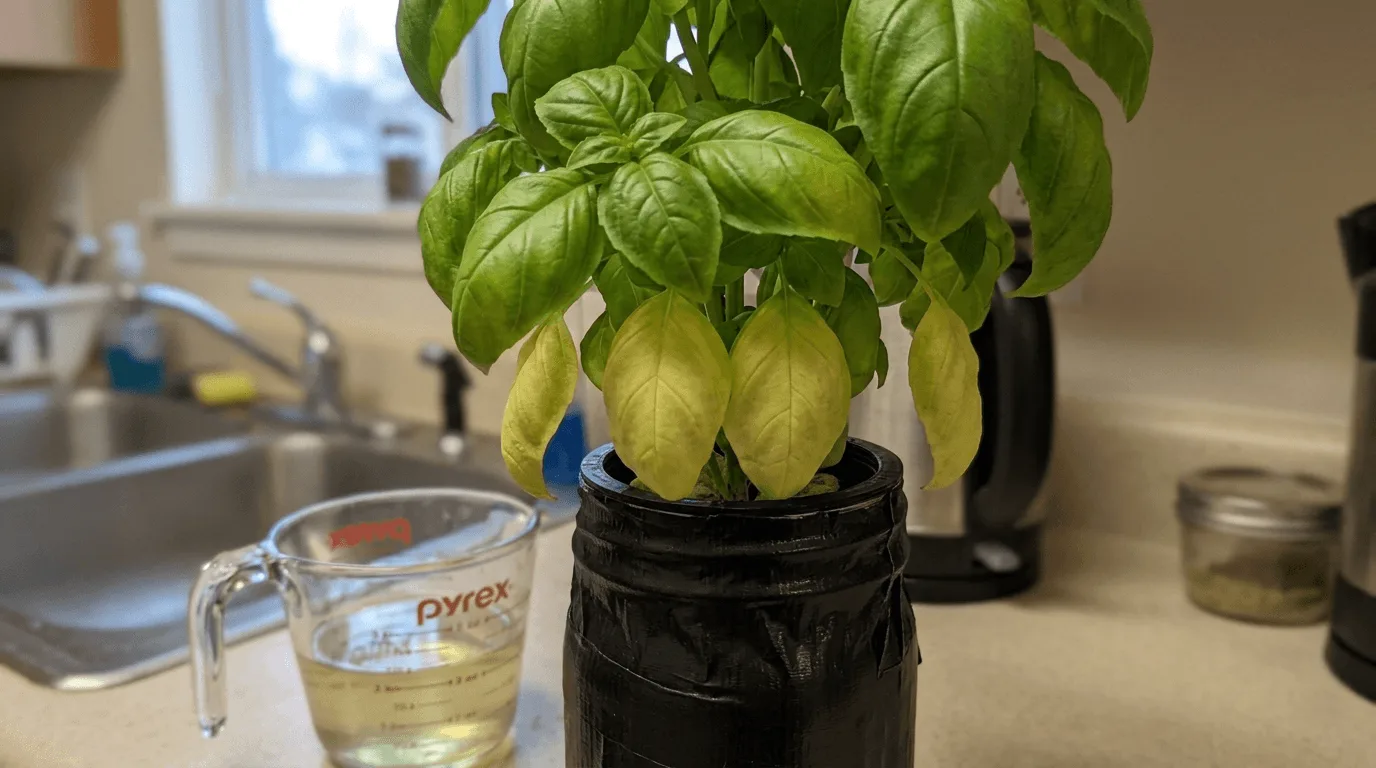
🍂 Fixing Yellowing Lower Leaves
When the bottom leaves of your plant turn pale yellow, it usually signals nitrogen depletion. As the plant uses up nutrients in the jar, it pulls mobile minerals from old leaves to support new growth at the top. Yellowing is a natural indicator that it’s time to feed your crop.
Empty the old solution completely. Never just top off the jar with new fertilizer. Doing so causes toxic salt buildup over time. Mix a fresh batch of nutrients at the correct strength and refill to the proper level. Your plant should regain its color in 3 to 5 days.
→ How to Set Up a Kratky Lettuce Jar on a Sunny Apartment Windowsill
→ Deep Water Culture vs Kratky for Tiny Apartments
→ The Easiest Light Schedule for Apartment Hydroponics When You Work 9 to 5
💬 A Word From Sarah
The lesson that changed how I manage jar gardens had nothing to do with plants. It had to do with math. I once let a basil jar run down to about half an inch of liquid without topping it off, thinking the plant looked fine from the top. What I didn’t realize was that the nutrient concentration in those last few centimetres had nearly tripled as the plant drank the pure water and left the dissolved salts behind. When I finally refilled it, the shock of going from extreme concentration to a fresh diluted mix hit the roots hard. The plant dropped half its leaves in two days.
Now I top off every jar as soon as the water drops more than an inch from the air gap line. Plain pH-adjusted water only, never nutrient solution, until the full 2-week change comes around. That one habit keeps the salt concentration stable and has saved every jar I’ve grown in since.
❓ Frequently Asked Questions
🌰 Which plant is best for a complete beginner?
Basil is the most forgiving plant for a new kratky jar setup apartment grower. It roots within days, handles minor temperature swings better than delicate greens, and gives you visible progress fast. Plant one basil jar first and add chives or lettuce once you’re comfortable with the water routine.
💧 How often do I change the water in a jar system?
Top off with plain pH-adjusted water as the plant drinks to maintain the water level. Do a full reservoir drain and refill every 2 weeks. This prevents salt buildup, keeps pH stable, and removes any bacteria that have accumulated in the stagnant solution.
🗝️ How high should I refill the water?
Once roots have grown down into the liquid, never refill to the very top. Always leave an air gap of at least 2 inches between the water surface and the bottom of the net cup. If you submerge the oxygen-absorbing roots, the plant will decline within days.
🌤️ Can I put my kratky jar in direct sunlight?
Yes, but the glass jar must be fully wrapped to block light from reaching the water. Direct sun hitting exposed nutrient solution causes algae blooms within 48 hours. Keep the foliage in the light and the roots in complete darkness. Foil, a sock, or matte black paint all work.
🌡️ What is the ideal water temperature for passive jars?
Keep your nutrient solution between 65 and 72°F (18 to 22°C). Water above 72°F holds less dissolved oxygen and encourages fungal growth. Keep jars away from hot radiators and direct afternoon sun during summer, and check water temperature if root rot appears unexpectedly.
🐛 Will a water jar attract bugs to my apartment?
Properly maintained hydroponic systems don’t attract pests the way soil does. Fungus gnats need moist dirt to lay eggs, so water-based setups naturally deter them. Wipe up any nutrient spills on the counter immediately, and cover exposed sponge tops with foil to block any remaining entry points.
🚰 Can I use regular tap water for a kratky jar setup apartment?
Yes. Let tap water sit out for 24 hours before using it so the chlorine evaporates. Then test and adjust pH to 5.5 to 6.5 before adding nutrients. If your city has very hard water, you may notice white mineral scaling on the glass over time. Filtered water solves this and makes pH adjustment more predictable.
☀️ Does this work without a grow light?
It depends entirely on your window. A strong south-facing window providing 6 or more hours of direct sun works well for chives and lettuce. Basil needs closer to 12 to 14 hours and will turn leggy in anything less. If your windows are weak or north-facing, a small budget LED makes a significant difference in yield and speed.
Happy growing! 🌿
— Sarah, Urban Hydro Space
Sarah is the founder of Urban Hydro Space and an indoor gardening enthusiast dedicated to helping apartment dwellers grow fresh herbs and vegetables in small spaces. With hands-on experience testing hydroponic systems, she shares practical tips and honest product reviews to make indoor gardening accessible for beginners.