⏳ 15 min read · Last updated: March 2026
Disclosure: This post contains affiliate links. If you purchase through these links, I may earn a small commission at no extra cost to you. Thank you for supporting Urban Hydro Space!
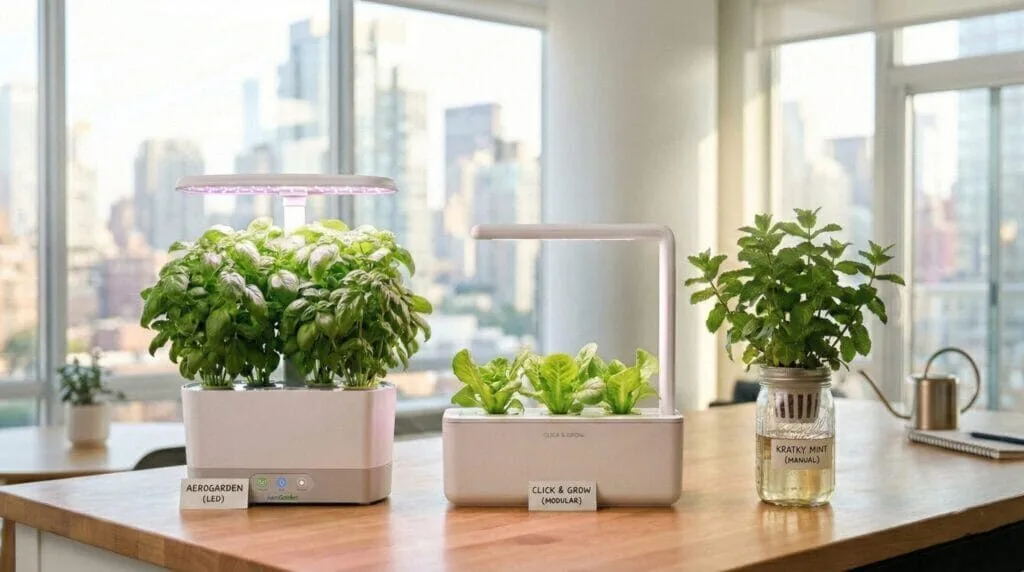
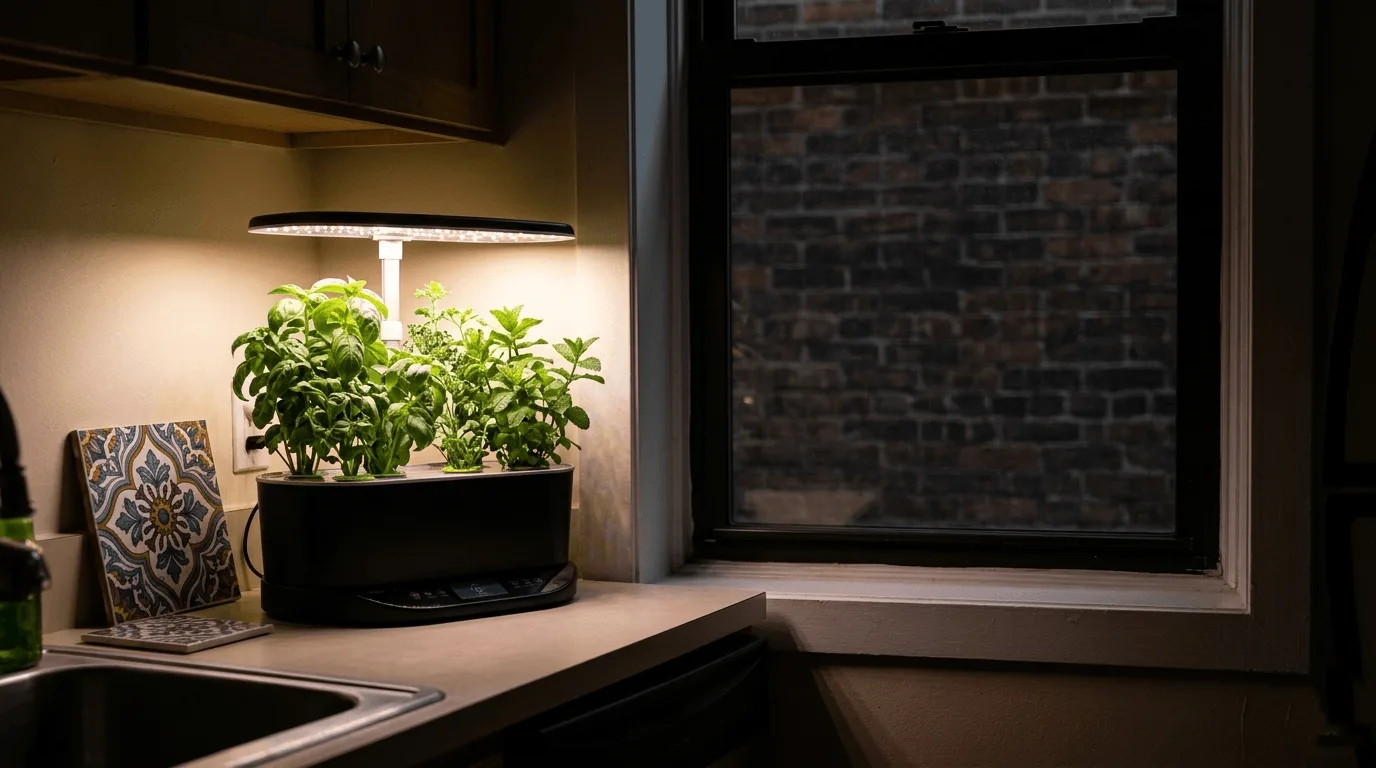
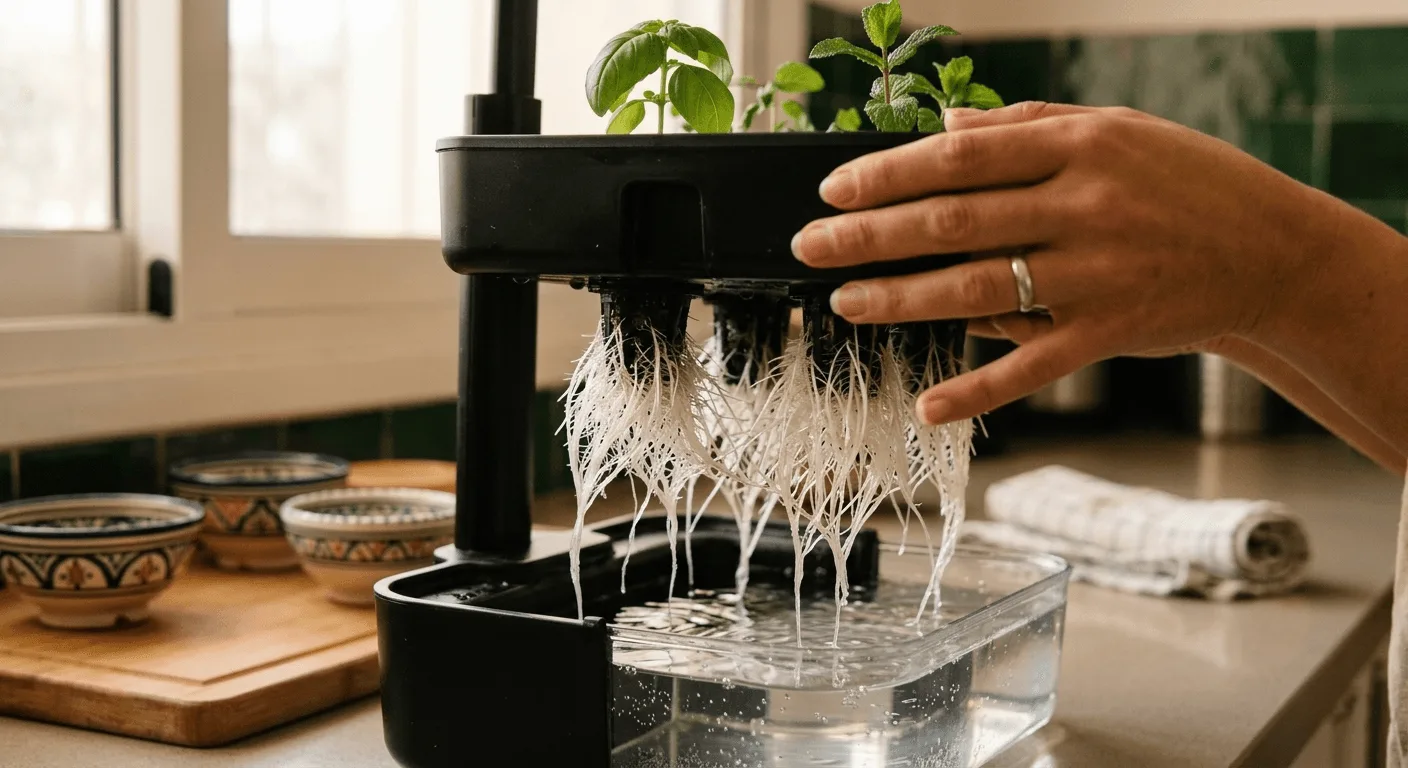
Finding the best hydroponic starter kit apartment setup changed how I use my kitchen. A few years ago, I lived in a tiny studio with one window facing a brick wall. My potted basil died within two weeks because it needed direct sun I simply didn’t have. After a lot of trial and error, I discovered that a compact countertop hydroponic unit solved every problem at once: no sunlight required, no soil, no mess on the carpet.
I’ve since tested four of the most popular countertop kits on my own counter. This guide breaks down each one using verified specs so you can pick the right system without the guesswork I went through.
🌿 Why Countertop Hydroponic Kits Work for Apartments
Apartment growers face three problems that soil pots can’t solve: no outdoor space, unreliable natural light, and landlord rules about mess. Countertop hydroponic kits address all three in a single plug-in unit. They supply their own LED, circulate their own nutrients, and keep the growing area completely contained on your counter.
Because these systems are self-contained, you skip the guesswork that comes with soil. No watering schedules to memorize, no fertilizer mixing by eye. The built-in timer handles lighting automatically, and the pump keeps roots oxygenated without any input from you. These units draw far less power than you’d expect. My full breakdown of the easiest light schedule for apartment hydroponics covers exactly what these systems cost to run per month.
- Keep your nutrient water at pH 5.5 to 6.5 for healthy herb growth.
- Do a full reservoir drain and refill every 2 weeks. Top off with plain pH-adjusted water daily.
- Position your grow lights 6 to 8 inches above the plant canopy for leafy herbs.
- Place a silicone mat under your unit to dampen pump vibrations on hard countertops.
🏆 Quick Picks
Short on time? Here are my top picks. Each fits on a standard kitchen counter and handles lighting automatically.
- Best Budget: MUFGA 12 Pods Hydroponics Growing System: Check Price on Amazon
- Best Smart Features: Ahopegarden 10 Pods with LCD Temp Display: Check Price on Amazon
- Best Large Tank: iDOO 12 Pods with 5L Visual Water Tank: Check Price on Amazon
- Best Simple Setup: SUNCOZE 12 Pods with 1-Button Control: Check Price on Amazon
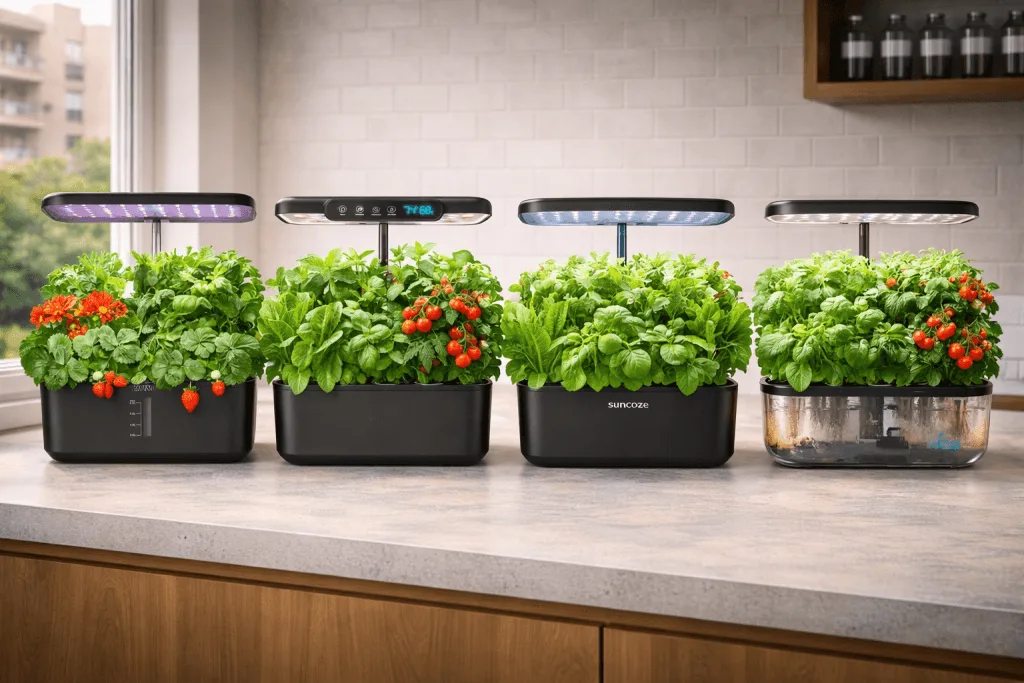
📊 Side-by-Side Comparison
🌾 MUFGA 12 Pods: Best Budget Kit with the Largest Tank

The MUFGA 12-pod system is the most reviewed kit on this list, with over 2,600 ratings and a solid 4.4-star average. That volume of real-world feedback matters for a beginner. You’re buying something thousands of people have already figured out how to grow with, which means the troubleshooting community is large and the common mistakes are well-documented.
The standout spec here is the 6.5 L reservoir, the largest of any unit on this list. More water means longer intervals between refills and more buffer if you forget to top off for a day. The 24W LED runs on a 16-hour light cycle and includes both Vegetable and Flower modes, a feature usually reserved for pricier units. Dimensions are 14 x 9.4 x 6.7 inches, which fits comfortably on most kitchen counters.
The trade-off is build quality. The plastic on the basin runs thinner than premium brands, and some users report light issues after extended use. Handle the tank carefully when carrying it to the sink for cleaning. Seeds are not included.
📐 Setup and Light Height
The MUFGA assembles in under ten minutes straight out of the box. Snap the light post into the base, plug in the adapter, insert the grow sponges, and you’re ready to plant. The light post adjusts from 5.3 to 17.7 inches above the water tank, giving you a wide range across the full growth cycle from seedling to mature herb.
For leafy herbs like basil, mint, parsley, and chives, keep the panel 6 to 8 inches above the tallest leaf tips. If you’re unsure about positioning on a shelf or inside a cabinet, my guide on grow light distances for hydroponic herbs on a shelf walks through the exact measurements.
⏲️ Light Timer and Pump Cycle
The built-in timer cycles the LED on for 16 hours a day without any input from you. You never have to remember to flip a switch. The independent water pump forms a circulation loop that keeps oxygen moving through the root zone on an automatic cycle.
If you’re sensitive to sound at night, set the start time to align with your waking hours. Plug it in at 6:00 AM and it shuts off at 10:00 PM. For noise reduction strategies, see my guide on how to quiet a noisy hydroponic pump in an apartment.
🔧 What to Do If the Pump Stops
Plant roots and mineral debris can clog the small impeller inside the pump. If you stop hearing water circulate, the motor may be jammed. Try these steps before assuming the pump needs replacing:
- Disconnect the power cord from the back of the unit.
- Remove the plant deck and pull off the sponge filter covering the pump intake.
- Rinse the filter sponge under warm tap water to remove slime or mineral crust.
- Snap the cover back on and plug the unit in to test the water flow.
🌱 Ahopegarden 10 Pods: Best for Smart Monitoring
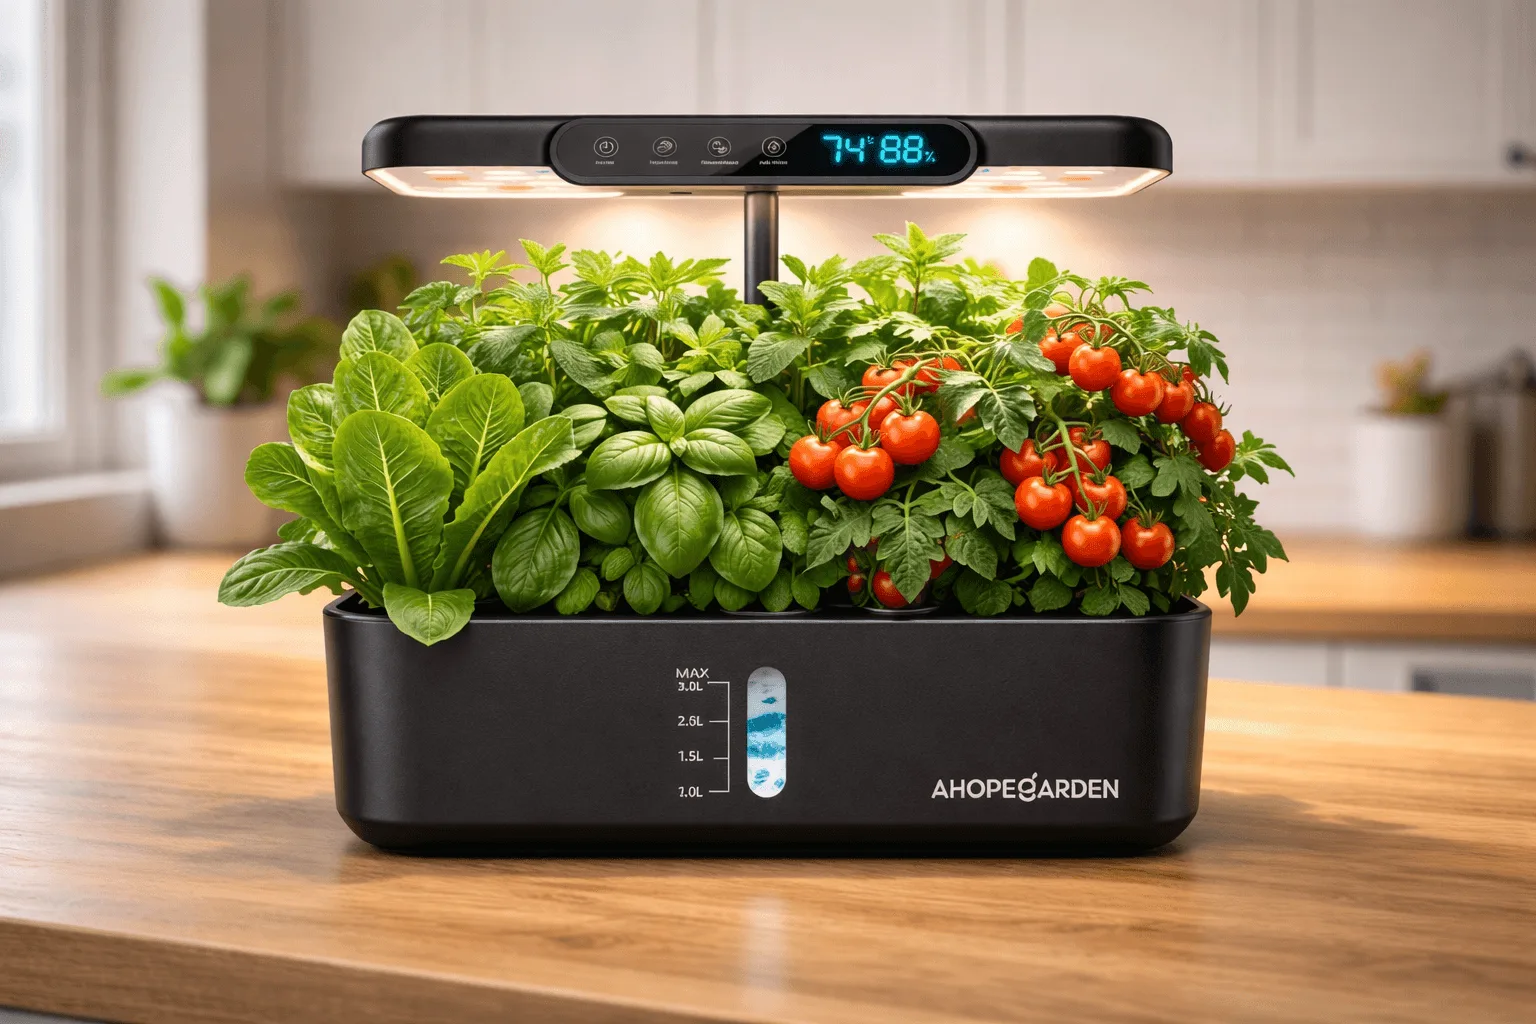
The Ahopegarden 10-pod system is the highest-rated kit on this list at 4.7 stars and holds the #11 spot in Hydroponic Growing Kits on Amazon. The reason buyers rate it so consistently well comes down to one feature: the LCD screen that displays real-time temperature and humidity directly on the unit. No guessing whether your room is too warm or too dry. The data is right there every time you walk past.
It also includes a low water alarm that flashes red on the touch panel when the reservoir drops below 1L, a quick-release button to detach the light panel for cleaning, and a built-in drainage hole that most competing units skip entirely. The trade-off is a smaller 3 L tank and only 10 pods versus 12. Dimensions are 11 x 7 x 7 inches, making it the most compact unit on this list.
🌡️ LCD Screen and Low Water Alarm
The LCD display shows ambient temperature and humidity in real time. For apartment growers, this solves a problem most beginners don’t know they have: room conditions change seasonally, and a too-warm environment raises water temperature above the safe 72°F (22°C) threshold, which accelerates root rot. With a display on the unit, you catch this before the damage starts.
The red flashing alarm when water drops below 1L is a practical safety net. A 3L tank depletes faster than larger units, so the alarm earns its place. Top off with plain pH-adjusted water daily to keep roots from drying out between full reservoir changes.
☀️ Light Height and Timer Modes
The extendable light post adjusts across 4 sections up to 15.4 inches, the tallest reach on this list. Two timer modes are available: 16 hours for vegetables and 22 hours for fruiting plants. For standard herbs and leafy greens, use the 16-hour vegetable mode. The full-spectrum LED mimics natural sunlight to push growth rates well above what soil cultivation delivers.
To choose the right herbs for this system and understand which varieties grow best together in one reservoir, my guide to the best herbs for small hydroponic systems covers compatibility and spacing across seven varieties.
🩺 What to Do If Leaves Turn Yellow
Yellowing leaves almost always point to a pH problem before anything else. The Ahopegarden’s temperature display helps rule out heat stress, but it doesn’t measure water pH directly. If your basil starts going pale, run through this sequence:
- Test the water pH. It should sit between 5.5 and 6.5. Adjust this before touching the nutrients.
- Inspect the roots through the visual window. Brown or slimy roots signal root rot rather than a deficiency.
- Drain the reservoir completely using the drainage hole and refill with fresh, balanced nutrients at the correct EC for your plant type.
🌻 iDOO 12 Pods: Best for a Large Water Tank

The iDOO 12-pod system earns its place on this list through one specification that separates it from everything else: a 5L food-grade translucent water tank that supports 2 to 3 weeks of growth between full refills. For someone who travels or works long hours, that maintenance interval is genuinely different from a 3 or 4L system that needs attention every week.
The translucent tank lets you observe root growth, water quality, and pump operation without lifting the deck. The unit is made from food-grade ABS material, which matters if you’re growing food and want to avoid heavy metal contamination. Dimensions are 15.16 x 9.65 x 7.8 inches, so measure your counter space before ordering. Rating sits at 4.5 stars across 412 reviews.
☀️ Light Modes and Growth Cycle
The full-spectrum LED runs on a 16-hour automatic cycle and offers both Vegetable and Flower/Fruit modes. Vegetable mode emits blue, red, far-red, and white light for leafy growth. Flower/Fruit mode shifts toward red and far-red to push flowering and fruiting stages. Switching between the two requires just one button press.
For a broader comparison of what to look for in LED grow lights at this price point, my guide to the best LED grow lights for apartment countertop hydroponics breaks down spectrum, wattage, and PPFD ratings in plain terms.
💧 Using the 5L Tank to Your Advantage
A larger reservoir gives roots more room to develop and creates a more stable nutrient concentration. Small tanks swing in EC and pH faster as plants drink and evaporate water. The iDOO’s 5L volume buffers those swings, which means less frequent adjustment between full changes.
Still do a full drain and refill every 2 weeks. Top off with plain pH-adjusted water daily to replace what your plants drink. The larger volume does not eliminate the maintenance schedule; it just makes the consequences of missing a day less severe.
🚨 What to Do If Algae Appears
Algae grows in nutrient-rich water that gets exposed to light. A translucent tank is beautiful for monitoring roots but does allow some light penetration. If you see green slime forming inside the tank walls, act immediately:
- Cover any empty pod holes with opaque stickers or rubber stoppers to block light entering from above.
- Remove the plants carefully and wipe the tank interior with diluted hydrogen peroxide.
- Rinse the roots under lukewarm water to remove any green film without stressing the root mass.
- Refill with fresh nutrient solution and make sure all pod labels sit tightly over each sponge.
☀️ SUNCOZE 12 Pods: Best for Simple One-Button Control
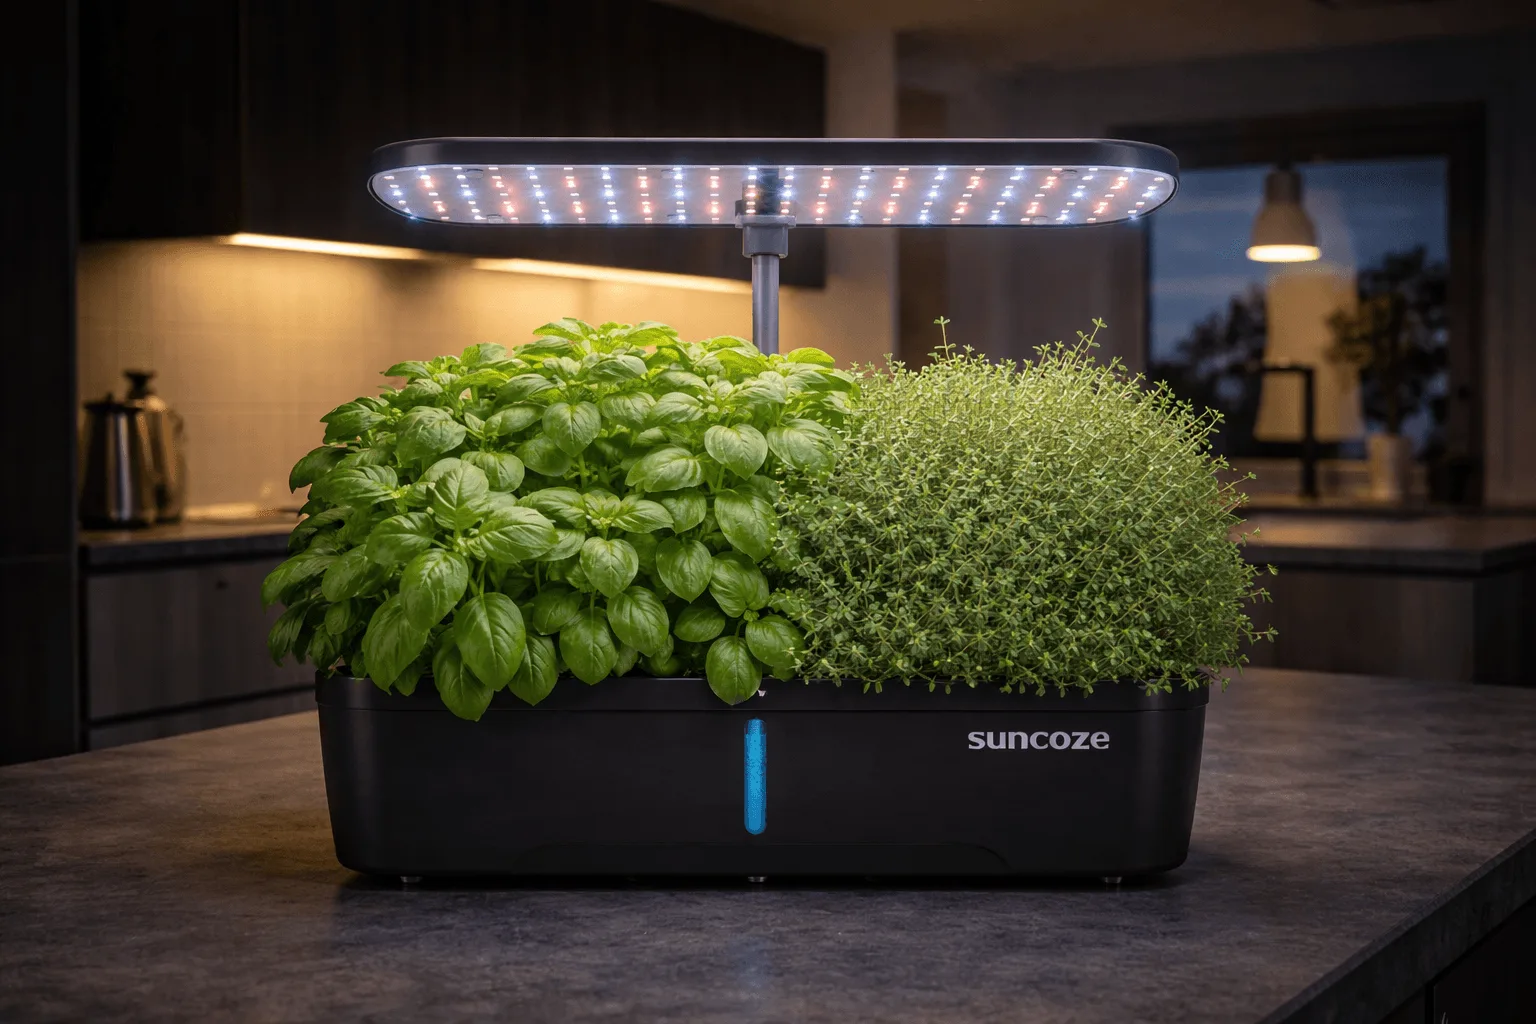
The SUNCOZE 12-pod system is built for people who want to start growing without a learning curve. The entire lighting system is controlled by a single M button: tap to turn on and cycle between 12, 14, and 16-hour light modes; hold for 3 seconds to turn off. No menus, no app, no pairing process. Plug it in and press one button.
The 20W LED runs on whichever timer mode you select and provides full-spectrum coverage across all 12 pods. The 4L visible water tank shows the water level at a glance. The pump runs on a 5 minutes on, 25 minutes off cycle, which is a gentler rhythm than continuous-flow units and contributes to the quiet operation customers consistently mention. Dimensions are 7.1 x 15.5 x 6.6 inches. Some users report pump issues after extended use, which is worth factoring in.
⚡ Setup in Under a Minute
The SUNCOZE advertises a one-minute setup, and it delivers. Extend the rods, attach the grow deck, plug it in, and press M. There is no configuration beyond selecting your light mode. This makes it genuinely the right choice for someone who has never touched a hydroponic system before and wants to start growing the same afternoon the box arrives.
The adjustable height range runs from 2.2 to 12.4 inches, covering the full range from seedlings to mature herbs. Keep the panel at 6 to 8 inches above leafy herbs throughout the growth cycle.
💧 Pump Cycle and Water Management
The 5-minute-on, 25-minute-off pump cycle keeps roots oxygenated without running the motor continuously. This interval approach reduces motor wear and keeps noise lower than always-on pumps. The visible 4L tank makes it easy to see when a top-off is needed without lifting anything.
Top off with plain pH-adjusted water daily. Do a full drain and refill every 2 weeks on schedule. The intermittent pump means nutrients may settle slightly between cycles in a way continuous-flow systems avoid, so give the tank a gentle swirl when you top off to keep the solution evenly distributed.
🩺 What to Do If Seeds Won’t Germinate
Empty pods after two weeks usually mean the sponge is too wet or the room temperature is too low. Seeds need moisture and warmth, not a waterlogged sponge sitting in cold water. Work through these steps before giving up on the batch:
- Drop 2 to 3 seeds per sponge opening. More than that crowds the germination zone and reduces success rates.
- Press the clear plastic humidity domes firmly over each pod basket to trap warmth near the seeds.
- Lower the light hood a few inches closer to the deck to add gentle radiant warmth.
- If nothing sprouts after 14 days, replace with a fresh seed packet. Old seeds have low germination rates regardless of conditions.
| Model | Tank | LED | Timer Options | Max Light Height |
|---|---|---|---|---|
| MUFGA 12 Pods | 6.5 L | 24W | 16H auto | 17.7″ |
| Ahopegarden 10 Pods | 3 L | Full spectrum | 16H veg / 22H fruit | 15.4″ |
| iDOO 12 Pods | 5 L | Full spectrum | 16H auto (Veg/Fruit modes) | Adjustable |
| SUNCOZE 12 Pods | 4 L | 20W | 12H / 14H / 16H | 12.4″ |
🧪 My Biggest Nutrient Mistake with Apartment Hydroponic Kits
Even with a great kit, mistakes happen. In my first year growing indoors, I assumed more fertilizer meant faster results. I mixed my liquid nutrients at EC 2.4 for a fresh batch of baby mint seedlings. That concentration works for mature, established mint, but it burns the delicate roots of week-old sprouts that are still developing their feeding capacity.
Within three days, leaf edges curled and turned crispy brown. My seedlings were suffering from nutrient lockout caused by excess salt in the water. I had to drain the tank, flush with plain water, and restart at EC 1.0 for the first two weeks. They recovered, but the crop set back by nearly a month.
⚗️ Why High EC Hurts Seedlings
EC measures how much dissolved fertilizer salt is in your water. Seedlings are light feeders for their first two weeks. Starting them at the concentration you’d use for a mature plant stresses the roots and prevents water absorption, even when plenty of nutrients are present in the tank.
Always start seedlings at EC 1.0 to 1.2 and increase gradually as the plants establish. Add more nutrients if leaves look pale after week three. My guide on the best hydroponic nutrients for small apartment systems covers the full dose schedule I follow now, including EC targets by plant type.
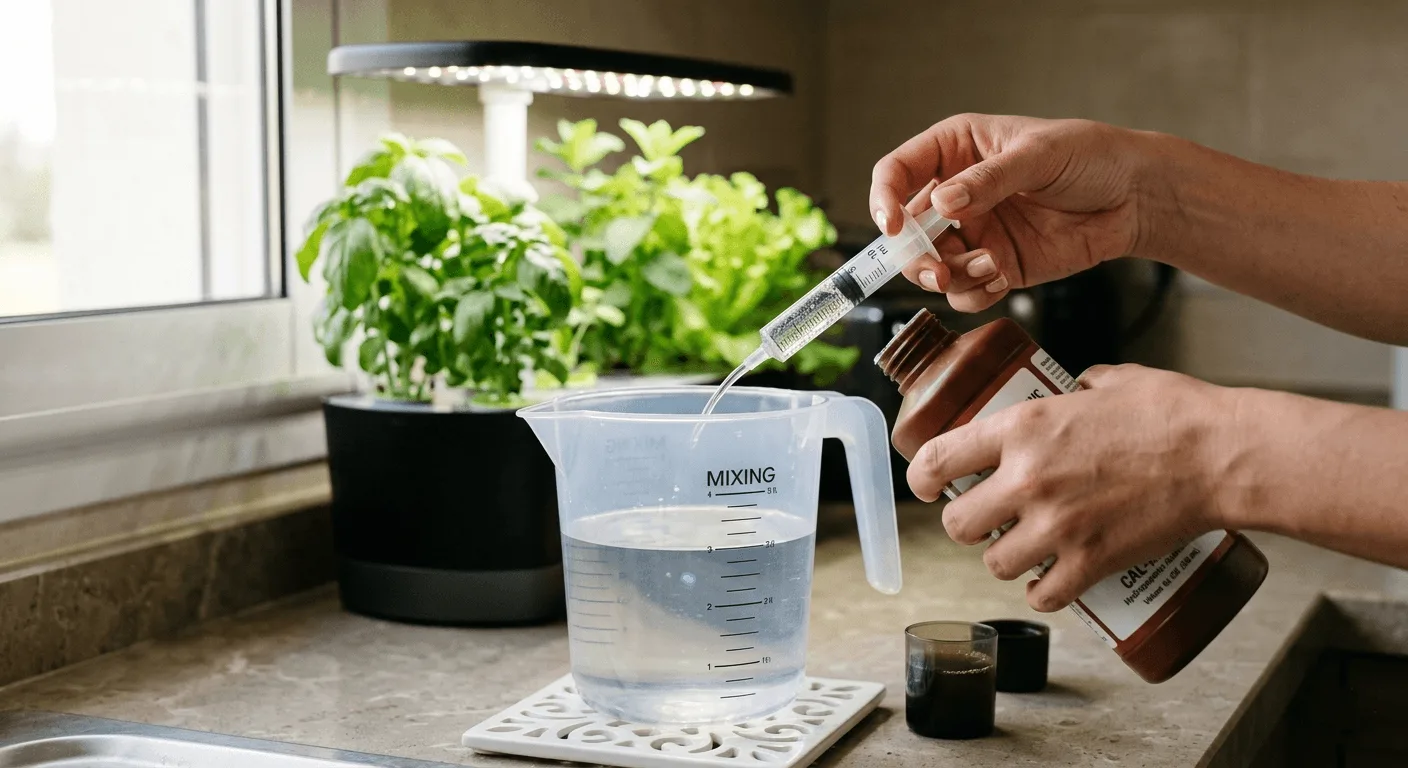
🫙 How to Measure Nutrients Without Guessing
Accuracy prevents disasters in a small reservoir. Never eyeball the liquid measurements. Small errors compound quickly when your tank holds only 3 to 5 liters. Use this process every time:
- Fill a clean one-gallon jug with fresh tap water.
- Use a plastic syringe to draw exactly 5 milliliters of part A nutrient.
- Stir the water thoroughly, then add 5 milliliters of part B nutrient.
- Test the pH, adjust it to pH 5.5 to 6.5, then pour the finished mix into your system.
For cleaning your mixing tools after nutrient prep, hydrogen peroxide works better than household bleach. It breaks down into water and oxygen and leaves zero toxic residue in your system. Mix it fresh each time you use it, as it degrades quickly once diluted.
→ 3 Best Countertop Hydroponic Systems for Apartment Beginners
→ DWC vs Kratky for Tiny Apartments: Which Is Easier?
→ Beginner Hydroponic Nutrients: Simple Feeding Schedule for Small Systems
💬 A Word From Sarah
The week I nearly quit indoor growing, my mint looked perfect above the waterline, full leaves with no yellowing, but below the deck the roots had turned brown and slimy. I’d spent so much time monitoring what I could see that I completely stopped checking underneath. Root problems are invisible until they become root rot, and by the time your leaves show symptoms, the damage is already weeks old.
Now I lift the deck every time I do a water change. I look at the roots, and if anything looks brown or soft, I treat with diluted hydrogen peroxide before it spreads. It takes thirty seconds. That one habit has saved three crops so far. Whatever kit you choose from this list, build that thirty-second root check into your routine from day one.
❓ Frequently Asked Questions
🌱 Which kit should a complete beginner start with?
Start with the MUFGA 12-pod system. It has the largest user community, over 2,600 reviews, a 6.5L reservoir that forgives missed top-offs, and a price that keeps the risk low for a first attempt. Plant basil or chives first. Both sprout fast and tolerate small beginner mistakes without dying immediately.
☀️ Can I use window light instead of the built-in LED?
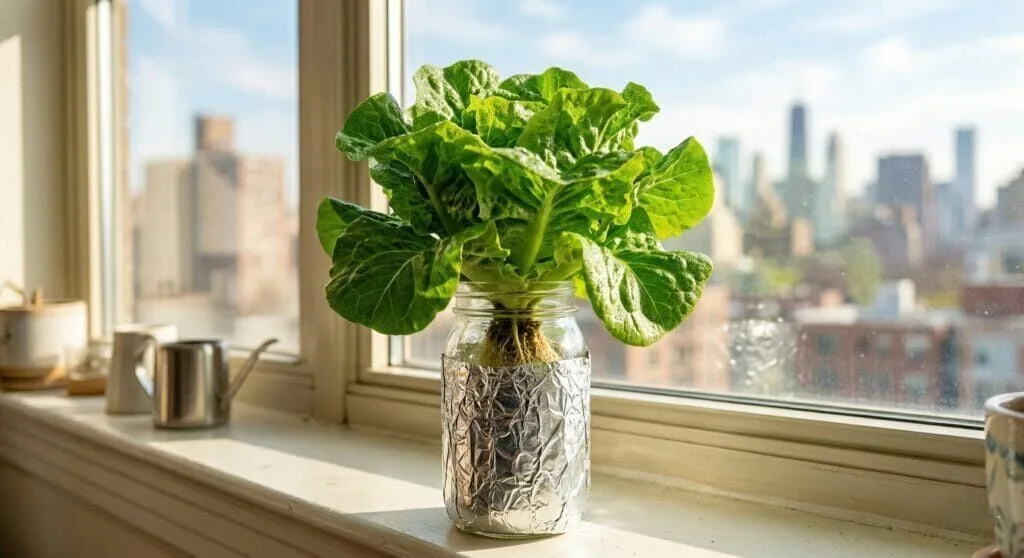
Not reliably. Most apartment windows don’t provide the consistent 14 to 16 hours of direct light that herbs need. The built-in LED is what makes these kits work year-round regardless of window orientation. If you have a strong south-facing windowsill and want a pump-free option, the Kratky jar method for windowsill growing is worth exploring, but it only performs in strong natural light.
💧 How often do I need to change the water?
Top off with plain pH-adjusted water daily to replace what your plants drink. Do a full reservoir drain and refill every 2 weeks. Waiting longer lets bacteria, algae, and salt deposits build up in the tank. Regular changes are the single most effective maintenance habit for a countertop system.
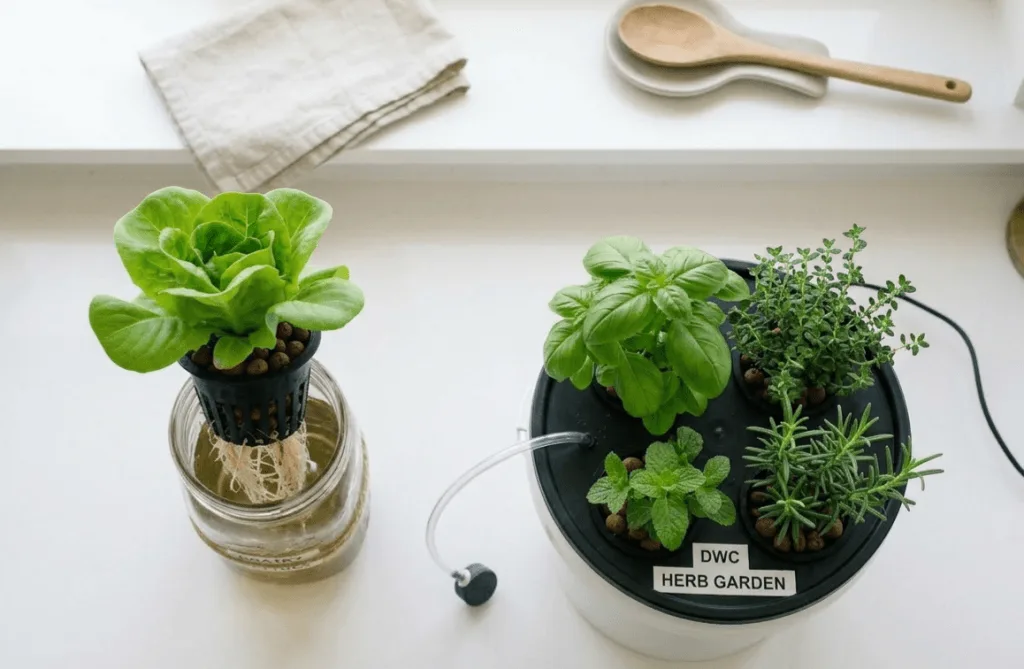
🌿 Can I grow different plants in the same unit?
Yes, but pick plants with similar EC and pH requirements. A safe shared-reservoir EC is 1.5, which works well for basil, parsley, chives, and lettuce grown together. Avoid mixing heavy feeders like mature basil with light feeders like thyme. The EC level that suits one will stress the other over time.
🔌 Do these kits need a separate air pump or air stone?
No. All four kits reviewed here include a built-in submersible water pump. You don’t need to purchase an external air pump or air stone separately. The internal pump circulates nutrients to the roots automatically. The only optional add-on worth considering is a silicone mat under the unit if pump vibration bothers you on a hard countertop.
🍃 Do hydroponic herbs taste the same as soil-grown?
Most people find hydroponic basil, mint, and parsley taste equal to or better than store-bought soil herbs. The controlled environment delivers consistent nutrients and eliminates soil contamination. Flavor differences are most noticeable with aromatic herbs like basil and mint, which benefit from steady EC levels and full-spectrum lighting at the right distance.
⏱️ How long will a countertop hydroponic kit last?
With regular cleaning and pump maintenance, a quality countertop kit lasts 3 to 5 years. The pump is the most likely component to wear out first, and most manufacturers sell replacements separately. Clean the reservoir with diluted hydrogen peroxide between crops and descale the pump inlet every 2 months to extend the working life of the unit.
🦟 Will these kits attract bugs into my apartment?
Indoor hydroponics attract far fewer pests than soil pots. Fungus gnats are the most common issue and are drawn to wet grow sponges. Covering exposed sponge tops with opaque stickers or a thin layer of aluminum foil prevents gnats from laying eggs. Keep the reservoir sealed and the pump intake clear to avoid stagnant wet zones where pests breed.
⚡ How much electricity do these kits use?
Very little. A 20 to 24-watt LED panel running 16 hours a day adds roughly $1 to $3 to your monthly electricity bill depending on your local rate. The pump draws even less. These systems cost far less to run than traditional high-intensity grow lights, which makes them a practical choice for an apartment on a budget.
🚰 Can I use regular tap water?
Yes. Let tap water sit out for 24 hours first so the chlorine evaporates, then test and adjust the pH to 5.5 to 6.5 before adding nutrients. If your local water is hard, you may notice white mineral scaling on the plastic over time. Filtered or distilled water eliminates this and makes pH adjustment more predictable.
🥬 Can I grow lettuce in these units?
Yes. Loose-leaf varieties like buttercrunch and romaine do very well in countertop kits. They grow fast, tolerate the standard 16-hour light schedule, and let you harvest individual outer leaves rather than pulling the whole plant. For a full step-by-step walkthrough, see my guide on growing hydroponic lettuce in a countertop system.
🌿 Which herb should I grow first?
Basil is the best starting herb for most beginners. It sprouts within 5 to 7 days, grows fast under the built-in LED, and gives you harvestable leaves in 3 to 4 weeks. Chives are an easier backup if basil feels like too much too soon. For a detailed planting and harvest guide, see my foolproof guide to growing hydroponic basil in a small apartment.
Happy growing! 🌿
— Sarah, Urban Hydro Space
Sarah is the founder of Urban Hydro Space and an indoor gardening enthusiast dedicated to helping apartment dwellers grow fresh herbs and vegetables in small spaces. With hands-on experience testing hydroponic systems, she shares practical tips and honest product reviews to make indoor gardening accessible for beginners.