⏳ 22 min read · Last updated: March 2026
Starting hydroponic seeds in rockwool is often the first big hurdle for any indoor apartment gardener, and getting it wrong is easier than it sounds. I remember staring at a tray of collapsed, fuzzy stems during my first winter growing indoors. My tiny basil plants had all fallen over overnight. I assumed I had bought a bad batch of seeds. The real culprit was how I was managing moisture on my kitchen counter.
I was drowning my seeds, creating soggy conditions where fungus thrived immediately. Seeds need air just as much as water to survive, and my early setups consistently failed before the plants even reached the system. Now I want to show you my exact method for sprouting healthy plants indoors without the heartache. I refined this process over months in my own tiny living space.
🎴 Why Starting Hydroponic Seeds in Rockwool Is Worth the Effort
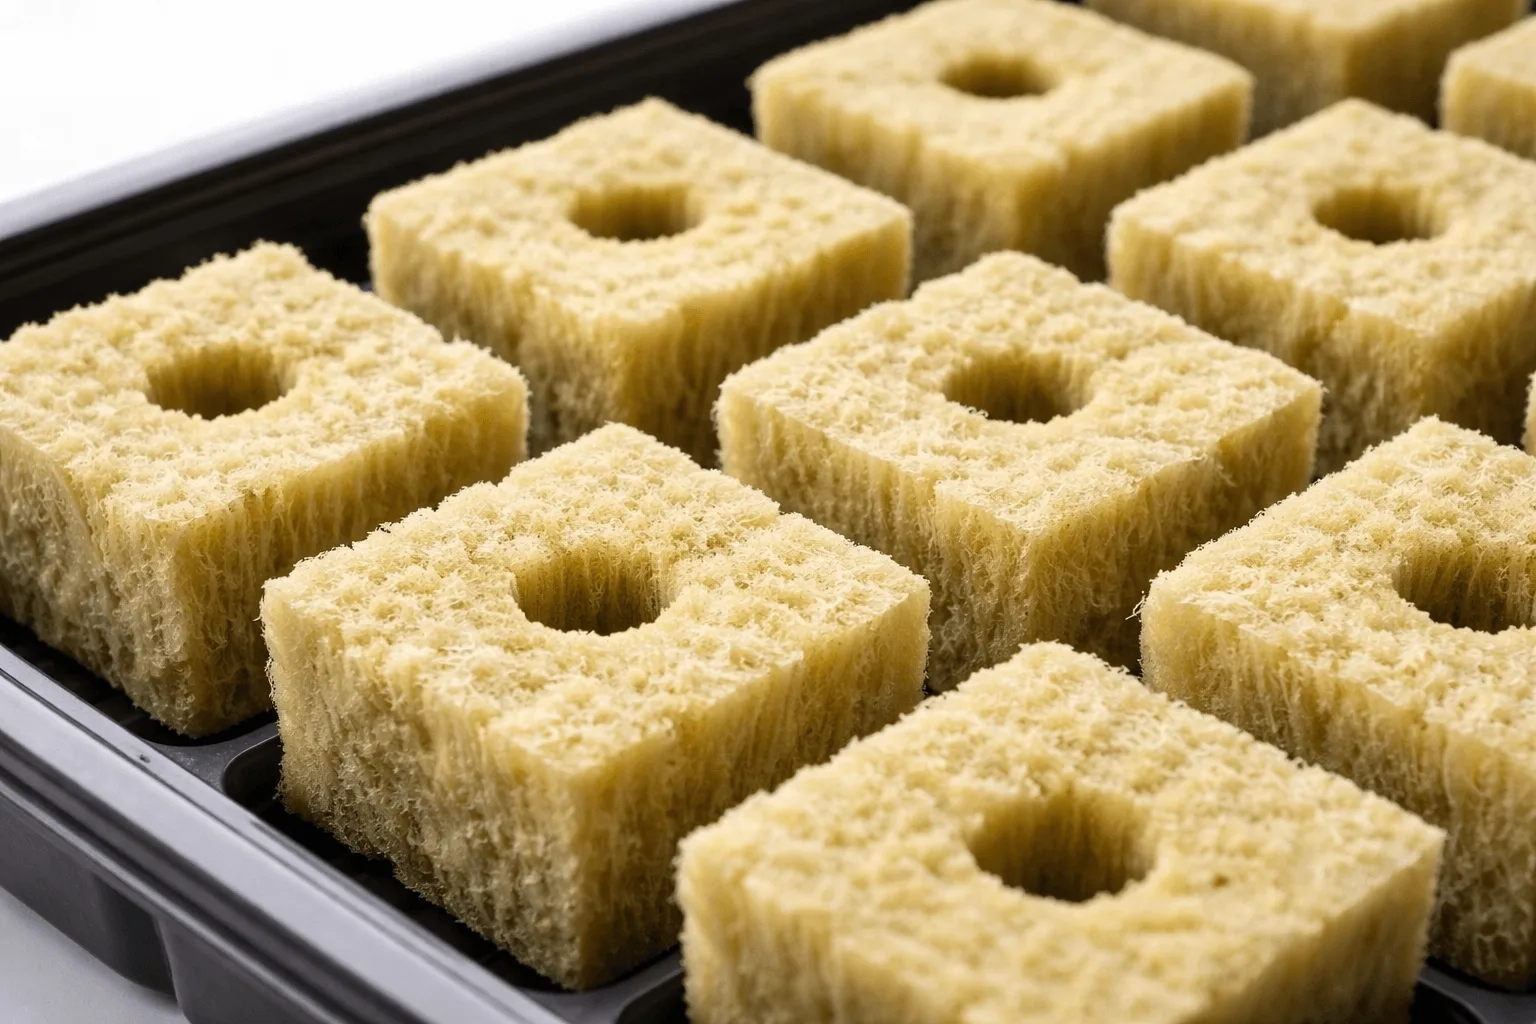
Many beginners ask why they can’t just use normal potting soil to start their indoor gardens. Soil brings pests, dirt, and unpredictable drainage into a clean apartment setup. Learning to start hydroponic seeds in rockwool bypasses all of that. Rockwool is made from spun basalt rock, which makes it entirely sterile right out of the package.
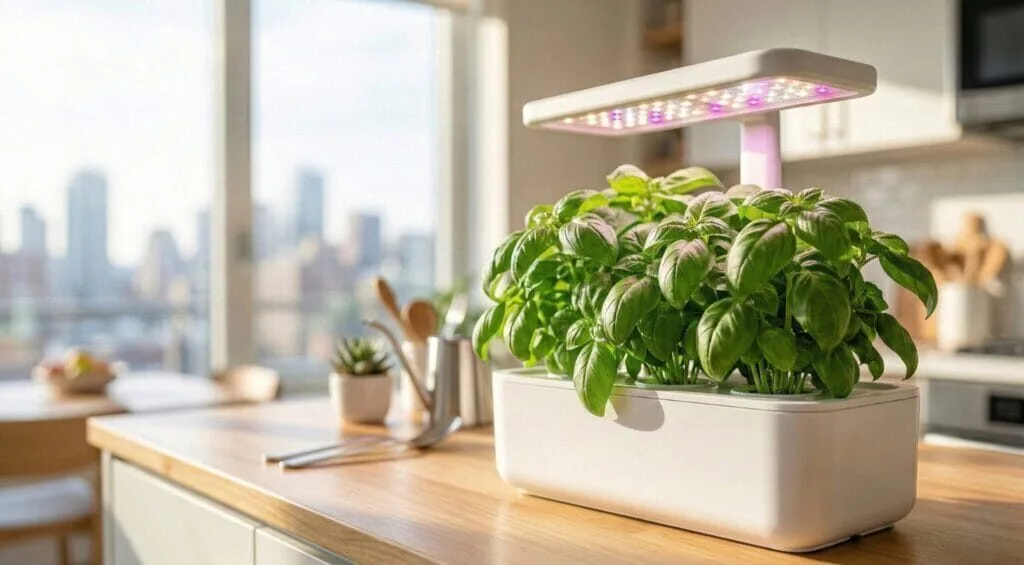
Starting plants in a sterile medium skips soil-borne diseases completely. Rockwool also holds its physical shape perfectly in plastic net cups, which makes transferring seedlings into a full system clean and simple. You can easily choose the best herbs for small hydroponics and watch them thrive in these little cubes from their first day.
- Always soak raw rockwool in pH 5.5 to 6.0 water before planting anything.
- Never squeeze the wet cubes. Squeezing will destroy the internal air pockets permanently.
- Provide 14 to 16 hours of direct light as soon as you see tiny green sprouts.
- Wait for the first true leaves before adding any liquid nutrients.
- Why Starting Hydroponic Seeds in Rockwool Is Worth the Effort
- Step 1: Pre-Soaking Your Rockwool Cubes Properly
- Step 2: Sowing Hydroponic Seeds in Rockwool Cubes
- Step 3: Lighting and Humidity for Early Growth
- Troubleshooting Mushy Cubes and Damping Off
- Step 4: When to Add Nutrients to Hydroponic Seedlings
- Moving Your Rockwool Seedlings to Their Permanent Home
- A Word From Sarah
- Frequently Asked Questions
🗙 The Water-to-Air Ratio Advantage
Rockwool has a physical property that benefits fragile roots immediately. Even when completely soaked, standard rockwool retains about 20 percent oxygen inside its fibers. New roots can breathe while taking in moisture at the same time, which makes drowning far less likely than with dense peat plugs.
When seeds first split open, they require significant oxygen to power their initial growth. If a medium holds too much water, the embryonic root suffocates and dies within hours. The spun basalt fibers naturally drain away excess liquid while clinging to just enough moisture, giving newly hatched roots the ideal balance of hydration and air. The fibrous structure also maintains its exact shape regardless of how many times you wet it, so the medium never crushes delicate new root hairs.
🩺 Preventing Common Seedling Diseases
Young sprouts are highly vulnerable to fungal attacks in their first week of life. Standard potting soil often harbors dormant fungal spores waiting for warm, wet conditions. Rockwool is heated to extreme temperatures during manufacturing, so it arrives completely clean. Starting plants this way drastically lowers the risk of early plant death.
In an enclosed apartment, a single fungal outbreak can wipe out an entire tray quickly. Soil gnats lay eggs in organic matter and spread harmful bacteria as they multiply. An inorganic basalt cube offers zero nutritional value to these pests, so your indoor garden stays sanitary during its most vulnerable stage. If you’ve lost a batch of expensive seeds to mystery mold, switching to a sterile starting block removes the most common variable in early plant failure.
💧 Step 1: Pre-Soaking Rockwool Cubes for Hydroponic Seed Starting
Before you plant any hydroponic seeds in rockwool, you must prepare the cubes thoroughly. Raw rockwool has a naturally high pH, usually around 8.0, which is too alkaline for most plants. Skipping this preparation step means your seedlings will struggle to absorb minerals later. Bringing the pH down before sowing ensures proper nutrient uptake from the moment roots form.
This soaking process takes about thirty minutes and dictates the future health of your garden. Prepare a large bowl of pH-adjusted water on your kitchen counter, drop your starter cubes in to hydrate, and let them sink naturally. They float at first, then slowly absorb liquid and settle to the bottom.
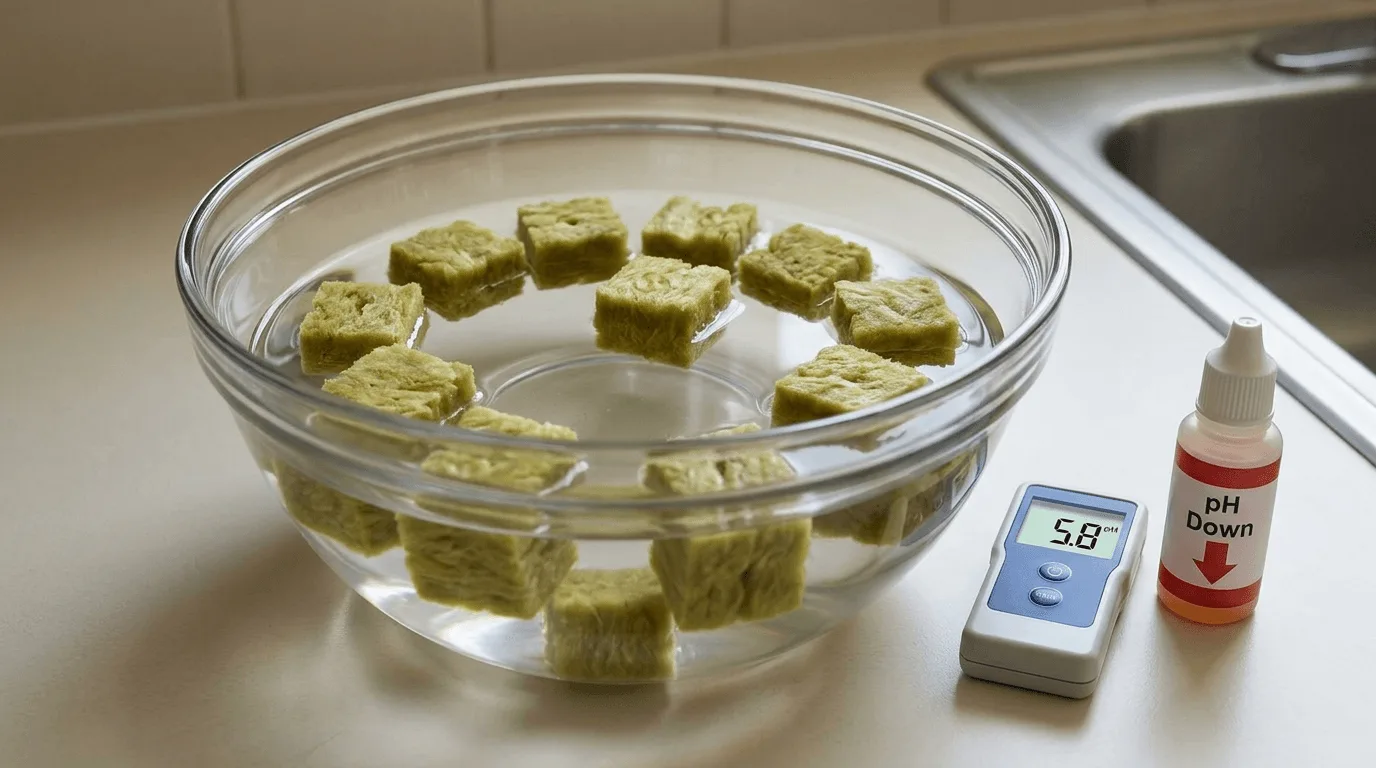
🧪 Adjusting pH Before Sowing Hydroponic Seeds in Rockwool
Fill a container with plain tap water and test the pH. Adjust it to a pH 5.5 to 6.0 range using a commercial pH Down liquid. Organic acids like lemon juice work as a temporary alternative but break down quickly, so commercial adjusters provide more stability if you’re storing the water for several days.
Handle commercial pH adjusters carefully. They are concentrated acids. Simple gloves protect your skin from accidental splashes. If your pH drops below 5.0 by mistake, don’t panic. Add more plain tap water to dilute the acid and raise the number back up. Keeping an extra jug of untreated water nearby makes this correction instant. To understand pH adjustments in the context of feeding, the beginner feeding schedule covers the chemistry clearly.
⏲️ How Long to Soak the Cubes
Place your dry cubes into the balanced water and let them sink naturally. Don’t push them down. Forcing them can damage their structure permanently. Let them soak for 30 minutes to ensure the internal fibers stabilize at the correct acidity. Once the time is up, carefully remove them from the bowl one by one.
Thirty minutes is the right window for full saturation and pH stabilization. Leaving them longer can sometimes cause the blocks to become overly brittle, so set a simple kitchen timer to keep track. After lifting them out, shake gently to remove excess dripping water.
→ Starting Seeds Indoors: Penn State Extension
→ Seed Starting Basics: National Gardening Association
If a cube still feels excessively heavy after a gentle shake, rest it on a dry paper towel. The towel wicks away surplus moisture within a few minutes, and your block reaches the ideal dampness without any structural damage.
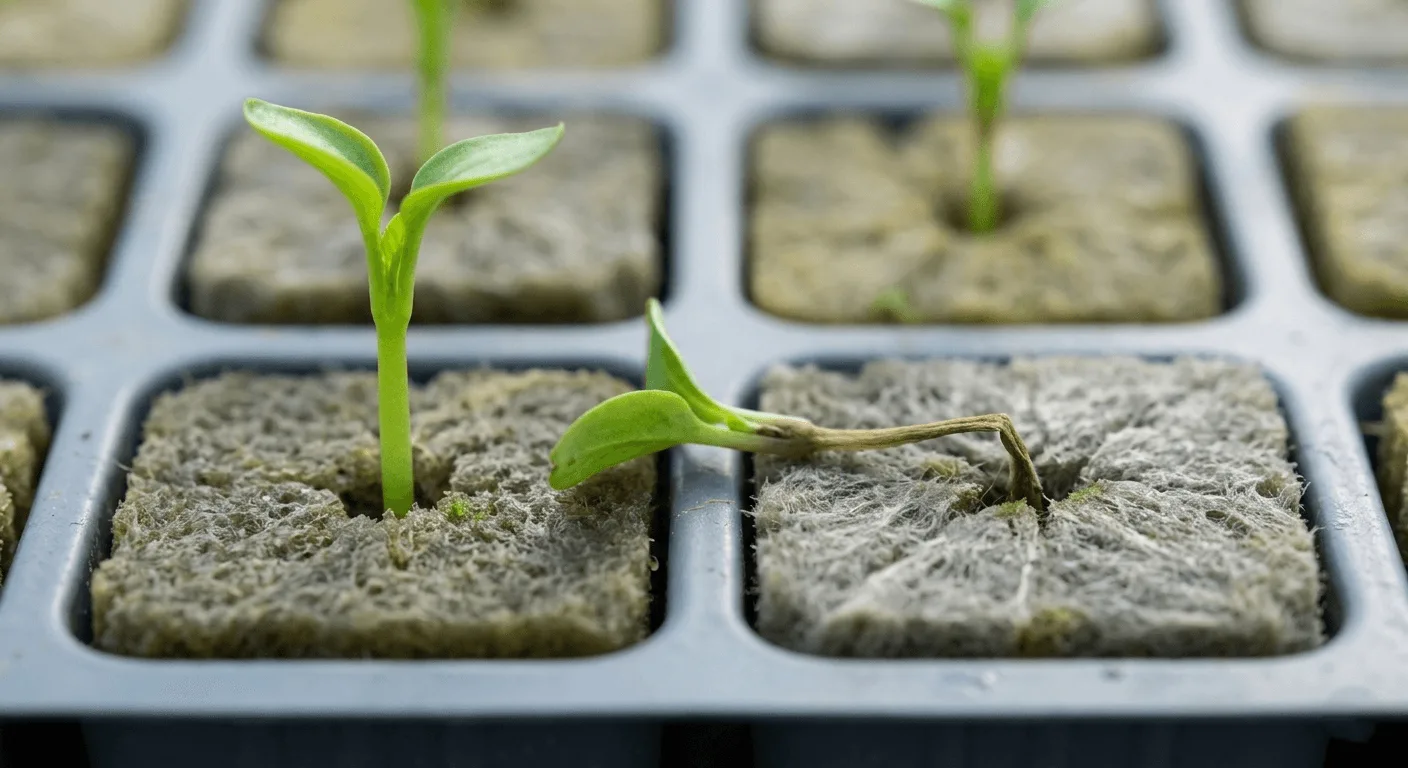
🌱 Step 2: Sowing Hydroponic Seeds in Rockwool Cubes
With your cubes properly hydrated and pH-balanced, it’s time to plant. Every commercial cube has a small pre-drilled hole in the top center. This is where your seed will begin its journey. Planting hydroponic seeds in rockwool requires a bit of finesse, particularly with small herb varieties.
If you’re setting up a countertop hydroponic lettuce system, the seeds are relatively easy to see and handle. Herbs like mint and oregano produce seeds that look like specks of dust and can disappear on a dark countertop in seconds. Setting up a clean, well-lit workspace before you open the packet prevents most of that frustration. Lay down a sheet of white parchment paper first. If a seed bounces out of your hand, the white background makes recovery simple.
🔍 Handling Tiny Seeds Without Losing Them
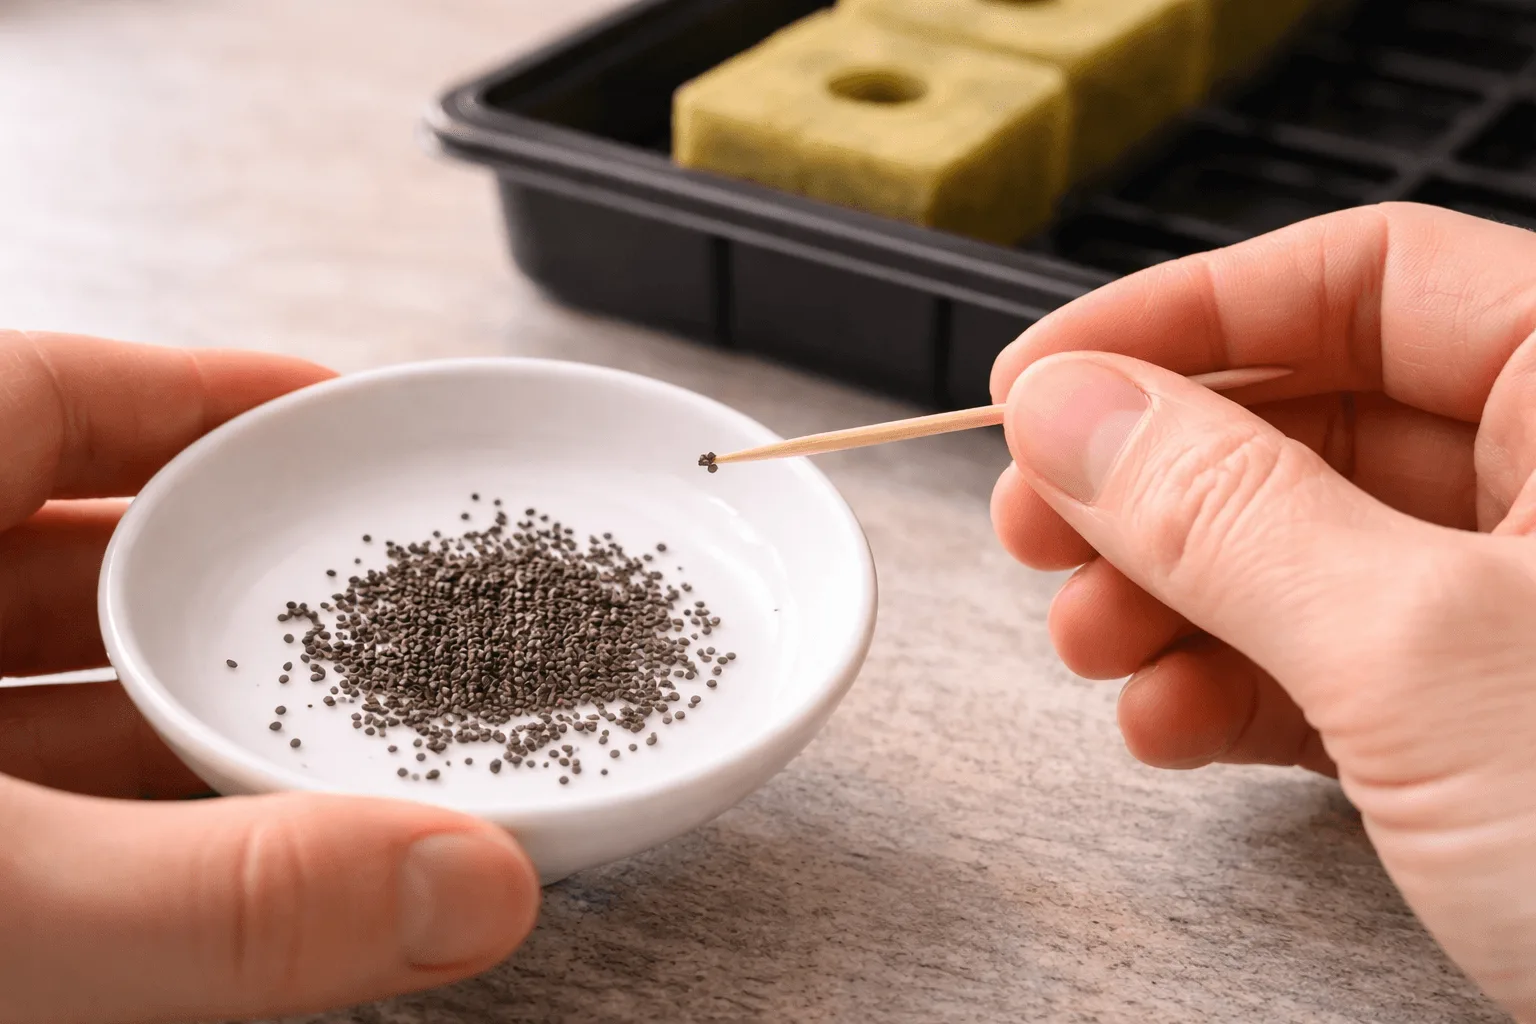
Pour a small amount of seeds into a white ceramic bowl first. The white background makes them visible even in dim apartment lighting. Slightly dampen the tip of a wooden toothpick with a drop of water and touch it to a single seed. It will stick immediately. You can then wipe the seed directly into the center hole of your cube with precise control.
This toothpick method lets you count exactly how many seeds you deposit and avoids accidentally dumping a dozen seeds into one tiny space. If you do drop too many seeds into a hole, don’t try to dig them out. Digging damages the rockwool fibers and pushes seeds deeper. Wait for them to sprout and simply trim away the weakest ones with clean scissors later.
🪴 Seed Depth and Covering Rules
Aim to place your seeds about 1/4 inch deep inside the pre-made hole. Drop 2 to 3 seeds per hole to guarantee at least one strong sprout. Once the seeds are inside, lightly pinch the top of the rockwool hole closed with your fingers. This blocks out light and creates the dark, humid pocket necessary for germination.
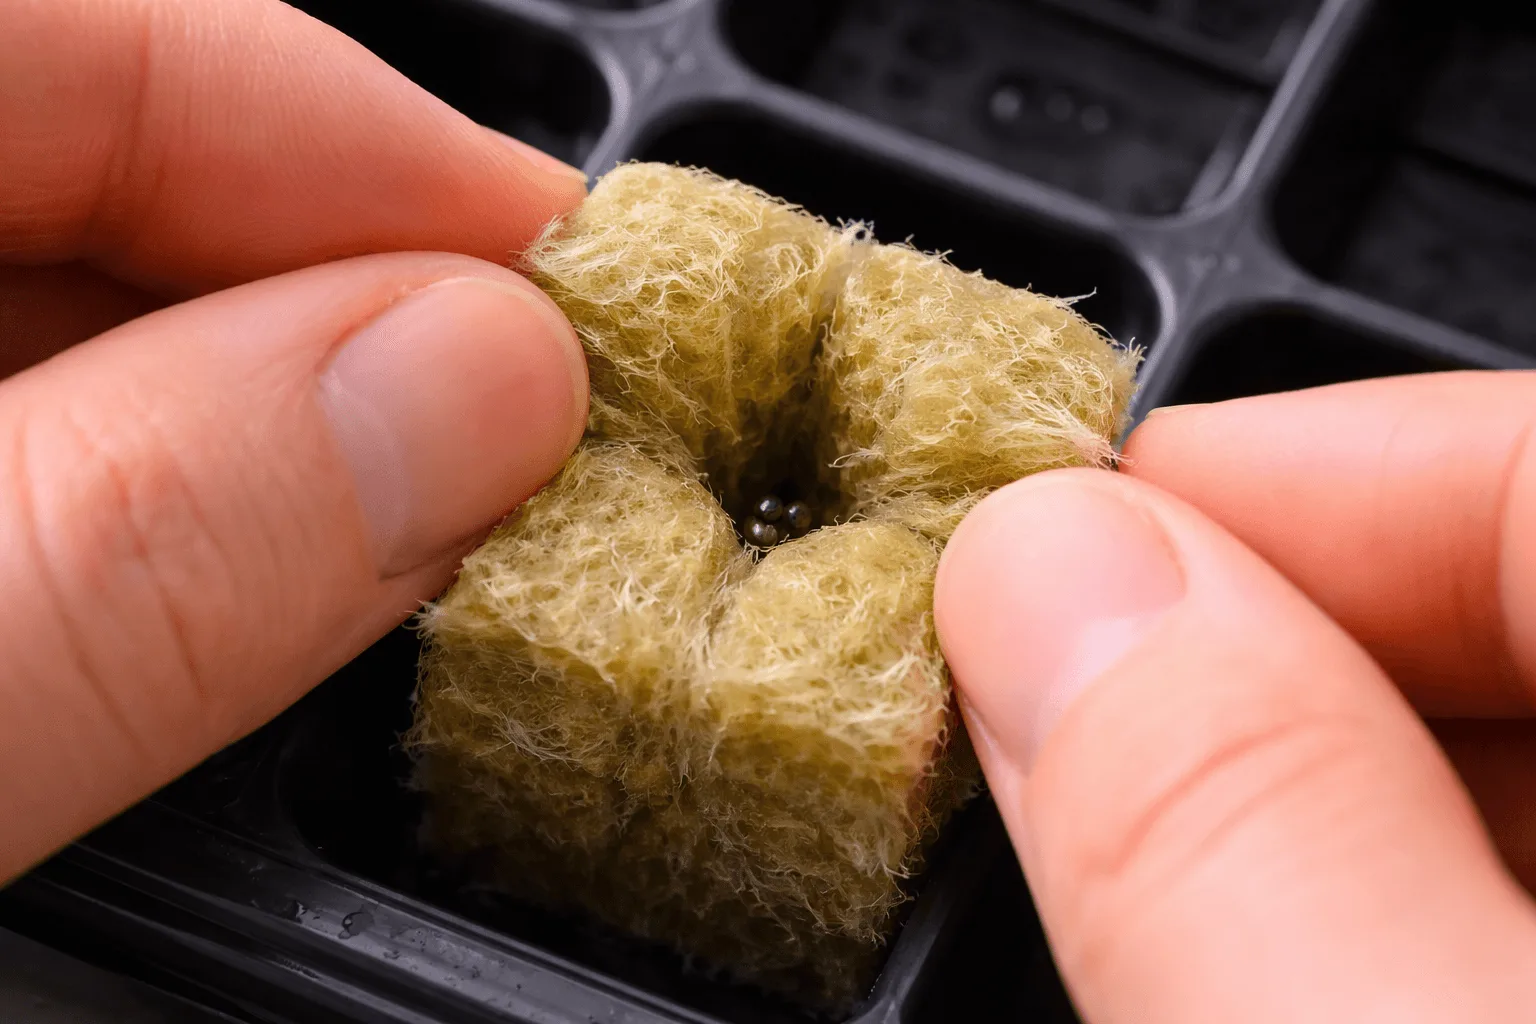
Some seeds, like lettuce, actually prefer a tiny bit of light to germinate. For those varieties, leave the hole slightly open. For most common kitchen herbs, a closed dark environment simulates being buried in soil and is the most reliable default technique for beginners. If the hole won’t stay closed, tear off a tiny piece of dry rockwool from a spare cube and gently plug the top with loose fiber. Strong sprouts from a well-prepared rockwool cube are especially important if you’re planning a Kratky lettuce jar setup later.
| Seed Type | Ideal Germination Temp | Expected Sprout Time |
|---|---|---|
| Lettuce and Greens | 65°F to 70°F (18 to 21°C) | 2 to 5 days |
| Basil | 70°F to 75°F (21 to 24°C) | 5 to 7 days |
| Cilantro | 60°F to 70°F (15 to 21°C) | 7 to 10 days |
| Mint | 70°F to 80°F (21 to 27°C) | 10 to 14 days |
| Oregano | 70°F to 75°F (21 to 24°C) | 8 to 14 days |
💡 Step 3: Lighting and Humidity After Germinating Seeds in Rockwool
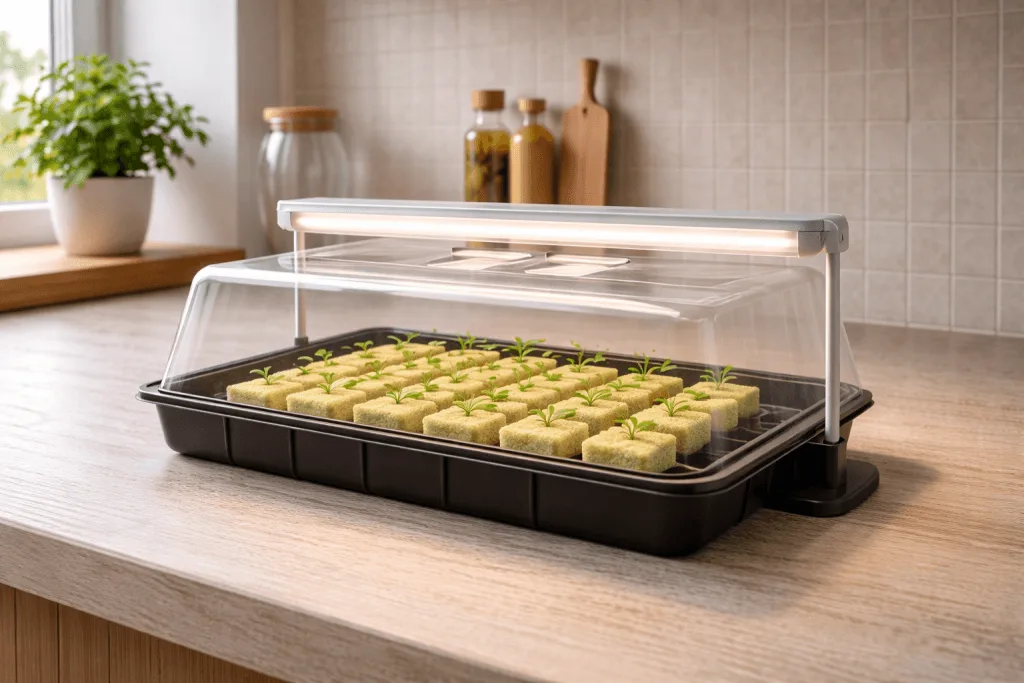
After sowing your seeds in rockwool, the cubes need a stable environment to wake the dormant plant embryos. Place the seeded cubes into a shallow plastic tray with a flat bottom. At this stage they don’t need bright light, but they do need warmth and moisture. A standard plastic humidity dome works perfectly for retaining that moisture without any additional effort.
Keep the tray in a warm corner of your kitchen, away from drafty windows. If your apartment gets cold at night, a seedling heat mat set to low speeds up the process noticeably. Once you see the first tiny green leaves emerge, the environmental rules change completely. Check your tray every morning for progress, because failing to adjust the environment promptly when sprouts appear leads to weak, elongated stems that collapse under their own weight within days.
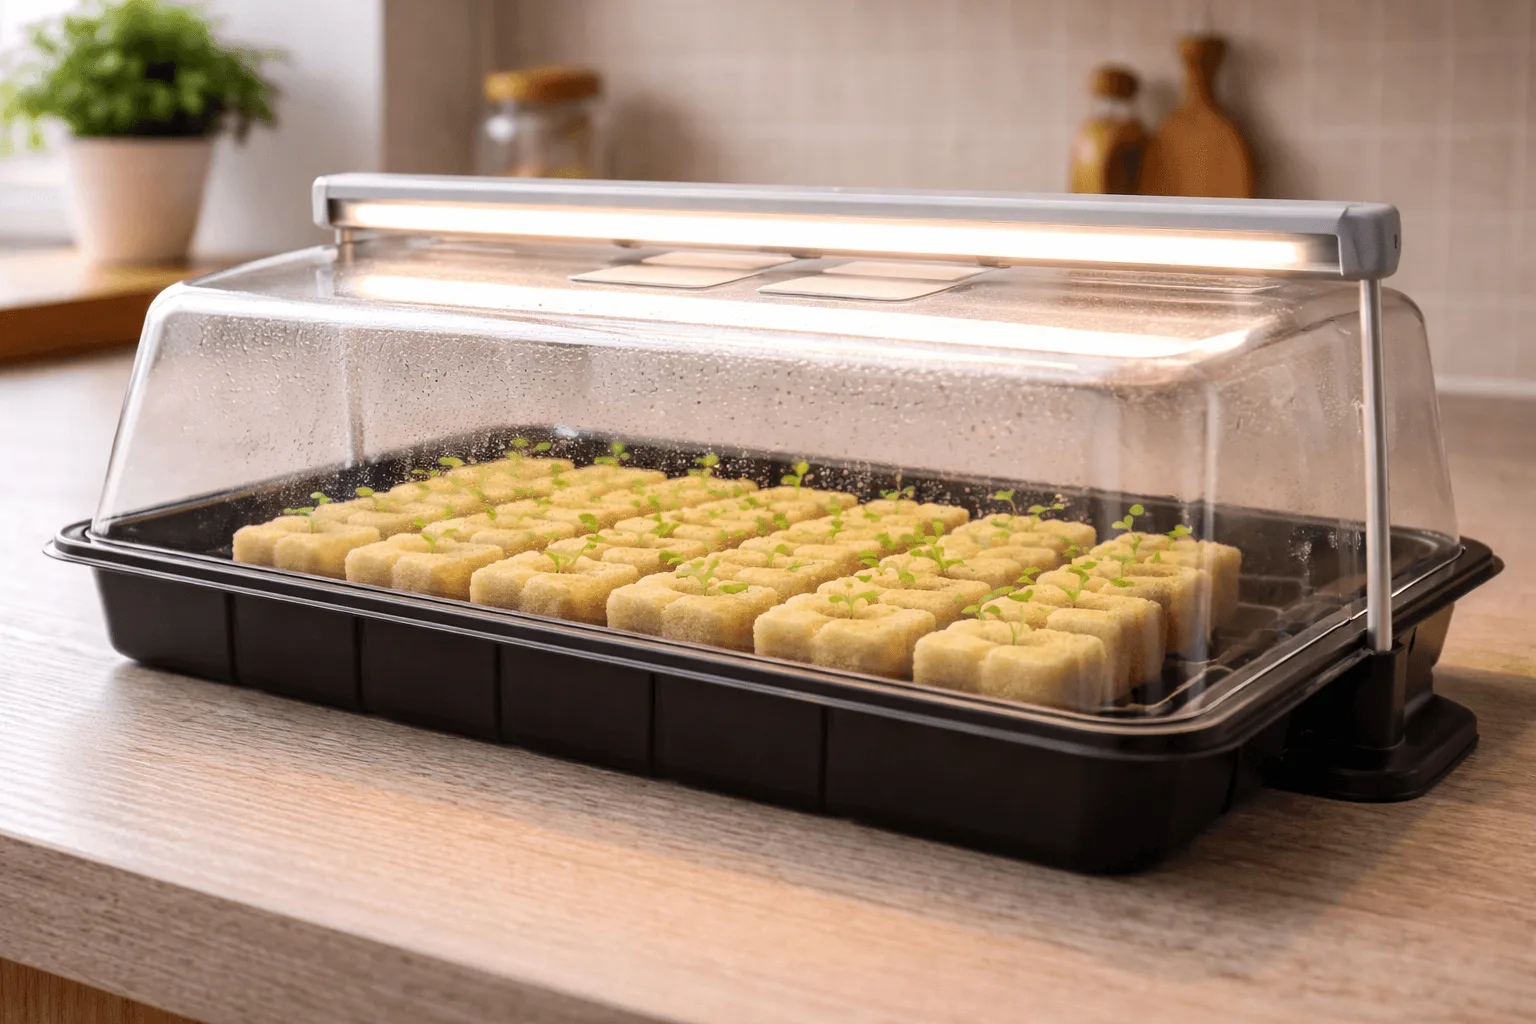
🌤️ Managing the Humidity Dome
Keep the plastic dome completely closed for the first few days to trap humidity. As soon as half of your seeds break the surface, open the top vents. Leaving the dome fully closed after sprouts appear traps too much moisture, and the stale air promotes harmful fungal growth quickly.
If your dome doesn’t have adjustable vents, prop one side up with a wooden pencil. This tiny gap allows fresh oxygen to circulate while slowly lowering the ambient humidity. Wipe away any heavy condensation that forms on the inside of the plastic roof. Excess dripping water can physically push delicate new sprouts back down.
If your seeds refuse to sprout after two weeks, the environment is likely too cold or the seeds were outdated. Moving the tray to a warmer spot above a refrigerator can rescue the project. If they still fail after another week, start fresh with a new seed packet.
☀️ When to Introduce Grow Lights
The moment green sprouts emerge, they begin searching aggressively for light. Provide a strong source immediately to stop them from stretching into leggy stems. Hang your LED panel 6 to 8 inches above the tops of the seedlings. If you’re unsure about placement, my guide on grow light distance for hydroponic herbs on a shelf walks through the exact measurements to avoid burning delicate leaves.

Running your lights for 14 to 16 hours a day is ideal for this early stage. Plug your grow lamp into a mechanical timer so your plants receive a consistent schedule even when you work late. A predictable day and night cycle helps establish strong biological rhythms in the plant. If your timer fails and the lights stay on for 24 hours, turn them off manually, give the plants a dark rest of eight hours, then reset the timer and resume the normal schedule.
🚨 Troubleshooting Rockwool Seed Starting Problems: Mushy Cubes and Damping Off
Even with careful preparation, rockwool seed starting occasionally goes wrong in a humid plastic tray. The most common enemy is damping off, caused by Pythium fungi. This fungus attacks the stem right at the surface of the rockwool, causing it to pinch, turn brown, and collapse entirely. Once a plant falls over from damping off, it cannot be saved.
Prevention relies on excellent airflow and careful water management at the root zone. If you notice early warning signs, you can often rescue the remaining healthy cubes before the fungus spreads. Healthy hydroponic setups smell faintly earthy, never sour or rotten. Your nose is often the first tool to detect an impending problem in your tray.
🧯 Fixing a Setup That Stays Too Wet
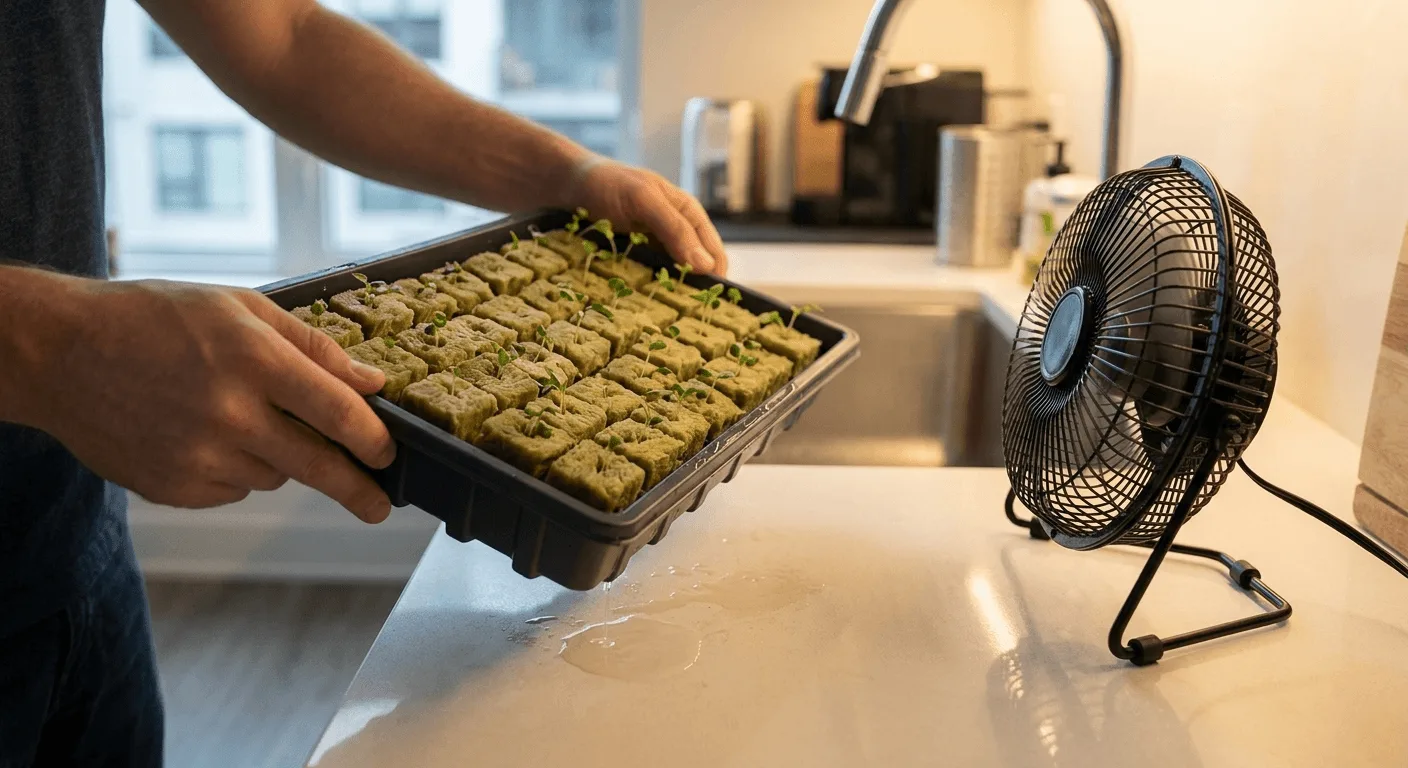
If water pools at the bottom of your plastic tray, your cubes are actively drowning. Rockwool should feel like a damp sponge, not a dripping wet rag. Overly wet cubes invite root suffocation and early fungal rot. To fix this immediately:
- Remove the plastic dome entirely to let stagnant air escape.
- Pour out any standing water in the bottom of the holding tray.
- Place a small oscillating fan nearby to gently move air across the tops of the cubes.
- Let the cubes dry for 24 to 48 hours before adding a few drops of fresh water to the base.
Monitor the weight of the cubes closely by lifting them during this drying phase. They should become noticeably lighter but never bone dry. If a cube becomes completely weightless, rehydrate the bottom slightly. Maintaining this balance requires a measured approach rather than a decisive correction in one direction.
If the stems begin to turn black after these rescue steps, the infection is terminal. Throw away the infected blocks and sanitize the tray completely with diluted hydrogen peroxide before starting the next batch. Keeping your tray clean between grows is exactly why my guide on how to clean a small hydroponic system without making a mess is worth reading before your first run.
🩹 Identifying Algae vs Harmful Mold
As your tray sits under bright lights, the top of your rockwool may turn green. That green slime is algae, mostly harmless, but it competes slowly for nutrients. White, fuzzy webbing growing across the surface is a different problem entirely. White mold signals a severe lack of airflow in your setup and spreads fast.
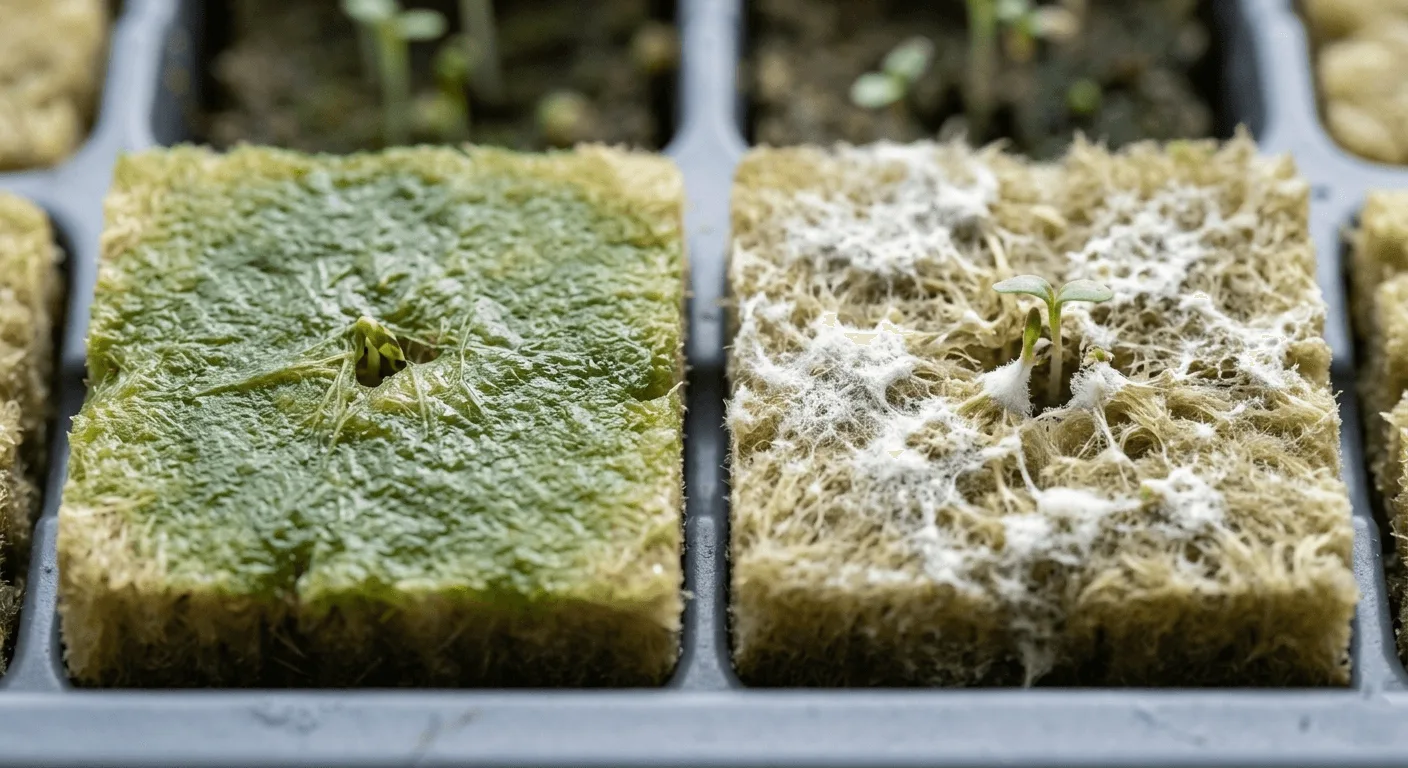
Algae requires light to grow, so blocking the light source stops it completely. A small piece of opaque plastic placed over the exposed rockwool surface works well. Ensuring your nutrient water doesn’t splash onto the top surface also helps, since algae thrives on the nitrogen in liquid fertilizer. Feeding the cubes strictly from the bottom keeps the top surface dry and clean. If fungal issues follow your plants into the main reservoir later, my guide on preventing hydroponic root rot covers the long-term fixes.
⚗️ Step 4: When to Add Nutrients to Hydroponic Seedlings
During their first week, seedlings grown from hydroponic seeds in rockwool survive entirely on energy stored inside the seed casing. They don’t need extra fertilizer while sprouting under the humidity dome. Adding heavy liquid plant food too early burns fragile roots within two days. Patience here protects weeks of future growth.
I learned this the hard way in my second year of indoor growing. I fed tiny basil seedlings a full-strength mix at EC 2.0. They burned, curled up, and died in exactly two days. Dropping the strength to EC 0.6 saved my next batch and fixed the damage within a week. Seedling roots are microscopic and easily overwhelmed by chemical salts at concentrations a mature plant would handle easily.
🌿 Reading the First True Leaves on Rockwool Seedlings
The first two leaves that emerge from a seed are called cotyledons. They’re rounded and simple, and they look very different from the mature plant. Wait until the plant develops its first true leaves, which look like miniature versions of the adult plant’s foliage. Once these unfurl completely, the plant has exhausted its internal food supply and will begin searching for external minerals.
If you notice pale or yellowing growth at this stage, my guide on fixing yellowing hydroponic leaves will get them back on track quickly. Yellowing at the true leaf stage is the plant signaling hunger. Respond within a day or two. If the true leaves emerge but look distorted or crispy at the edges, low apartment humidity is the more likely cause than a nutrient issue. A small bowl of plain water placed near the grow lights increases ambient moisture without any adjustments to the reservoir.
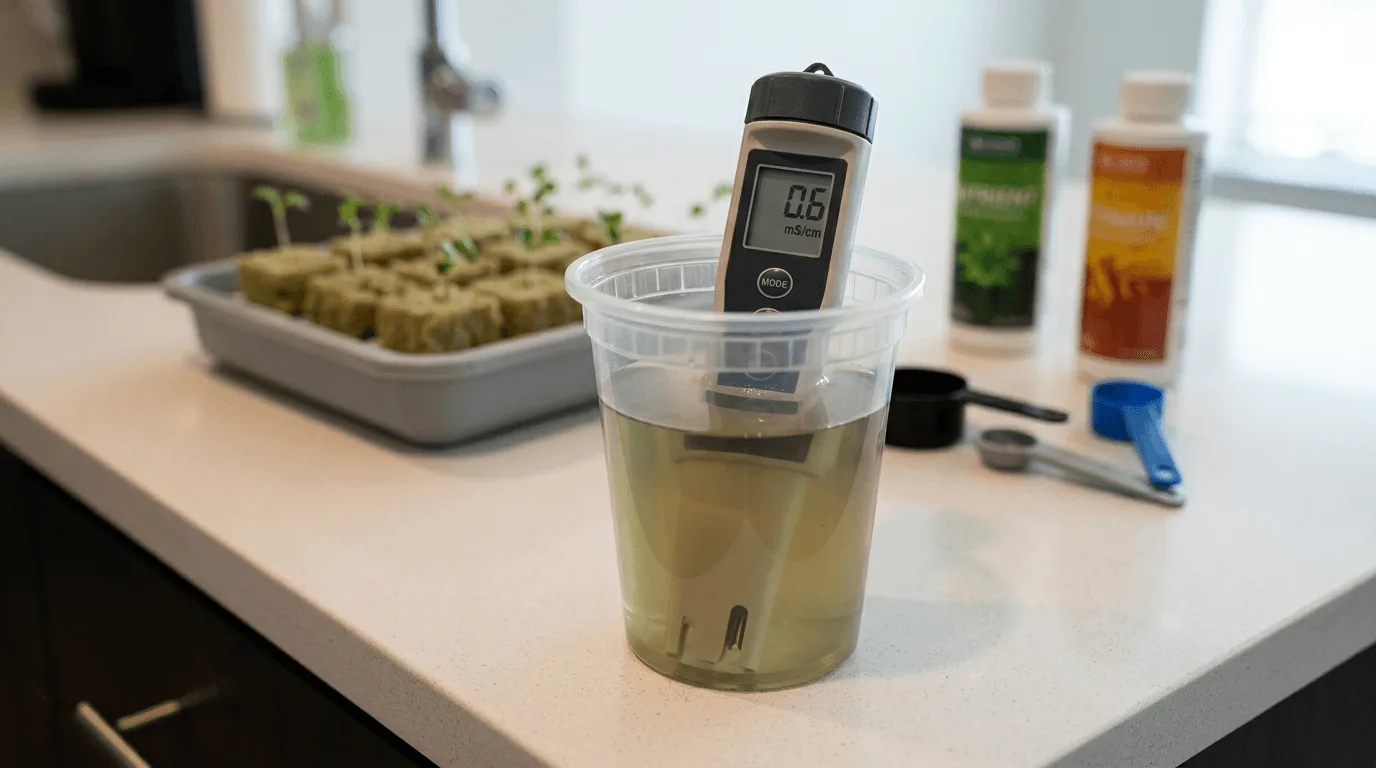
🧂 Mixing a Weak Starter Solution
When you first feed your seedlings, use a highly diluted nutrient formula, one-quarter of the manufacturer’s recommended strength. For most basic apartment setups, this means targeting EC 0.5 to 0.8 on your digital meter. Pour this weak solution into the bottom of the tray so the rockwool absorbs it from below rather than from the top.
Bottom-feeding encourages new roots to stretch downward in search of moisture, which builds a stronger root structure than surface watering. It also keeps the top surface dry, which prevents algae. If you accidentally mix the solution too strong, pour half down the drain and refill the container with plain tap water. That cuts the strength in half instantly. Choosing a forgiving brand makes this whole process more manageable. My guide to the best hydroponic nutrients for small systems covers which products work well at low seedling concentrations.
🌾 Moving Hydroponic Rockwool Seedlings to Their Permanent System
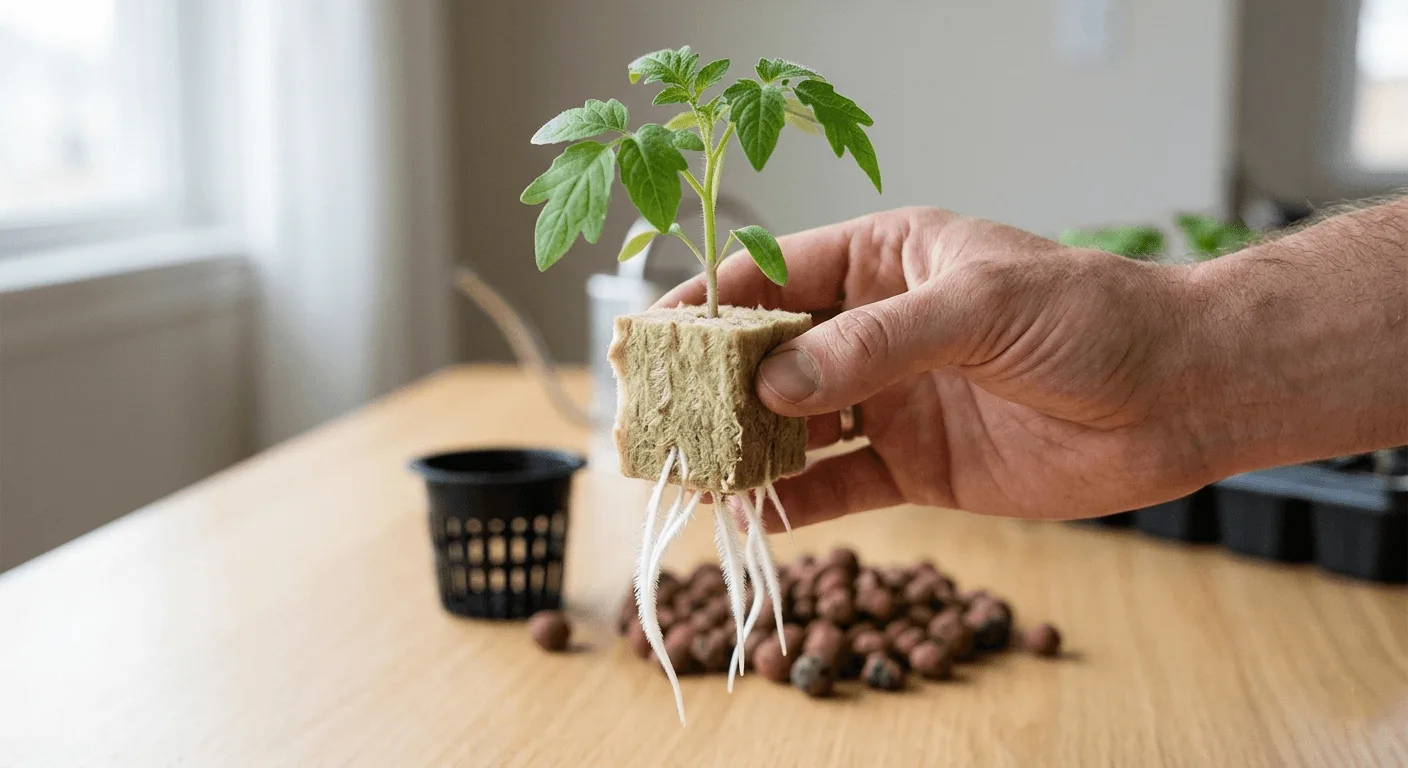
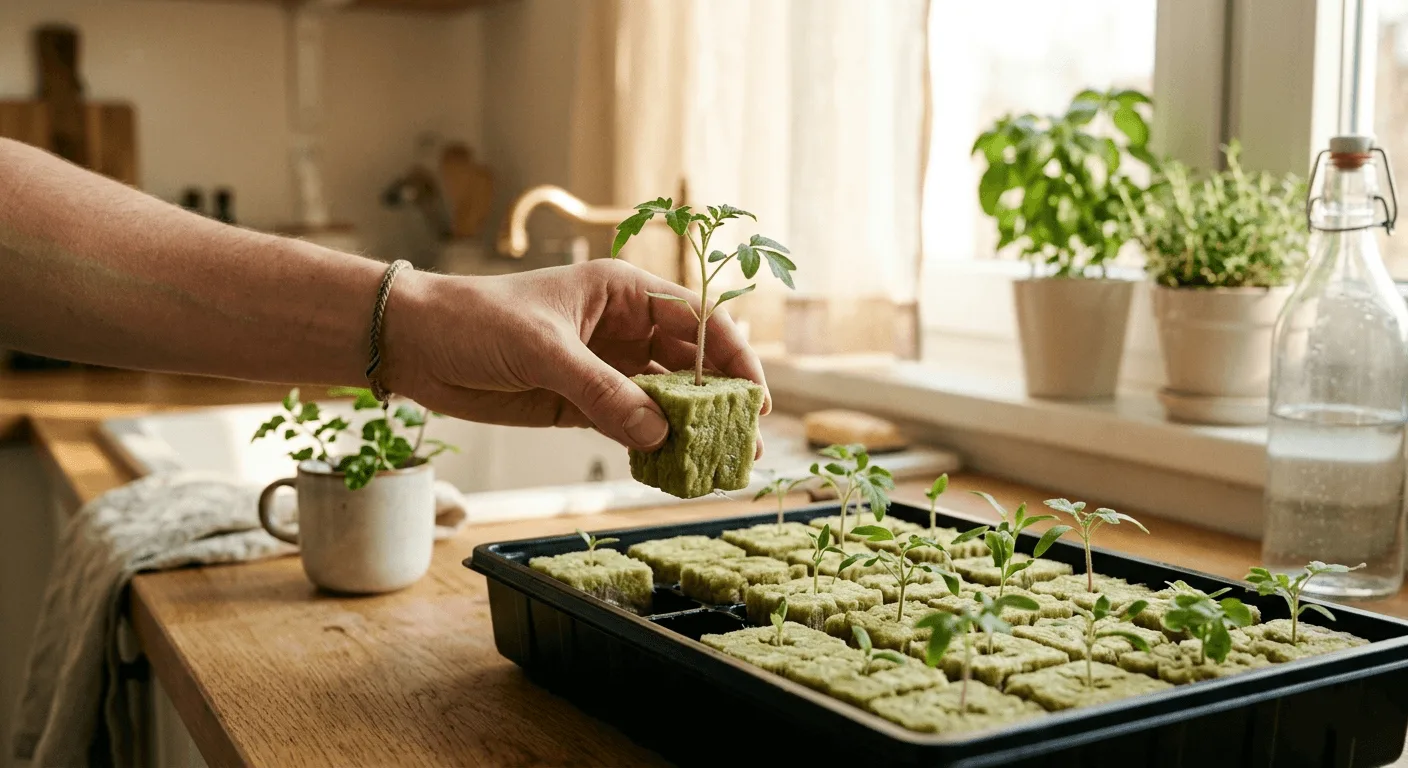
Your hydroponic rockwool seedlings are ready to graduate when you see white roots poking out of the bottom of the cube. This milestone usually happens around week two or three depending on the plant. Leaving them in the shallow starter tray too long stunts their growth. It’s time to move them into your main apartment system for the vegetative phase.
Whether you choose an active bubbling setup or a passive system, the physical transfer process is identical. If you’re unsure which setup fits your kitchen counter best, my comparison of DWC vs Kratky for apartments clarifies the trade-offs. Perform this transfer in the evening when your grow lights are off or dim. Plants settle into their new reservoirs much faster overnight before facing intense light the following morning.
🍃 Transferring to Net Pots
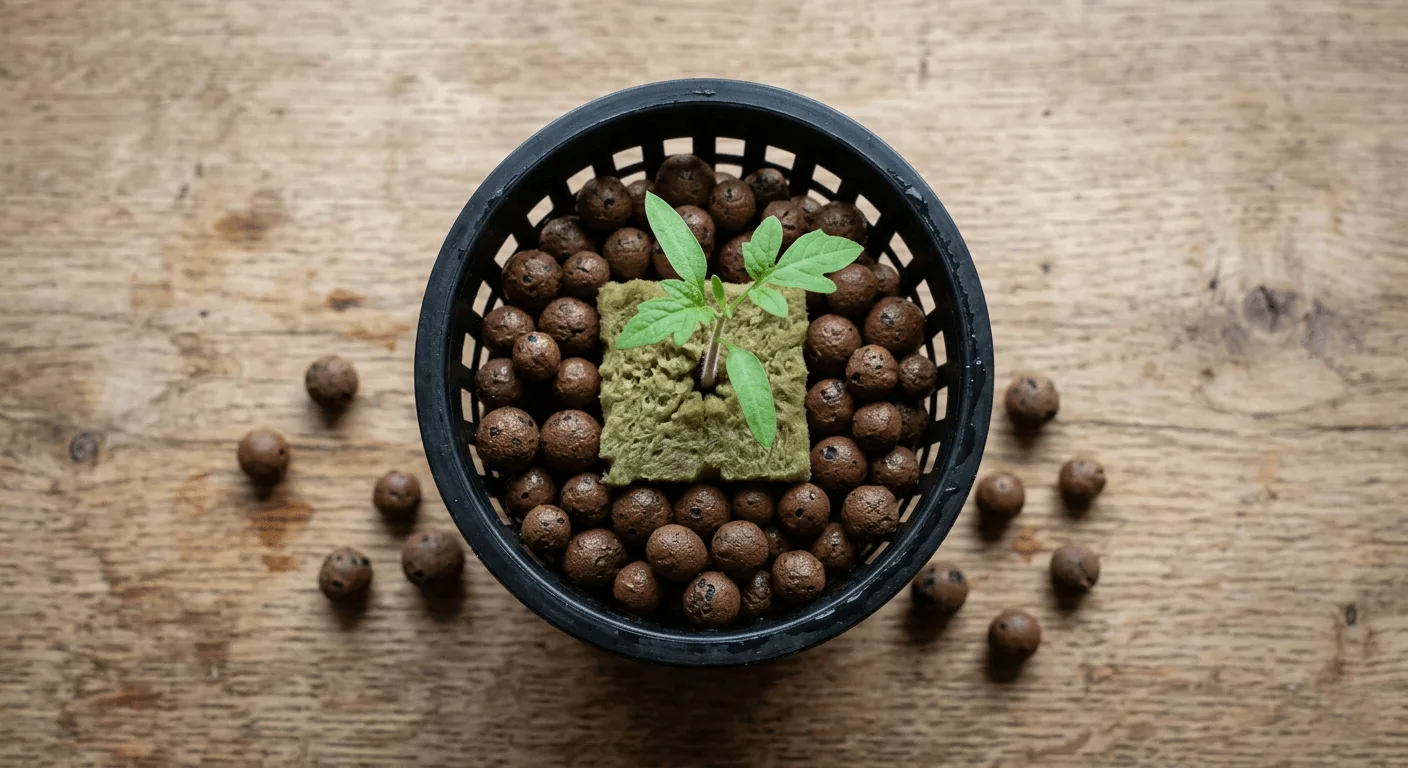
Drop your rockwool cube directly into a clean, appropriately sized plastic net pot. Gently surround the cube with clay pebbles to block out light and provide physical support for the stem. Be careful not to crush the delicate white roots hanging from the bottom. They are incredibly brittle and snap under heavy pressure from the stones.
If a long root gets tangled, use a pair of tweezers to gently guide it through the plastic slits of the net cup. You want the roots dangling freely below the cup, reaching toward the reservoir. Add a thick layer of clay pebbles right around the base of the main stem to prevent algae from forming on the exposed rockwool surface.
💧 Setting the Final Water Level
When you place the net cup into your reservoir, the nutrient water should only touch the bottom quarter-inch of the rockwool cube initially. Submerging the entire cube causes the stem to rot. Never let roots dry out during this sensitive transition phase either. As the roots grow longer and reach deeper into the reservoir, gradually lower the water level to create a vital air gap.
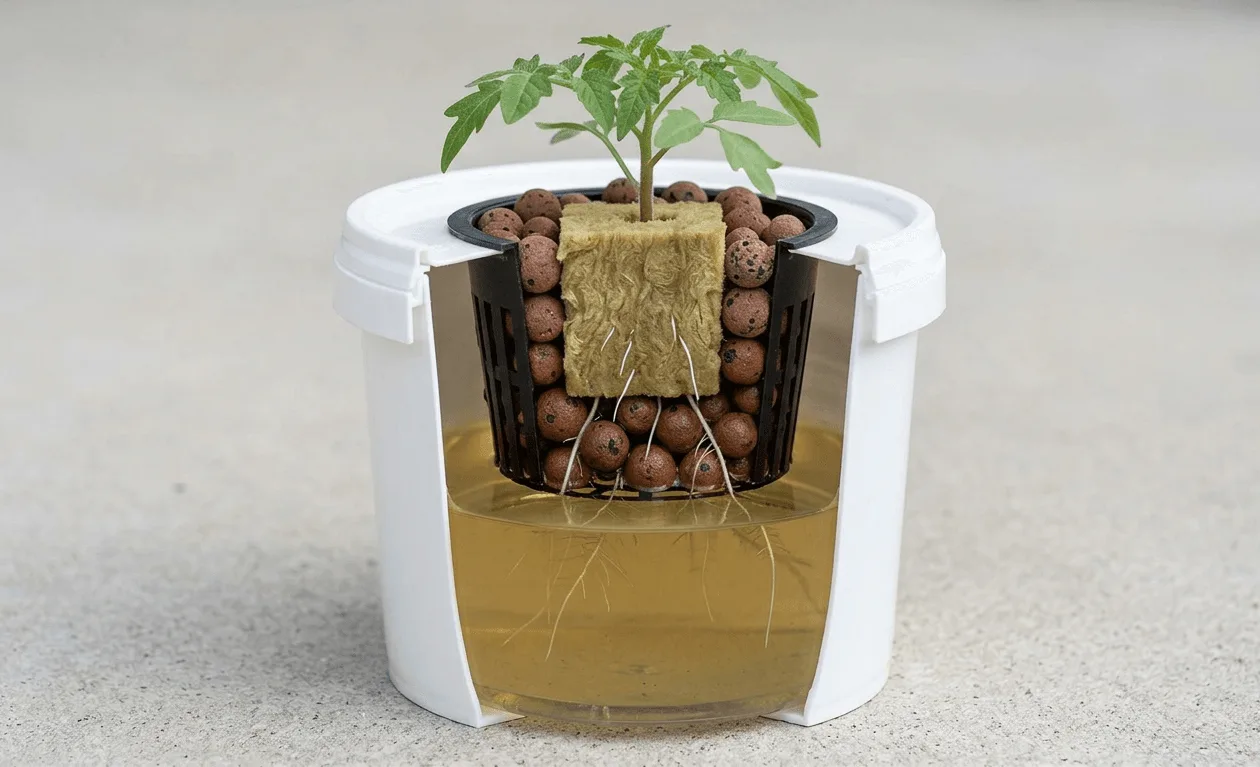
If you’re using an active system, the pump moves nutrients while an air stone oxygenates the reservoir continuously. To keep your living space peaceful during this phase, you can quiet a noisy hydroponic pump by placing it on a folded hand towel to absorb the vibrations. Verify your air stones are producing a steady stream of tiny bubbles. Properly oxygenated water lets the roots thrive without the suffocation risk that causes root rot in warm reservoirs.
If you’re still deciding which system to move your seedlings into, my roundup of the best hydroponic starter kits for apartments compares four countertop options with verified specs so you can match the right unit to your counter space and budget.
→ The Best Grow Lights for Low-Light Apartment Hydroponics Under $50
→ 3 Best LED Grow Lights for Apartment Countertop Hydroponics
→ 3 Best Countertop Hydroponic Systems for Apartment Beginners
💬 A Word From Sarah
The thing that finally clicked for me with rockwool wasn’t the pH or the soaking time. It was learning to read the weight of a cube. For the first two months I either kept them too wet out of anxiety or let them get too dry trying to overcorrect. What changed was picking up each cube every morning before I started work. Dry cube: add a few drops to the bottom of the tray. Heavier than yesterday: do nothing and open the vents wider.
That daily lift became the most reliable feedback I had. No meter, no checklist. Just the weight in my hand telling me whether the roots were getting what they needed. Once I built that habit, my germination rate went from somewhere around fifty percent to consistently above ninety. The cubes weren’t the problem in those early failures. My information was too coarse. If you’re losing seeds and can’t figure out why, start there. Lift the cube every morning for a week and notice what changes.
❓ Frequently Asked Questions
☀️ How long do hydroponic seeds in rockwool take to sprout?
Most leafy greens and herbs sprout within 3 to 10 days at the right temperature. Woody herbs like rosemary or lavender can take up to three weeks. Consistent warmth around 70°F (21°C) speeds up the process noticeably. If nothing appears after 14 days, check that your environment isn’t too cold before replacing the seeds.
✂️ What if all three seeds sprout in my cube?
Thin them immediately. Choose the thickest, healthiest sprout and snip the others off at the base with clean scissors. Never pull them out by the stem. Pulling disturbs the root system of the winner and often damages both plants in the process.
❄️ Do I need a fan for my seedling tray?
Yes. Gentle air movement is strongly recommended. A small computer fan running nearby strengthens tiny plant stems and sweeps away the stagnant, humid air that causes damping off. Even a fan set to its lowest speed makes a measurable difference in germination success rates.
🦟 Will rockwool attract fungus gnats to my kitchen?
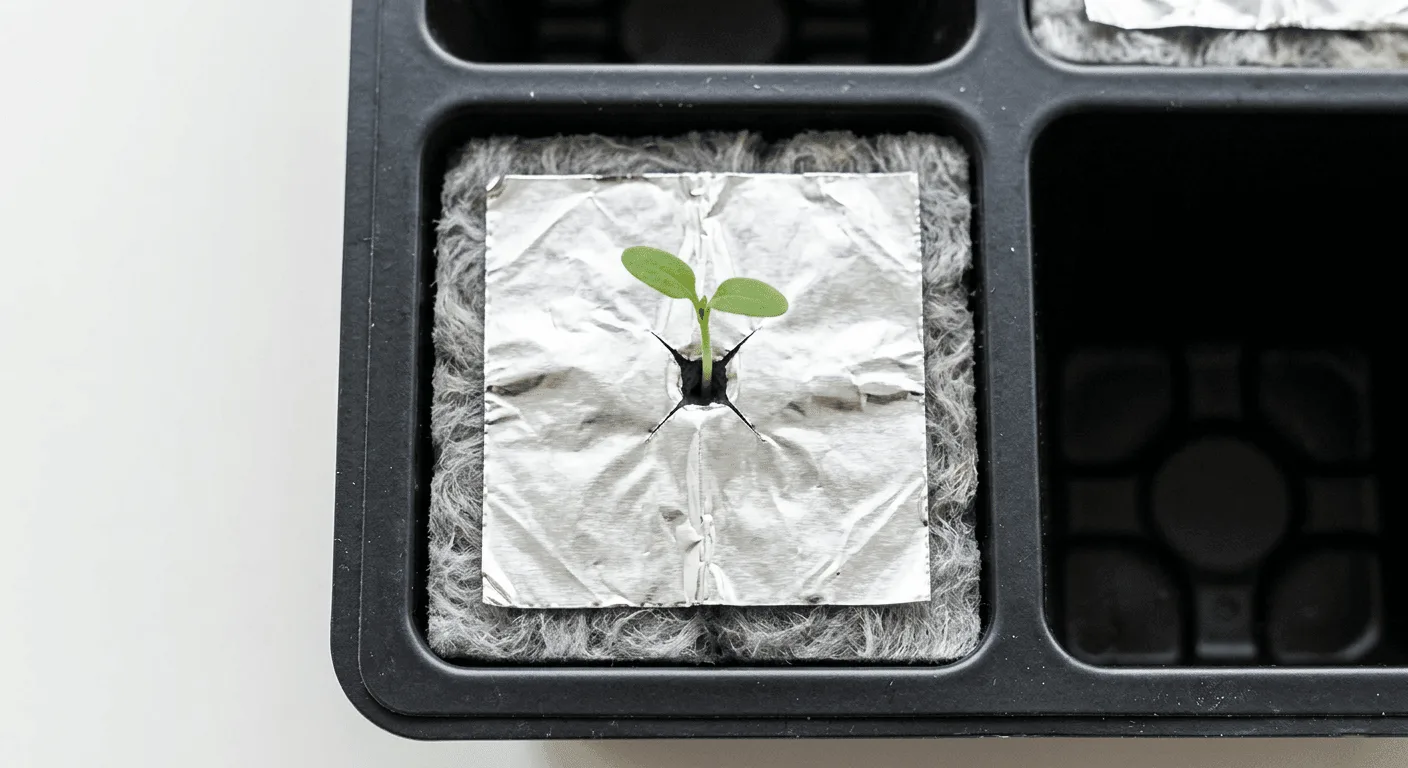
Rockwool doesn’t naturally harbor pests since it’s sterile and inorganic. If you leave the top of the cube soaking wet, gnats from outside can lay eggs in the green algae that forms. Keep the top surface slightly dry between waterings to deter them. A thin layer of aluminum foil over the cube surface eliminates this entirely.
🌡️ Can I use tap water to soak my cubes?
Yes, if you let it sit out for 24 hours so the chlorine evaporates. You still need to test and adjust the pH to 5.5 to 6.0 before soaking. Hard tap water often requires more pH Down to reach the safe range and may leave white mineral deposits on the outside of the cubes over time.
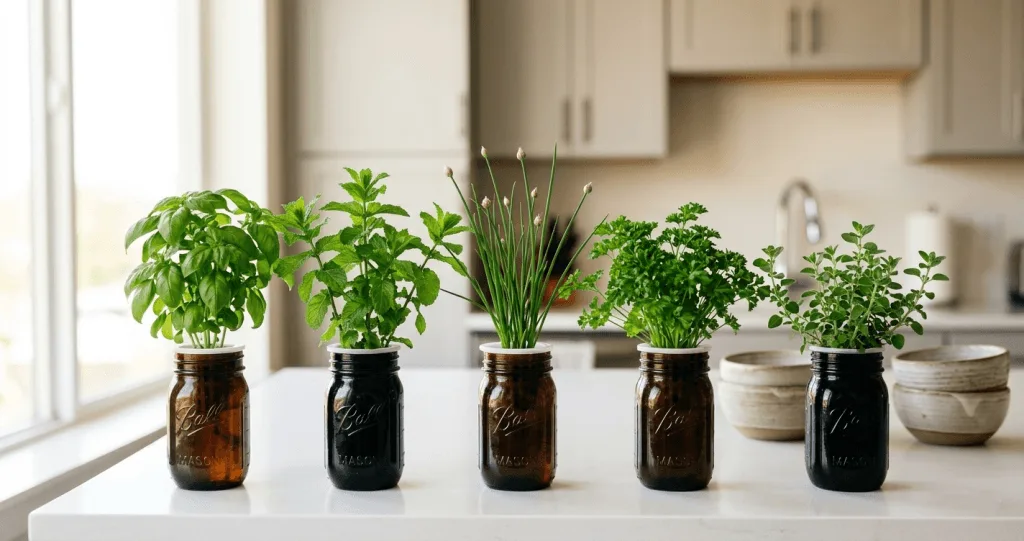
🔧 Are rockwool cubes compatible with Mason jar Kratky setups?
Yes. A 1.5-inch rockwool cube fits perfectly inside a standard 2-inch net cup, which drops directly into a wide-mouth Mason jar. Cover the glass jar completely to prevent algae growth in the nutrient water, and leave the air gap between the water surface and the bottom of the net cup as the plant matures.
🔌 Can I start seeds on my apartment windowsill instead of using lights?
Windowsill light is usually too weak for seedlings, especially in autumn and winter. The sprouts stretch aggressively toward the glass and fall over before they establish. A cheap LED desk lamp placed 6 to 8 inches above the tray consistently outperforms even a strong south-facing window for early seedling development.
Happy growing! 🌿
— Sarah, Urban Hydro Space

Sarah is the founder of Urban Hydro Space and an indoor gardening enthusiast dedicated to helping apartment dwellers grow fresh herbs and vegetables in small spaces. With hands-on experience testing hydroponic systems, she shares practical tips and honest product reviews to make indoor gardening accessible for beginners.